
|
 17 October 2021, 12:59
|
#41 |
|
Registered User
Join Date: Dec 2012
Location: Greece
Posts: 289
|
Top quality!
|

|
|
18 October 2021, 01:14
|
#42 |
|
Registered User
Join Date: Sep 2019
Location: Sydney
Posts: 357
|
Looks great Daniel. This seems to be a popular game for Amiga conversions. I too had thought of making Robocop my next project not that long ago. Looking forward to seeing it progress!
|
|
|
|
18 October 2021, 10:22
|
#43 | ||
|
Ex nihilo nihil
Join Date: Oct 2017
Location: CH
Posts: 4,856
|
Quote:
Quote:

|
||
|
|
|
18 October 2021, 18:12
|
#44 | |
|
Registered User
Join Date: Dec 2012
Location: Greece
Posts: 289
|
Quote:

|
|
|
|
|
18 October 2021, 23:09
|
#45 | |
|
Registered User
Join Date: May 2019
Location: Italy
Posts: 12
|
Quote:
|
|
|
|
|
19 October 2021, 15:37
|
#46 | |
|
Registered User
Join Date: Feb 2018
Location: Northumberland, UK
Posts: 272
|
Quote:
|
|
|
|
|
19 October 2021, 15:49
|
#47 | |
|
Registered User
Join Date: Jul 2015
Location: The Netherlands
Posts: 3,410
|
Quote:
By the way, I loved the ED-209 sprites. Looks so much better than the original Amiga version 
|
|
|
|
|
19 October 2021, 16:34
|
#48 |
|
Registered User
Join Date: Apr 2018
Location: UK
Posts: 487
|
Would you consider improving the visuals over the arcade? I've been playing with an A500 version and I have added a few extras, inc a 3rd closer layer of parallax.
I used this technique: [ Show youtube player ] I'm not sure if I'm going to take it any further but it looks nice. |
|
|
|
19 October 2021, 19:26
|
#49 | |
|
Registered User
Join Date: May 2019
Location: Italy
Posts: 12
|
Quote:
4 sprites attached at 64 pixels wide plus scrolling hardware in the 288 pixel window is not possible. You lose DMA slot. I think you are setting fetch 4x (64bit burst) for sprite and fetch 1x for bpl (16 bit) |
|
|
|
|
19 October 2021, 22:39
|
#50 | |
|
Registered User
Join Date: Feb 2018
Location: Northumberland, UK
Posts: 272
|
Quote:
Code:
dc.w FMODE,$800f dc.w DIWSTRT,$2c91 dc.w DIWSTOP,$2cb1 dc.w DDFSTRT,$38 dc.w DDFSTOP,$b8 Last edited by DanielAllsopp; 19 October 2021 at 22:53. |
|
|
|
|
19 October 2021, 22:50
|
#51 | ||
|
Registered User
Join Date: Feb 2018
Location: Northumberland, UK
Posts: 272
|
Quote:
Obviously using a combination of those bits you could use a 4 x fetch mode and 32 pixel wide sprites. But yeah, all set using the same register FMODE, at $dff1fc Quote:
|
||
|
|
|
28 October 2021, 01:48
|
#52 |
|
Registered User
Join Date: Feb 2018
Location: Northumberland, UK
Posts: 272
|
Update #3
Update #3
Just a quick one this time, and a bit of a deviation from the main game engine as I wanted a change of scenery So I've mainly been working on the implementation of the high score table, which appears as the very first scene. It's a pretty simple scene, with 3 64 pixel sprites for the red Robocop visual, and a pre-calculated palette which is poked into the owld copper to enable the fade in and out. The text is all blitted (I love Apple's auto-correct of blotted here) a character at a time as the scene progresses. 2 colour bobs, with the copper changing the colour at specific vertical positions. The eagle-eyed amongst you will notice I still have to implement the horizontal copper changes to change the name to white, so look out Coders. Asm / Hardware forum... for I will have some questions!  Anyway, this also allowed me some time to implement the actual structure of the game and general flow which will be used throughout, that is I now have some nice robust code for switching between different scenes when required, for example moving between the intro/prologue to the game. I've also been working with RNC packed data and messing around with some sprites and ripped data for the rest of the prologue: 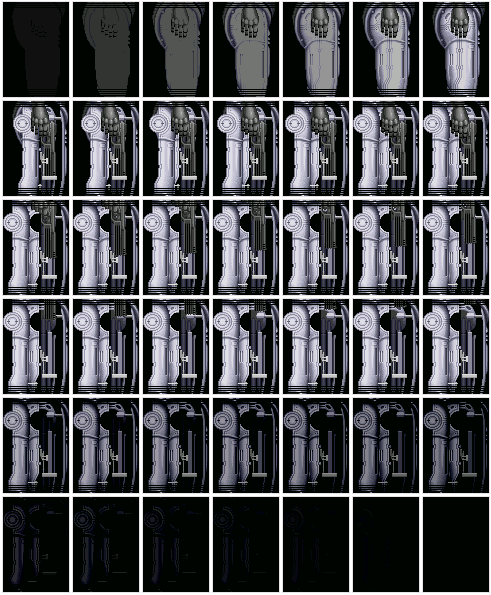 Anyway, here's a short video of the first part of the intro. I hope you like it [ Show youtube player ] Shout outs and big thanks for help during this little phase belong to: - saimon69: music and sound effects. Awesome work! - The local club: for copious amounts of beer this evening. Fuzzy head incoming! |
|
|
|
28 October 2021, 07:07
|
#53 |
|
Registered User
Join Date: Aug 2007
Location: Tasmania, Australia
Age: 39
Posts: 1,189
|
Hi Daniel, your work is looking amazing so far! I think it's wonderful that you're working on a port of the Robocop arcade game for the Amiga. Have you considered entering it in this year's AmiGameJam contest which is for ports? It would make a great entry, even if it's incomplete by the time the contest is over (in about three months). We'd love to see this amongst the contest entries!
See https://itch.io/jam/amigamejam for more info. |
|
|
|
12 November 2021, 17:09
|
#54 |
|
Registered User
Join Date: Feb 2018
Location: Northumberland, UK
Posts: 272
|
Update #4
Although I've been distracted with my real work lately, work on the intro sequences has continued; adding a couple of more scenes and utilising some audio samples ripped from the movie. I've also done a bit of refactoring to stitch all of the scenes together nicely, which seems to have gone well. My main conundrum this time centred around finding an easy way to render the text in the high score table in different colours. Coders will know that the Copper allows you to change the colour registers depending on the current position of the beam drawing the screen, the most common way being that the changes are handled with a vertical beam change, i.e. line by line. That would solve the font colours at the top: the red 'BEST PLAYERS' line and the table header, but the tricky (for me anyway) part came next. For each high score line, the majority of the text is green but the name should be in white. You could of course blit a different colour font here, but that's too easy; it would take valuable memory up, and that's not the hardware-banging low-level way I wanted to go with this project. I'm here to learn, not take the easy way out. The Copper also allows you to change colour registers (or any register) by waiting horizontally too, although it's a little more restricted as I was about to find out. Sounds simple enough in theory; wait for a specific line, then wait for a specific horizontal position, change the two colours required for the font to render correctly, wait again for a safe area after the name and set them back to green. However, in practice: 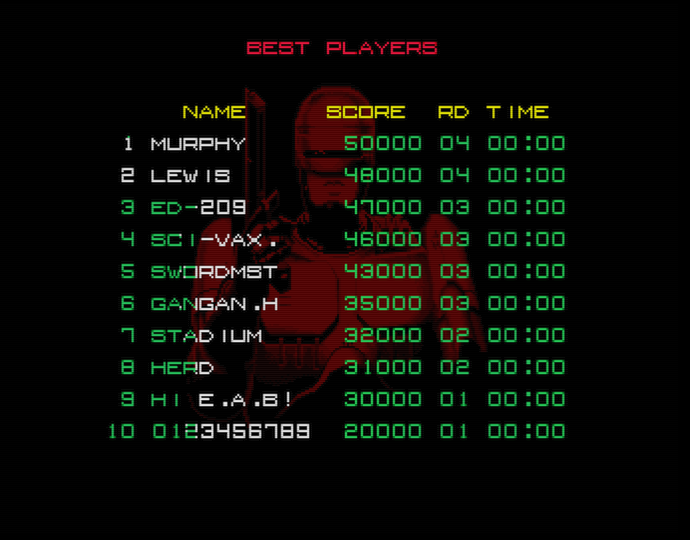 The horizontal waits clearly aren't working as expected! Apart from the copper loops, and the pesky WAIT command working differently after a certain line (read in more technical detail here: http://eab.abime.net/showthread.php?t=108722) it became apparent that there just wasn't enough time to change two colour registers: 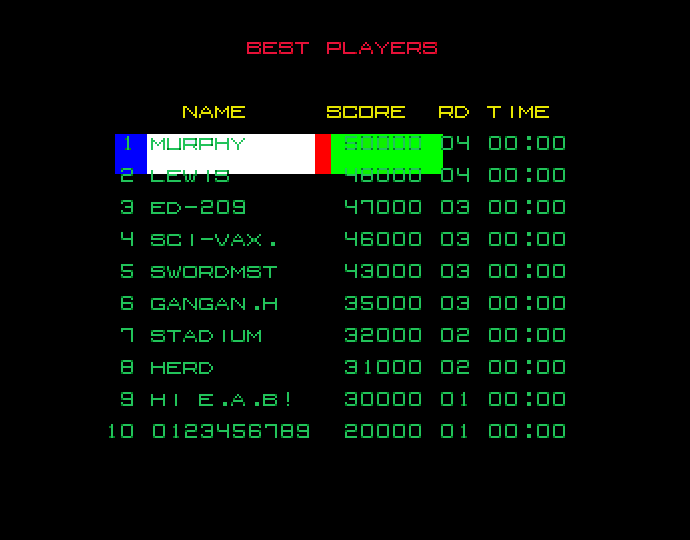 The image above shows that after changing one colour, the beam has already moved across a number of pixels and by the time it comes to changing the second colour the position is completely out of sync. Back to the drawing board. The final solution kindly pointed out by mcgeezer lay in a new AGA register called BPLCON4 which allows you to shift the position of the palette which is used by the bitplanes with one register write which was enough for my needs in this case. The two white palette entries were 4 positions away from the two green entries, so shifting the palette to the left by 4 positions made sure that the correct colours were in the correct place at the correct time! Result! 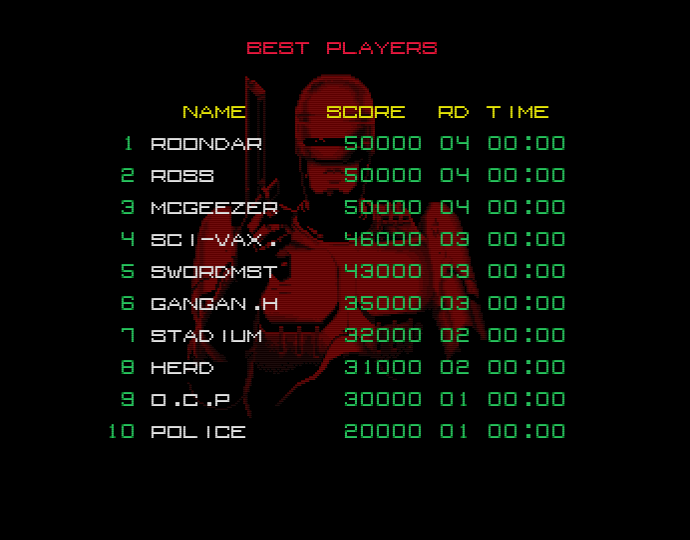 Two other scenes were added to the sequence to allow me to stich them all together: the quick flash of white noise after the high score table, and the prime directives. The white noise is simple a sequence of 5 images which are flashed onto the screen as 16 colour 64 pixel wide sprites, again using SSCAN2 to lessen the load, and repeated 4 times. Easy. The prime directives scene takes the same 'typewriter' code used in the highscores table and outputs different text, which is made easier by the fact that it's all green text so no messing around with Copper loops, or WAIT instructions. I did want to initiate some of the sound effects at specific times though so I refactored my code to execute a callback when each line ends, allowing me to look at the line which has just ended and play a different sample relative to that line number. Oh, there's also a subtle difference from the arcade version in the prime directives scene as bit of an improvement, Easter egg [ Show youtube player ] Shout outs and big thanks for help during this little phase belong to: - ross: keyboard irq help, copper horizontal waits - roondar: copper horizontal waits and general 68k advice - mcgeezer: copper colour changes with BPLCON4 and some - gigabates: pesky non-ascii codes in source code making vasm take a wobbler - DanScott: NOT.b advice and some supertastic "set" examples- jotd: More invaluable 68k advice |
|
|
|
12 November 2021, 18:02
|
#55 |
|
J.M.D - Bedroom Musician
Join Date: Apr 2014
Location: los angeles,ca
Posts: 3,519
|
Directive 5: Amiga Rulez
[jk]
|
|
|
|
12 November 2021, 18:10
|
#56 |
|
Registered User
Join Date: Sep 2019
Location: Italy
Age: 50
Posts: 292
|
Don't kill OCP executives
|
|
|
|
13 November 2021, 09:40
|
#57 |
|
CaptainM68K-SPS France
Join Date: Dec 2004
Location: Melun nearby Paris/France
Age: 46
Posts: 10,413
 |
Looks incredibly awesome !
|
|
|
|
04 December 2021, 12:55
|
#58 |
|
Registered User
Join Date: Dec 2021
Location: Uk
Posts: 3
|
Directive 6: Shutdown any Atari ST factories by force. No ST disk dealing on the streets.
|
|
|
|
04 December 2021, 18:02
|
#59 | |
|
CaptainM68K-SPS France
Join Date: Dec 2004
Location: Melun nearby Paris/France
Age: 46
Posts: 10,413
|
Quote:

|
|
|
|
|
07 December 2021, 17:58
|
#60 |
|
Registered User
Join Date: Feb 2018
Location: Northumberland, UK
Posts: 272
|
Update #5
Trying to finish off the intro sequences so I can get into the actual game for the next update. This time that involved adding two more scenes from the arcade game and the main title screen itself, ready for the player to start the game. The first scene involved some nice animations, which when extracted from the arcade sprites weighed in well over 512kb for one animation. There had to be a way to get that down, and part of my challenge when recreating this game is to figure out new ways to implement something that you just wouldn't care about when writing a game for a modern platform. At first, the animation included a number of frames which contained a gradually faded-in static frame before the animation starts, as well as frames featuring a gradually faded-out static frame when the animation ends. See the image in update #3. That could easily be solved by removing those 40-odd frames, blitting the object with the palette set to black and using some code to fade the palette in up to the final values and then play the animation. Same applies when the animation finished; just fade the palette back to black. Once that's done we can clear the buffer, and move onto the next part of that scene. Same challenge arose though: lots and lots of frames of animation. This time though, Robocop's gun slides in from the middle of the screen, gradually becoming more and more visible as the position changes. I only wanted to use one blitter object for this instead of having multiple frames with varying degrees of the gun being drawn. I finally figured out an easy way to do this would be to adjust the display window using the DIWSTOP register:  I could then blit the object below the display window, move the object up to the final position over a set number of frames, and at the same time not be bothered about any trails as they'd be off-screen. Once the scene has ended we can reset the display window back to the normal values for the next scene. There's one more scene before the main title comes in, and that's some sort of explosion which occurs across the whole width of the screen. Fortunately, all of the assets from Robocop adhere to some nice safe widths, 64 pixels, which conveniently is the same width of the sprites I'm using for this port. So, instead of going down the route of using SSCAN2 to automatically double the sprites across a certain part of the screen, already done that elsewhere, I thought I'd have a go at manually repositioning the sprites across the whole screen by changing the SPRxPOS registers for the sprites 0 and 1 (they're attached 16 colour sprites). One head-scratcher issue with this though, at least for me, is that after line $80 you have to change the way you WAIT with the copper. So in laymans terms, for anything above line $80 you WAIT with one copper command, and one and after line $80 you WAIT using another. I did have examples of code to get around this, in fact I did implement it for the highscore table, but I just couldn't be arsed to do that here, especially as it would only be needed for the first 8 lines of sprite data. The solution? Just move the sprites down 8 pixels and draw them there instead, resulting in a much simpler copper loop. After-all, it's only an intro screen which is displayed on the screen for a matter of seconds! 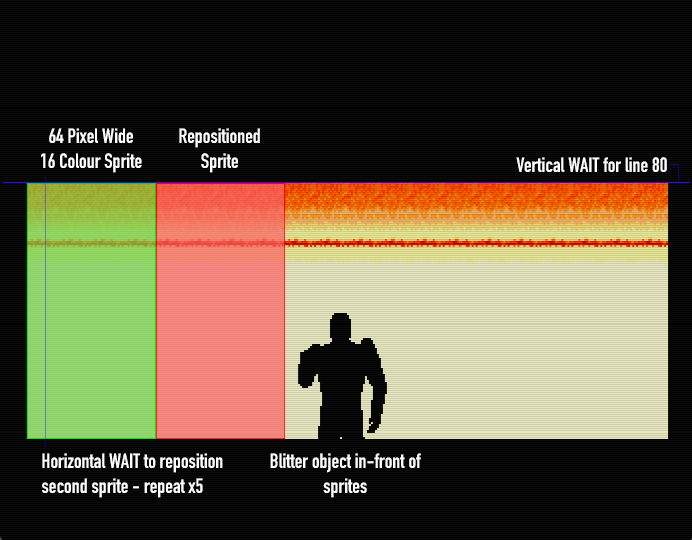 There's a little bug in there which I need to address though, and a few missing items such as the the flashing text cursor and some sound effects but they can wait until the end when I tidy everything else up. I'm also aware that the music is playing every so slightly too fast compared to the arcade original. Easy fixes though. The main title is a simple affair; moving all 8 sprites up the screen, changing the background colour at set points and using my 'typewriter' routines again to display the text. So, it's all ready to restart on the game code, so that's the next thing... back to level 1 and adding some more meat to the engine, which will probably get a little refactor now I have gained some more knowledge from doing the intro scenes. [ Show youtube player ] Shout outs and big thanks for help during this little phase belong to: - a/b: More 68k insights - DanScott: Sprite positioning pointer - Leffman: Actual sprite positioning code |
|
|
| Currently Active Users Viewing This Thread: 1 (0 members and 1 guests) | |
| Thread Tools | |
 Similar Threads
|
||||
| Thread | Thread Starter | Forum | Replies | Last Post |
| Robocop 3 Help | rodi | support.Games | 23 | 25 May 2006 16:51 |
| Robocop 3D | Souleh | support.Games | 12 | 20 June 2004 20:59 |
| Robocop 3 | Parsec | support.Games | 8 | 06 July 2003 03:58 |
| robocop 3 | Unregistered | support.WinUAE | 10 | 04 September 2002 16:23 |
| Robocop 3 | turk182 | request.Old Rare Games | 20 | 25 November 2001 09:49 |
|
|


