
|
 04 January 2015, 04:53
|
#1 |
|
Posts: n/a
|
128meg SIMMs on Derringer 030
Hi guys. Already posted this on amiga.org so I figured I do it here as well, for the benefit of those who don't frequent that forum. Enjoy:
1.)Remove Derringer from the machine. 2.)Remove 68030 from socket (you will be soldering to the back of the 68030 socket pins, so you wouldn't wanna risk heating on the CPU, itself.. Anywayze.. Remove it.. 3.)Remove any SIMM that may be in the SIMM socket. 4.)Find U17 on the top side of the board, its located in between the CPU and the SIMM. 5.)Lift pins 12, 13, and 14 of U17 and solder 3 wires, one to each lifted pin. Make these wires about 10-15cm long for now, and carefully run them through the hole (see photo). 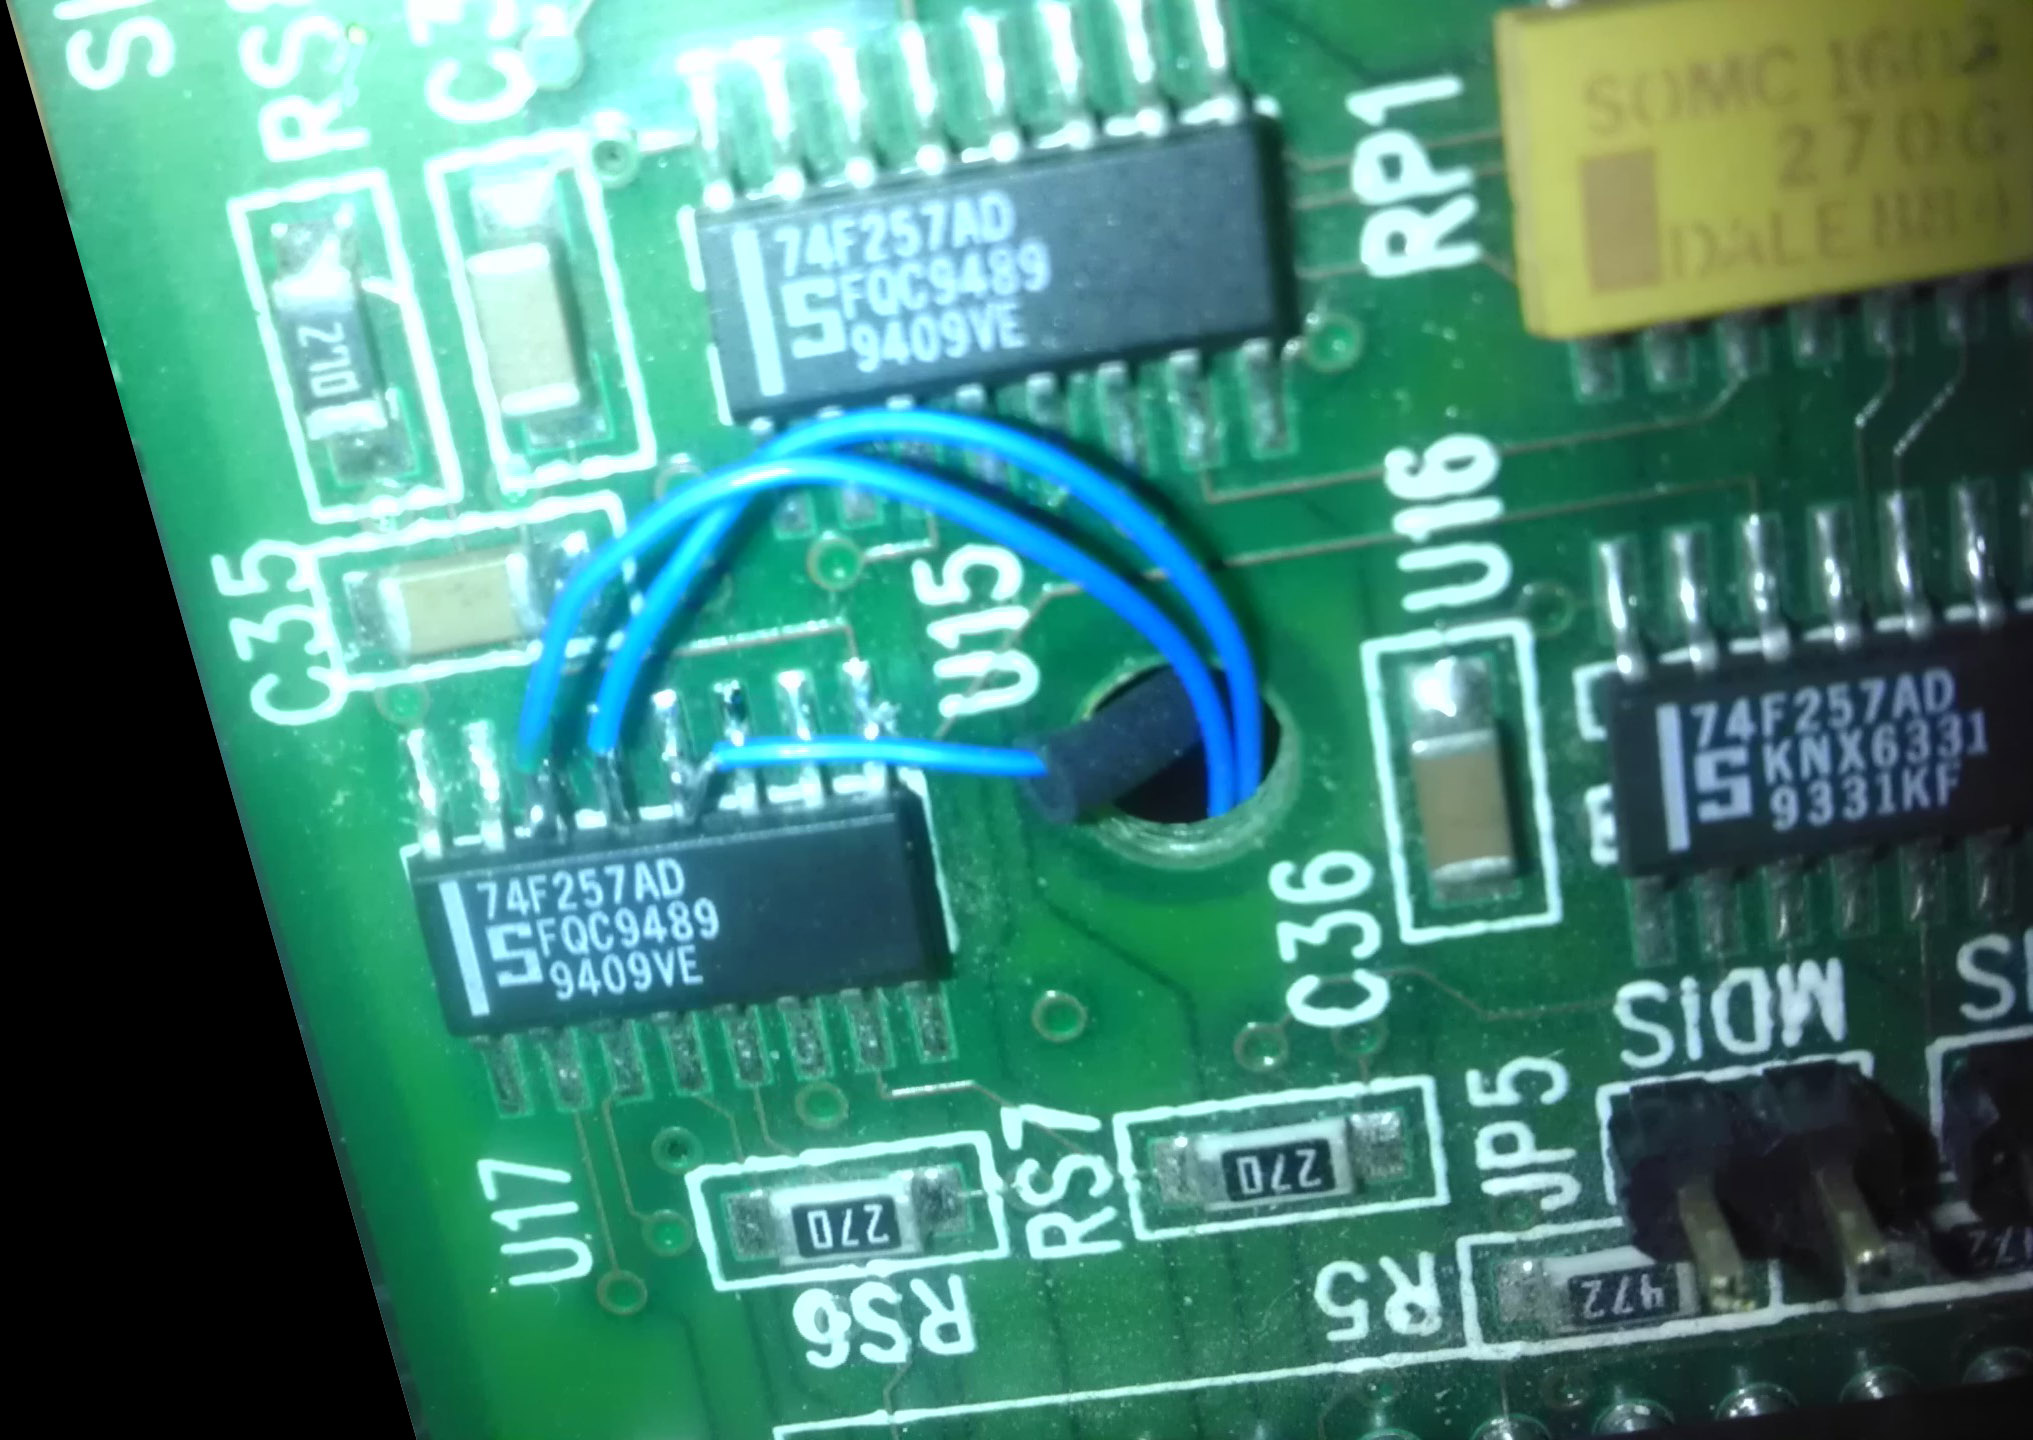 6.) turn the derringer board upside down and find pin 29 of the SIMM socket. 7.) Get a 27ohm resistor and solder one leg of it to pin 29 of the SIMM socket. Solder the other leg of the resistor to the wire that goes to pin 12 of U17. 8.) Solder the other 2 wires that go to pins 13 and 14 of U17 to pins A4(A28) and B4(A29) of the back of the 68030 socket. 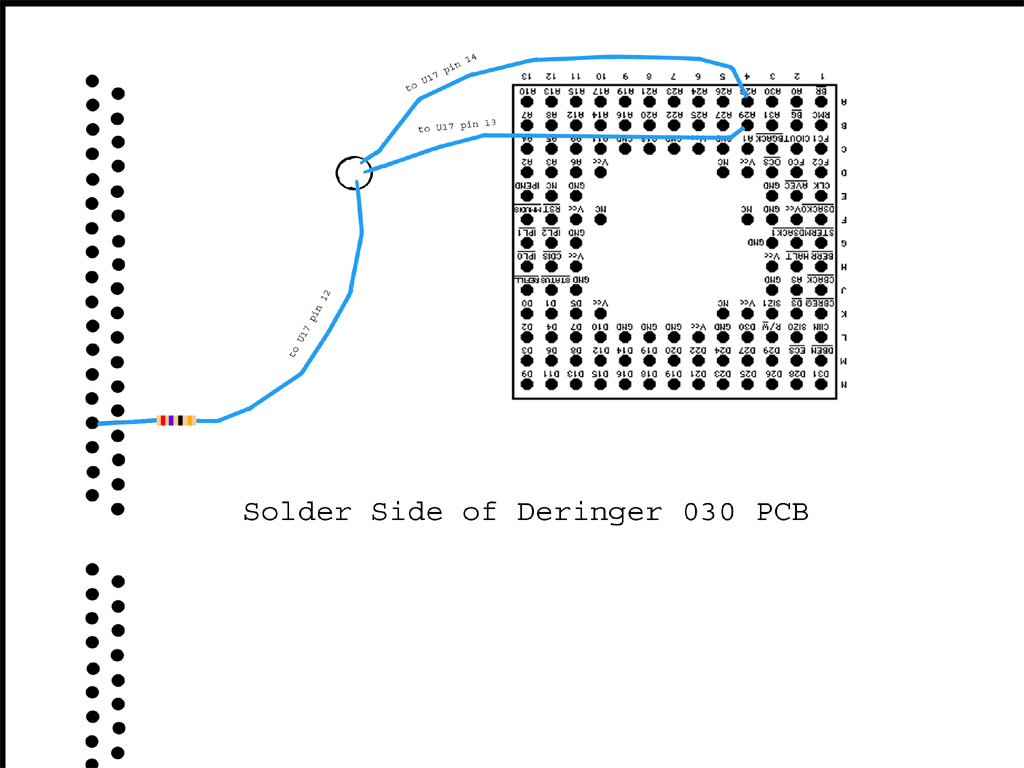 9.) Reinstall the 68030 CPU and SIMM back into the Derringer's sockets. The SIMM you need is actually 32meg x 32/36 (128megs total). From the factory, the Derringer can use SIMMs of up to 8meg x 32/36 (32megs total). Adding the RA11 address line gets us 4x more memory. I got my 128meg SIMM from Mech of a4000t.com 10.) Install the derringer in the AMIGA. 11.) Boot up the AMIGA. If it doesn't boot, you screwed something up and it isn't my fault. 12.) Get this archive: http://aminet.net/util/boot/addmem301.lha 13.) Uncompress the archive and copy the addmem command to your c: directory on your system boot drive. 14.) Add the following 3 commands to your S:Startup-sequence right after the D3 command. Here's what mine looks like: Code:
c:D3 >NIL: dram drom -mv -ms
c:Addmem >NIL: $18000000 $1A000000 32bit
c:Addmem >NIL: $28000000 $2A000000 32bit
c:Addmem >NIL: $38000000 $3A000000 32bit
c:caches >NIL: +i +d
The Addmem command here is adding 3 additional 32meg chunks of 32bit ram to the OS's free memory list, at the specified ranges. The caches command just turns on the 68030 instruction & data caches. Ok. So that's all there is. It works like a charm for me. If it works for you, great. If not, it ain't my fault. "You mess with your hardware, you take your chances." The cool thing about this hack is that the 3 pins we are using on U17 are not normally used by the Derringer. So, as long as you follow my instructions and don't accidently mess with anything else, you aren't actually risking anything. Here's what I mean: 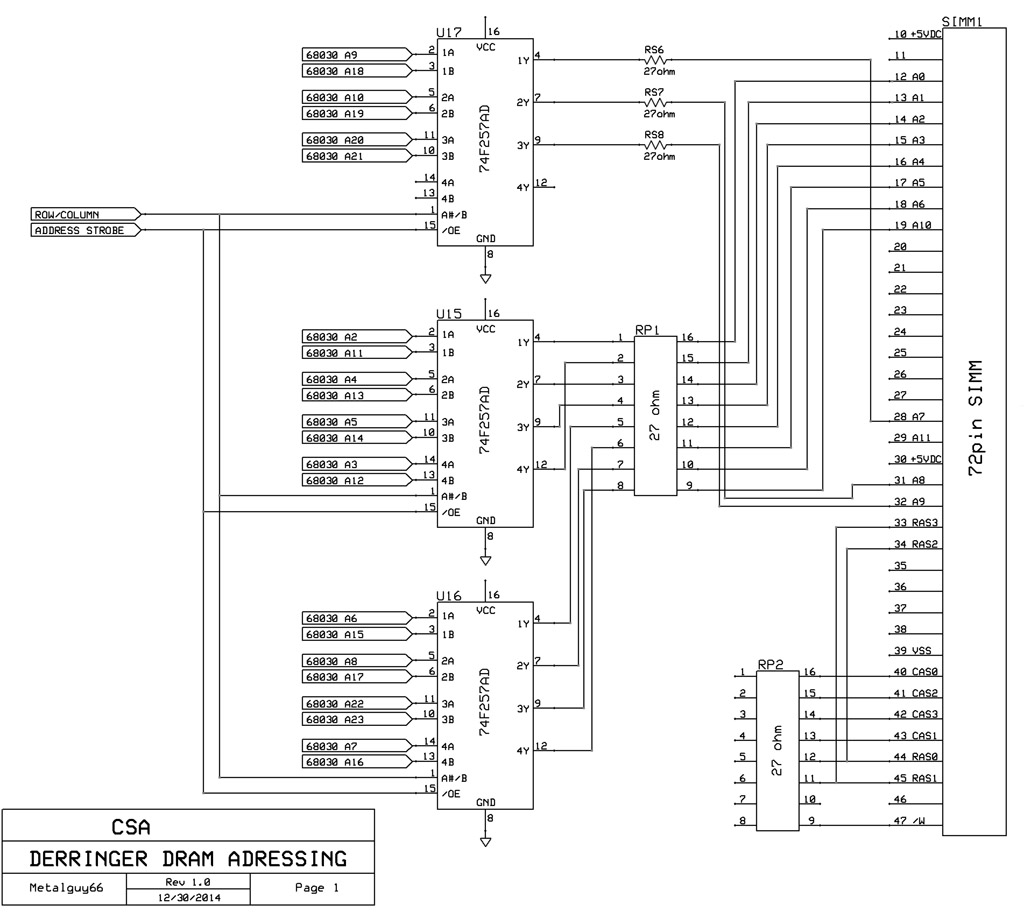 As you can see, the 4th mux channel in U17 is not even hooked up to anything on a stock Derringer (You DO have to lift the pins in order to perform the hack because the Derringer PCB design has the unused inputs grounded.) So, even after this mod is performed, if you simply re-insert a smaller SIMM (up to 32megs doesn't use the RA11 address line) the thing "electrically" returns to the way it was, for all practical purposes. You don't even have to "undo" the physical mod. It will just be running an "RA11 to nowhere" based on the states of A28 and A29 which won't do a darned thing. Now, a little about HOW it works. As I mentioned before (and you can hopefully see in the schematic above) we have 11 bits of MUXed DRAM addressing. This means 2 separate strobes of 11bit ROW and COLUMN addresses to each bank of DRAM. These 11 MUXed bits are generated by cpu address bus lines A2 - A23, multiplexed into two sets (ROW & COLUMN) by the 74F257 ICs. So to the AMIGA, we are selecting 8megs by the states of A2 - A23. To get to 32megs, we have some GAL/PAL logic that is controlling when/where the various CAS & RAS strobes are applied and this is based on the state of CPU ADRESS lines A24 and A25 (not shown on schematic because its done inside programmable PAL or GAL logic chips on the Derringer board). This logic also uses CPU address lines A26 and A27 to effectively map the Derringer DRAM to the location $08000000 in the AMIGA's memory address space. Ok. So what our little hack aims to do is add one more bit of MUXed DRAM addressing and thus go from 32megs to 128megs. This is 2 more bits of CPU addressing. Since I cant change the PAL/GAL logic or what it is doing, A24 - A27 is pretty much off limits. What this hack DOES do is use A28 and A29 which the normal Derringer DRAM access logic doesn't use. So, what we end up with is 4 sections of RAM, each 32megs in size, but spaced apart in the upper (would be Zorro III) memory space in intervals of 256megs. So, the first 32meg bank appears at $08000000 to $09FFFFFF (This is where the Derringer's 32bit ram normally appears) 2nd bank appears at $18000000 to $19FFFFFF 3rd bank appears at $28000000 to $29FFFFFF 4th bank appears at $38000000 to $39FFFFFF This is why we require 3 separate Addmem commands in addition to the normal derringer D3 command, in order to add all the ranges of memory to the system. Amiga OS should absolutely not care that this is the case, and any system legal application should be able to use the ram as contiguous, for all practical purposes. Whew.. That was a bunch of typing. Hope I didn't make any mistakes or bore you too bad. Questions? Further Comments? Anyone? |
|
04 January 2015, 04:56
|
#2 | |
|
Posts: n/a
|
64meg SIMMs?
Quote:
Translation: If it's gonna work, here's how it will work: 4 sections of 16 megs each, spread 256megs apart in the adress space. Addmem $08000000 $09000000 checkmem 32bit Addmem $18000000 $19000000 checkmem 32bit Addmem $28000000 $29000000 checkmem 32bit Addmem $38000000 $39000000 checkmem 32bit When testing, disable D3 in your s:startup-sequence, so that no 32bit fastram is added to the system at bootup. Then, open a shell and try the above Addmem commands with the checkmem option invoked. If any section of ram isn't going to work, it will return an error message within a few seconds. If it doesn't, the system will appear to be locked up while it tests that section of RAM for several minutes, but eventually, it will return you to the AmigaDOS prompt and add the ram to the system (you'll see "other memory" increase at the top of the workbench screen.) After you've done all your testing, reenable D3 in the s:startup-sequence, plus add an Addmem command for each additional ram bank that D3 doesn't find, and this time, no checkmem option. (D3 "finds" the first bank, located at $08000000) Hope this helps. Good luck! |
|
|
05 February 2015, 19:13
|
#3 | |
|
Posts: n/a
|
it has now been confirmed that 64meg (16meg x 32/36) 72pin SIMMs also work with the mod, using the address ranges given in the previous post.
Quote:
|
|
|
15 November 2018, 08:54
|
#4 |
|
Registered User
Join Date: Apr 2010
Location: Amigaplanet
Posts: 645
|
Hello,
does anyone of you have for schematics for the Derringer? Or even the PALs? My Derringer just died in my A2000.  CPU, Memory, Connecter, Quartz are ok. Appreciate any kind of help! Sorry for writing OT here. |

|
| Currently Active Users Viewing This Thread: 1 (0 members and 1 guests) | |
| Thread Tools | |
 Similar Threads
|
||||
| Thread | Thread Starter | Forum | Replies | Last Post |
| CSA Derringer Accelerator & Kick 3.1 | amigoun | support.Hardware | 3 | 27 December 2018 02:54 |
| CSA Derringer / A500 / Indivision ECS won't fit | zombie10k | support.Hardware | 42 | 28 December 2012 21:41 |
| CDTV + Derringer Problems | voyager | support.Hardware | 5 | 18 August 2008 18:18 |
| Wanted: 030 accelerator for A2000 , with MMU and *normal* simms for fastram | keropi | MarketPlace | 26 | 06 June 2007 21:48 |
| Amiga 500/2000 Accelerators For Sale (Derringer 68030 50MHz...) | rlake | MarketPlace | 7 | 28 September 2004 20:43 |
|
|


