
|
 11 June 2012, 16:29
|
#1 |
|
Posts: n/a
|
a600 keyboard controller
Help!
Recently bought an a600HD from a carboot, and at first all was well. Booted (white screen first), and accepts floppy disks. Loads of games, those I've tried work. A week or so ago, I popped the Workbench floppy in the drive, and when it gets to the question "Install keymap 1=yes/0=no)" I can type 1 or 0, but when I press return nothing. Have tried cleaning the ribbon/pads on the membrane, and today a replacement keyboard arrived form fleabay, but again the same fault. I have noticed that the full row doesn't work (ie QWERTYIOP, ZXCVBNM...), and am wondering if maybe the controller is at fault. Searched google high and low, but still lacking an answer.... Can anyone help/put me out my misery? Cheers Graham |
|
11 June 2012, 16:47
|
#2 |
|
Registered User
Join Date: Apr 2011
Location: birmingham
Age: 55
Posts: 2,827
|
are you sure its not the ribbon cable,maybe both the keyboards have the same problem.
have you checked the ends of the ribbon at the very end to see if you cant see through it,and the solder contacts under the motherboard. it very rare for the controller to go. |

|
|
11 June 2012, 18:14
|
#3 | |
|
Posts: n/a
|
Quote:
QWERTYUIOP ZXCVBNM<>? Plus Return, Del, <- There's no flashing caps lock lights, and when booting the screen is white. I've tested the ribbon connector on the mboard, making sure theres continuity between itself and the solder joints underneath - all is fine. Have also checked continuity between pads on the membrane, again all ok. Might plug the membrane in itself and check between the first pad and the connector, make sure there's not a break... Just seems funny, that two seperate keyboards have exactly the same keys not working 
|
|
|
11 June 2012, 18:24
|
#4 |
|
Registered User
Join Date: Apr 2011
Location: birmingham
Age: 55
Posts: 2,827
|
can you see through the carbon on the very end of the ribbon?
if you can it wont work. |
|
|
|
11 June 2012, 18:34
|
#5 |
|
Registered User
Join Date: May 2012
Location: Porto/Portugal
Posts: 385
|
That is too weird i think it must be some solder point on the motherboard or bad contact on stripe conector try isopropilic alcoohol on it
|
|
|
|
12 June 2012, 09:34
|
#6 |
|
Posts: n/a
|
Had a look at the ribbon edge last night, and it looks ok, no daylight, the 'fingers' are nice and black. Gave it a wipe with an alchowipe (always knew it was worth keeping them, when the kids were born
 ) )Tried it this moring - just the same. But I did notice that the row of caps/resistors that sit behind the keyboard connector (towards the rear of the mboard) - some of the joints just look a bit gunky? Should I give them a rub with some alchohol to clean them up? Don't know if they're anything to do with the keyboard cicuitry, but must be worth a try...? ps Thanks Roy, the machine works in every other respect, and it's been fun trying some of those old games again. I just don't want to give up on it just yet.... |
|
12 June 2012, 09:43
|
#7 |
|
Registered User
Join Date: May 2012
Location: Porto/Portugal
Posts: 385
|
try to retouch solder joints but first i think you should disconect keyb from uper case plastic,conect to motherboard and then with a workbech text prog sit your finger on one key that don´t work, with the other hand try to press components near keyboard ribbon could be bad solder joints on one component,wish this helps
|
|
|
|
12 June 2012, 09:43
|
#8 | |
|
Registered User
Join Date: Apr 2011
Location: birmingham
Age: 55
Posts: 2,827
|
Quote:
yes,try cleaning the gunk/dust off with an old toothbrush with alcohol.(is it around the capacitors?because thats a capacitor fail and it eats through traces) also have a look around the keyboard mpu at point u13 on the pcb look for micro fractures at the base of the ic bad solder joints and remove dust etc and check the ribbon connector on the motherboard at cn13 you can unclip the top half and look inside for bent pins etc. and see how you get on. EDIT: it sounds like your caps have leaked onto your motherboard use lemon juice to nuetralise it now.and remove and replace the two caps behind the ribbon connector.damn im stupid.(i dident realise when you said the word gunk by the ribbon connector) can you take some hires picturs of the board? Last edited by roy bates; 12 June 2012 at 09:55. |
|
|
|
|
12 June 2012, 13:31
|
#9 |
|
Registered User
Join Date: Feb 2012
Location: Tayside
Posts: 181
|
I haven't seen an Amiga at a car boot sale in years, most go on ebay these days, not unless their faulty or something.
|
|
|
|
12 June 2012, 16:15
|
#10 |
|
Registered User
Join Date: May 2006
Location: Kilmacolm
Age: 46
Posts: 632
|
If you have loadsa gunk around the keyboard connector, could be a trace has been eaten by leaky caps.
Where about are you in Scotland, linux_geek, I've done a few A600 cap jobs and misc repairs, maybe I can help you out. I'm in Blairgowrie now and Dundee from mid July. Hey Keitha1200, I see you're in Tayside, maybe we could could have a sensi tournament while we're at it 
|
|
|
|
12 June 2012, 16:55
|
#11 |
|
Posts: n/a
|
Right, isopropylalcohol opened, cotton-bud in one hand, screw-on macro lens for my dslr in the other, I cleaned the caps & resistors that sit behind the keyboard socket thingy... was just dust I think, solder joints are all nice and shiney, and as far as I can see, there's no damage to the track lines coming to and from the connector.
Tried pushing the pins inside the connector forward so as to reach the ribbon easier, but nope, not that either.... Nightshift tonight, but might take a photo of the end of the keyboard ribbon, just in case, my version of "ok" is really not "ok" ....?? Im in Kilmarnock Jimbob. I have had some experience of SMT soldering (although I no longer have the tools etc required to do it)... Maybe I should just put it all back together and just not use the keyboard lol Oh and it cost a £10 spot and came with a big box of floppies - all of which Ive tested work just fine  G |
|
13 June 2012, 00:56
|
#12 |
|
Registered User
Join Date: May 2006
Location: Kilmacolm
Age: 46
Posts: 632
|
Sounds like you can handle any repairs on your own. You can replace the SMT electrolytics without a hot air gun if you're patient and careful with a normal soldering iron, but it will be a pain if you are used to using the correct tools. Those two behind the keyboard connector are the most awkward.
I thought I had made notes of which ribbon traces were which when I fixed a keyboard a while back but I only actually wrote down a few details relevant to my problem, d'oh! Looking at the schematic it isn't really obvious but my guess is that pin 35 and 37 on U13 connect to the rows that don't work on your keyboard. A place to start looking anyway. |
|
|
|
13 June 2012, 05:16
|
#13 |
|
Registered User
Join Date: May 2012
Location: Porto/Portugal
Posts: 385
|
As you can see on schematics there are a very few components on pcb it is almost direct u13 and keyboard stripe although there are some transistors, my bet is a solder on u13.
 
|
|
|
|
13 June 2012, 14:48
|
#14 |
|
Posts: n/a
|
Thanks guys. Will have a proper look tomorrow. Nightshift last night, and no bed until tonight, to get back into daylight mode
 I have taken a couple of photo's, and a theres two things I've noticed: Firstly the ribbon edge, looks OK, I think? 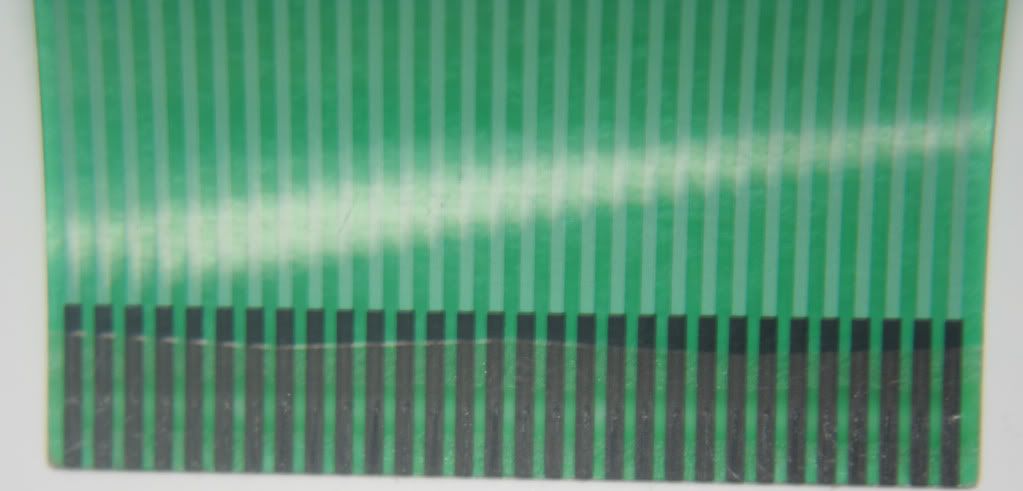 But if I use a flash: 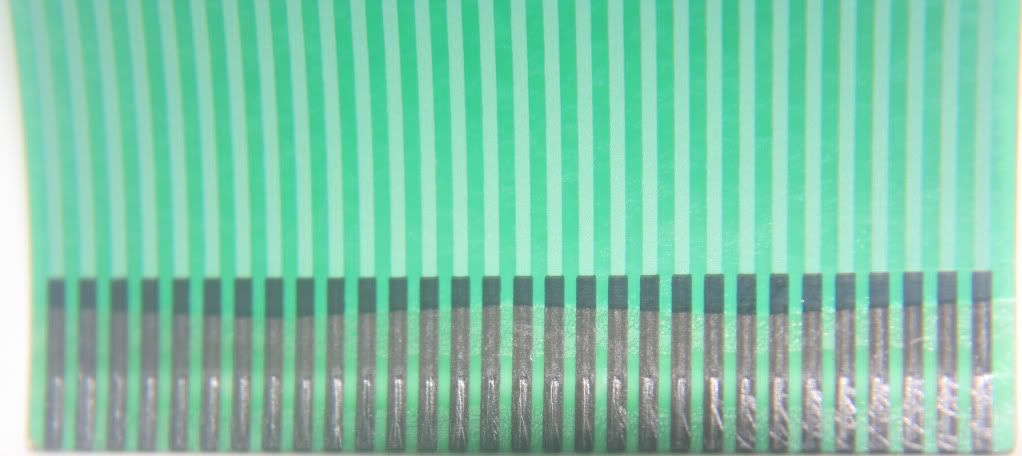 Then I noticed this on the tracks from U13 to the connector, Don't know if it's broken tracks, or just 'swarf' from the manuf. process. Need to get my continuity meter out, me thinks  Excuse the dodgy circle... Excuse the dodgy circle...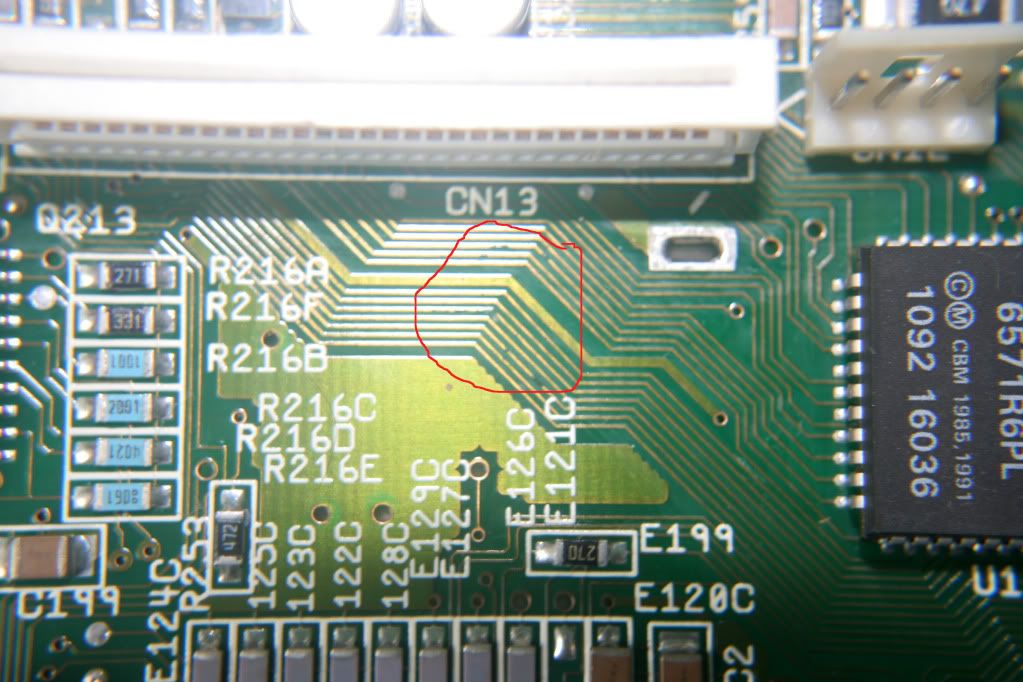 Think its going to be a trial and error process lol Jimbob, may still rely on your skills. It's been 20+ years since I worked in SMT production, and at the time soldering was considered far too delicate for us men, and solder repairs were done exclusivley by women. I just had a wee shot now and then, when no managers were looking
|
|
13 June 2012, 15:14
|
#15 |
|
Registered User
Join Date: Apr 2011
Location: birmingham
Age: 55
Posts: 2,827
|
you can repair those traces with thin gauge wire,just gentry rub/scrape the enamel off the trace and solder the wire over the top to join it back up, just be careful not to bridge the traces together.
the keyboard riboon looks ok the traces is where the signal is lost,thanks for the pics. at least you know why some of the keys dont work on the keyboard ,a few lines on the matrix has been cut. |
|
|
|
14 June 2012, 02:19
|
#16 |
|
Registered User
Join Date: May 2012
Location: Porto/Portugal
Posts: 385
|
yeah nightshift or like i ,like to say graveyardshift is a pain i am on security and do about 8 night per week when i wake up like i had been spanked after daylight sleep,don´t need rewire by wires now on ebay conductive paint to repair traks much more professional and good looking,those trcks look corroted behind the varnish ,dont forget those behind the pcb
|
|
|
|
14 June 2012, 11:24
|
#17 |
|
Registered User
Join Date: May 2006
Location: Kilmacolm
Age: 46
Posts: 632
|
Looks like you may have found the trouble. I'd be happy to do the repairs and replace caps while I'm at it but since we are not exactly next door neighbours, I recommend you contact forum members FOL or dOpefish, they are more experienced than me. They can probably sort you out for a reasonable fee. I'd do it for parts and postage cost but you are taking a chance on my relative inexperience.
|
|
|
|
14 June 2012, 12:55
|
#18 | |
|
Registered User
Join Date: Feb 2012
Location: Tayside
Posts: 181
|
Quote:
braw
|
|
|
|
|
14 June 2012, 15:51
|
#19 |
|
Posts: n/a
|
Thanks guys for all your help
I've ordered some conductive paint and varnish, to do the repair - don't worry, I've got some old broken PCBs in the shed, that I can practice on first...  If I can't do it, I'll look up out for one of the guys you recomend jimbob If I can't do it, I'll look up out for one of the guys you recomend jimbob I assume I can apply it with a cocktail stick - would have tried the solder method, but after seeing how it's done, too fidgity for me. I'll post back and let you all know how it went, and if it worked..! [EDIT] Made a little schematic, so I can figure out which pin on CN13 connects to which foot on U13! Will make checking continuity a little bit easier [/EDIT] Thanks everyone Graham Last edited by linux_geek; 15 June 2012 at 12:34. |
|
20 June 2012, 14:23
|
#20 |
|
Posts: n/a
|
Well the other day, the postman delivered some 'liquid silver' and PCB varnish, courtesy of eBay. Yesterday, I finally plucked up the courage to attempt the repairs. I started off, by finding out which U13 pins went to the connector CN13, and checking the continutity with a cheapo meter. All said and done, the board had 3 broken traces... CN13/3, CN13/7 & CN13/12. 7 & 12 were easy to find, 3 was not where I suspected it to be, but right up next to the connector itself! Eventually found where the breaks were, and got started...
Didn't have a tool to remove the varnish, so I improvised, using an eraser, with a sowing needle pushed into it, to give me something to grip on to. I also used the screw on macro filters for my DSLR, so I could get a nice close view of the track/needle. Chipped a bit off at a time, cleaning with nail varnish remover (dont have isopropyl alcohol). To apply the silver, I used a wooden skewer (100 in a bag, Tesco), sharpened to within an inch of its life, and just "dabbed" the stuff along the track. It spread out a little, but I chipped that off, when it was dry with my pin/rubber. Checked the continuity, and everything seemed fine. Left to dry overnight... Today, plugged it in, booted the Workbench floppy, and everything on the keyboard is working just perfect  Thanks to everybody for helping me get it fixed, else it was headed for the tip! Don't know when I'll have time to play all the games that was in the box (musty be around a 100!) But will have fun anyhow Also tried to install to the internal HD (30Mb), but after prep,the FormatHD reports the HD cannot be seen. Might be a fried HD. Have ordered a IDE to CF adapter, as I have plenty of CF cards as my camera uses them... hope it all works OK A big thankyou to everyone (again) Graham |
| Currently Active Users Viewing This Thread: 1 (0 members and 1 guests) | |
| Thread Tools | |
 Similar Threads
|
||||
| Thread | Thread Starter | Forum | Replies | Last Post |
| WTB- A600 Keyboard Membrane Or Full Keyboard! | hansel75 | MarketPlace | 1 | 02 November 2012 06:51 |
| What can you tell me about this keyboard controller? | DDNI | support.Hardware | 3 | 06 April 2008 00:52 |
| A600 keyboard | macce2 | Swapshop | 0 | 17 May 2007 23:04 |
| I-Pac Controller/Alternate Keyboard Controls | tieke | support.WinUAE | 1 | 23 September 2003 06:50 |
| Looking for an A600 Keyboard | oldpx | MarketPlace | 6 | 17 August 2002 09:56 |
|
|


