
|
 29 March 2020, 11:20
|
#1181 | |
|
Unregistered User
Join Date: Sep 2012
Location: Copenhagen / DK
Age: 43
Posts: 4,190
|
Quote:
|
|

|
|
22 April 2020, 03:29
|
#1182 | |
|
Code Kitten
Join Date: Aug 2015
Location: Montreal/Canadia
Age: 52
Posts: 1,178
|
Quote:
What you want is definitely not pure peroxide but diluted versions and those are the ones available to regular kittens. You can most certainly find some in pharmacies alongside Isopropyl Alcohol since this is an excellent disinfectant. I would moreover recommend pharmacy peroxide over the hair-related solutions since these probably include additional undesirable chemicals. Peroxide, when sold as a disinfectant is only diluted by water and nothing else, making it perfect for retrobriting (if you buy several liters). This said, as many others have said, sunlight/UVs alone seem to work just fine. 
|
|
|
|
|
14 July 2020, 18:59
|
#1183 |
|
Registered User
Join Date: Jan 2011
Location: -
Posts: 728
|
I'd love to hear some updates about this. It's been over 10 years since people started retr0brighting.
To anyone that did this a decade ago: - Has your item yellowed again? If so, is it worse than original? About the same? Patchy? - How brittle has your item become? Same as before or worse? (I doubt it'll get better) - What method did you use? Soak, paint on, etc. Photos for bonus points 
|
|
|
|
14 July 2020, 19:06
|
#1184 | |
|
Junior Member
Join Date: Oct 2001
Location: UK Southern End
Posts: 704
|
Quote:
as bad, and the science and chemicals in the Retrobright ( Retr0bright ) process used apparently causes the plastic to turn brittle. I see the yellowing as part pf the machines history, and it does not really worry me too much, and the above is why I have never used the process. |
|
|
|
|
14 July 2020, 19:26
|
#1185 |
|
Registered User
Join Date: May 2010
Location: Helsinki, Finland
Posts: 1,341
|
In my experience the process works well, but the yellowing does tend to return to some degree. Using a method where the part is fully immersed in liquid is safest; if the peroxide is allowed to dry the result will be blotchy. Treating colorful parts is a bit hit and miss as to how the dyes react, I'd limit myself to beige Amiga and Commodore stuff unless there is an opportunity to do a test piece first.
I haven't noticed any increase in brittleness with the parts I've done - as far as I can tell only the very surface is effected. However, many of these old parts are certainly brittle to begin with. |
|
|
|
14 July 2020, 19:31
|
#1186 |
|
Registered User
Join Date: Jul 2010
Location: Middlesbrough
Posts: 87
|
Here is an update from my A500.
Original post in Oct 2011 http://eab.abime.net/showpost.php?p=...&postcount=655 A pic I've just taken of the same A500 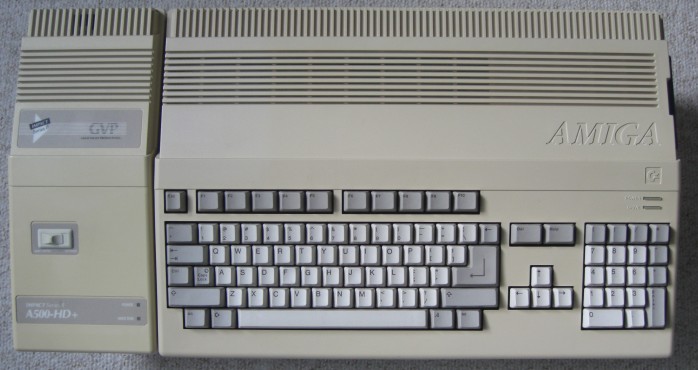 If the pic above doesn't appear, then here is a link: Click here Even though the lighting and camera settings are different, you can at least see that it's still looking very good. I sprayed it with satin finish clear coat afterwards (which isn't noticeable). I used the liquid peroxide/oxy mixture. Last edited by necronom; 15 July 2020 at 10:23. Reason: fixed the image url |
|
|
|
15 July 2020, 10:13
|
#1187 | |
|
Retired Quartex Sysop
Join Date: Sep 2001
Location: Roman Verulamium
Age: 58
Posts: 1,873
|
Quote:

|
|
|
|
|
15 July 2020, 10:27
|
#1188 |
|
Registered User
Join Date: Jul 2010
Location: Middlesbrough
Posts: 87
|
That's odd. They all appear for me and are just direct links to the jpg files. I've added links below the pics to click on.
|
|
|
|
15 July 2020, 10:39
|
#1189 | |
|
Retired Quartex Sysop
Join Date: Sep 2001
Location: Roman Verulamium
Age: 58
Posts: 1,873
|
Quote:
|
|
|
|
|
15 July 2020, 17:14
|
#1190 |
|
Junior Member
Join Date: Oct 2001
Location: UK Southern End
Posts: 704
|
I.m getting Bad Gateway Error on both links.
|
|
|
|
08 October 2020, 01:34
|
#1191 |
|
Registered User
Join Date: Aug 2020
Location: UK
Posts: 122
|
Best method I've found, use Clairol Pure White 40, it has everything you need perfectly mixed. Use a paintbrush to apply, wrap item(s) in clingfilm to prevent evaporation. Pick a day with clear skies, and choose the room with the most sunlight, stand items in the window from the moment the sun comes into the room until it goes away. Heat is essential to aid the process. Also when sunlight isn't available (around 364 days per year in Scotland) I found the source that caused the damage is the best source to reverse it, ie if prolonged use of a fluorescent lamp was the catalyst for the bromine to react (which causes the yellowing), then reverse it with a fluorescent lamp.
As for patchy results, this is usually caused by the retrobrite evaporating in certain areas quicker than others. Just re-coat, re-wrap and do another session. Also, despite a common myth, I've never managed to over-retrobrite anything. |
|
|
|
26 October 2020, 12:11
|
#1192 |
|
Registered User
Join Date: Oct 2020
Location: Northwich, UK
Posts: 42
|
I had a badly yellowed C128d keyboard, used 6% hydrogen peroxidefrom amazon, 2 x 30w UV 365-395 nm lamps and it took 48h. The result isn't the best, but the enemy of good is better.
|
|
|
|
27 October 2020, 09:55
|
#1193 | |
|
Retired Quartex Sysop
Join Date: Sep 2001
Location: Roman Verulamium
Age: 58
Posts: 1,873
|
Quote:
|
|
|
|
|
03 January 2021, 12:31
|
#1194 |
|
Registered User
Join Date: Oct 2019
Location: Nordmaling/Sweden
Posts: 100
|
I am about to try retrobrighting my very mustard yellow A1200 and also the Keys.
I am doing the full immersion type. I have found a large plastic container and ordered about 4 litres of 12% liquid peroxide. Next up is buying some uv lamps. Hope this goes well. Edit: I am now finished and the result is way better than What i expected. It looks brand new. I ordered 8 liters of hydrogen peroxide. I found a large 55l container that i wrapped in aluminumfoil around the outside. I had to attach a heavy spanner under the chassie to keep it submerged and I had it in there and under uv-light for about 24 hours. Same thing for the keycaps. I just poured them in and turned them upside down and let them float around in the peroxide for 24 hours. This is a very good way to go since i was afraid of marbling. Last edited by Jolabandola; 19 January 2021 at 13:01. |
|
|
|
22 February 2021, 13:01
|
#1195 |
|
Registered User
Join Date: Jan 2021
Location: Braintree
Posts: 4
|
I'm just getting ready to try this myself, I think I've everything I need, 12% peroxide, full spectrum LED (Banggood special), foil and a container. I think I'll try the keycaps first.
[IMG]https://drive.google.com/file/d/1Sc-...ew?usp=sharing[/IMG] Last edited by SALLEN0710; 22 February 2021 at 13:03. Reason: Trying to add an image |
|
|
|
24 April 2021, 13:27
|
#1196 |
|
Retired Quartex Sysop
Join Date: Sep 2001
Location: Roman Verulamium
Age: 58
Posts: 1,873
|
How much time in sun in peroxide is too much?
Prob when the plastic bag pops from pressure of released O2 from the peroxide  Was nearly done... my keys look good but not minty enough... Done it before with a glass jar which is BAD... heats up far too much and warped a space bar (years ago). Plastic bag zip seal and agitate every 30 mins for me. Don't rate cream, too many bad results... Might try the casing in a bath of water with bottle of cream added, so always submerged |
|
|
|
20 May 2021, 20:41
|
#1197 | |
|
Registered User
Join Date: Mar 2008
Location: US
Posts: 315
|
Quote:
Precisely my experience--the yellowing returns over time. However, I only experimented on a few small non-valuable pieces. The "sunlight only" method on a cool day caused an obvious and very fast increase in yellowing here. For the last 10-15 years I (occasionally and sparingly) use Plexus and 210 Plastic Cleaner, and none of those items have yellowed. Could be a sealing effect and/or UV protection from the product, could be that the items wouldn't have yellowed anyway. No more peroxide experiments for me, IMHO color matching plastic dye/paint and an airbrush is a better method, as it will leave the original texture of the plastic intact and eliminate the yellowing problem. Naturally, that approach requires working around original labels without damage and just more hassle in general, or might not be feasible at all in some cases (A3000D faceplate). |
|
|
|
|
25 June 2021, 20:17
|
#1198 |
|
Retired Quartex Sysop
Join Date: Sep 2001
Location: Roman Verulamium
Age: 58
Posts: 1,873
|
Anyone suggest a MILD abrasive?
I have an A500 PSU that I removed a sticker from and cleaned with sticker remover, and IPA and it still looks like it stained. I retrobrited but there looks to be some sort of discoloration so I am thinking maybe a mild abrasive to remove the top layer with the sticker stain in? I have acetone around but that tends to dissolve plastics! |
|
|
|
25 June 2021, 22:26
|
#1199 | |
|
It's coming back!
Join Date: Jul 2018
Location: comp.sys.amiga
Posts: 762
|
Quote:
|
|
|
|
|
25 June 2021, 23:35
|
#1200 |
|
Registered User
Join Date: Mar 2012
Location: UK
Posts: 1,893
|
Seeing how yellowed headlights are sanded - I guess that this method could be used but who would be brave enough?
I also have some headlight wipes that work pretty well so I wonder how they would be? Might be worth an experiment with. Certainly when I used them on my car headlights there was a lot of 'yellow' that came off and the lights were visibly clearer. |
|
|
| Currently Active Users Viewing This Thread: 1 (0 members and 1 guests) | |
| Thread Tools | |
 Similar Threads
|
||||
| Thread | Thread Starter | Forum | Replies | Last Post |
| A500+ Colour / Yellowing? | craggus2000 | support.Hardware | 25 | 22 November 2010 09:24 |
| Removing Yellowing using H2O2, TAED & UV | alexh | support.Hardware | 31 | 21 February 2010 23:48 |
| Guide to removing yellowing of plastics | tonyyeb | support.Hardware | 38 | 28 November 2009 19:23 |
| Partial yellowing? | Amiga1992 | support.Hardware | 21 | 04 July 2008 00:46 |
| Yellowing | BippyM | support.Hardware | 56 | 03 January 2003 20:08 |
|
|


