
|
 15 March 2014, 09:44
|
#1 |
|
Precious & fragile things
Join Date: Feb 2009
Location: Victoria, Australia
Posts: 1,946
|
PCB Washer + FrankenOven
A while ago I suggested I would take some pictures of FrankenOven and the possibility of a PCB washer.
I have uploaded three videos to Youtube and will include a picture here. Info for Washer: Simple 12V motor with reduction gear box driving an aluminium shaft with removable plastic bucket for rinsing and cleaning after PCB is finished. Matting is a simple bath mat and a ground strap will be added soon to avoid issues with static. Wood pieces on one side and metal railing holds the container in place and uses the container's own wheels to slide. Original video has too much flex in the plastic and needed the steel bracing to make it rock properly. I knocked it up this afternoon out of scrap wood and steel, will add an earthing point and properly terminate the motor contacts as well as fuse it. Info for FrankenOven: Powered by a PIC18F46K20 microcontroller, it takes a signal from a thermocouple in the oven out to a MAX31855 converter. LCD is a simple 128 x 64 and I have designed the fonts from scratch, stored in the internal EEPROM of the PIC. Three modes of operation, Leaded solder, Unleaded solder and Constant temperature ( set at 40 degrees ) [ Show youtube player ] FrankenOven [ Show youtube player ] Bath Before Reinforcing [ Show youtube player ] Bath After Reinforcing Last edited by Loedown; 15 March 2014 at 09:50. |

|
|
15 March 2014, 10:30
|
#2 |
|
Registered User
Join Date: Apr 2011
Location: birmingham
Age: 55
Posts: 2,827
|
i tried clicking on the videos mate,it says they are private.
|
|
|
|
15 March 2014, 10:36
|
#3 |
|
Precious & fragile things
Join Date: Feb 2009
Location: Victoria, Australia
Posts: 1,946
|
I'm a bit of a novice with Youtube, try again I think I have it right now.
|
|
|
|
15 March 2014, 10:37
|
#4 |
|
Registered User
Join Date: Apr 2011
Location: birmingham
Age: 55
Posts: 2,827
|
cheers mate,its working now.
i'll have a look. EDIT: are you only using the oven to dry the boards after a wash? do you have a set time etc or timer for duration. Last edited by roy bates; 15 March 2014 at 10:57. |
|
|
|
15 March 2014, 11:35
|
#5 | |
|
Precious & fragile things
Join Date: Feb 2009
Location: Victoria, Australia
Posts: 1,946
|
Quote:
I need to replace the oven's existing elements with probably infrared heaters instead, the heating phase is taking too long on lead free reflow, seems ok for normal leaded pcb, it's just for my own prototypes. |
|
|
|
|
15 March 2014, 11:45
|
#6 |
|
Registered User
Join Date: Apr 2011
Location: birmingham
Age: 55
Posts: 2,827
|
nice work mate.
its looking really good,keep it up. |
|
|
|
15 March 2014, 15:48
|
#7 | |
|
Registered User
Join Date: Jun 2010
Location: PL?
Posts: 2,741
|
Quote:
[ Show youtube player ] |
|
|
|
|
15 March 2014, 16:37
|
#8 |
|
Registered User
Join Date: Sep 2006
Location: Thunder Bay, Canada
Posts: 4,323
|
Not too bad, the prices of US baths are pretty cheap now, anywhere from $30 - the skys the limit
|
|
|
|
06 April 2014, 12:48
|
#9 |
|
Precious & fragile things
Join Date: Feb 2009
Location: Victoria, Australia
Posts: 1,946
|
I took the capacitors off my A4000 board in preparation for washing, took out the socketed chips ( Super Buster, Kickstart & one socketed logic chip U103 ), took pictures before and after.
The initial result from washing for 40 minutes in a bath of roughly 1:6 vinegar / water isn't enthralling, the board is certainly cleaner but it hasn't done enough with the areas damaged by battery acid and capacitor leak. I will try again tomorrow with a mixture of lemon juice and water to see how well that cleans up. I have also made a plate to fit the A4000 board on to be heated to 120 degrees C before resoldering the capacitors, I built a digital thermometer last week based on TMP36. When the project is complete and working to my satisfaction then I will post photos, videos and explanations / descriptions for any interested party. |
|
|
|
09 April 2014, 07:25
|
#10 |
|
Precious & fragile things
Join Date: Feb 2009
Location: Victoria, Australia
Posts: 1,946
|
Long tomorrow, been sick.
Washed the board again, this time for 1 hour 40 minutes in solution of around 2 parts water to 1 part lemon juice and the board looks quite a bit cleaner, it's drying now in Frankenoven so I will inspect it later tonight and write back. I am also going to get some small pieces of metal and some screws to make the action of the bath a little less relaxing. I will up the temperature of Frankenoven from 40 to 50 degrees, the boards are taking way too long to dry and an extra 10 degrees will not harm the board. First inspection of the board shows the lemon juice interacts with flux residue to form a slightly powdery substance, a stiff brush will fix that issue, other than that the board looks very clean. Last edited by Loedown; 09 April 2014 at 13:46. |
|
|
|
09 April 2014, 15:48
|
#11 |
|
Precious & fragile things
Join Date: Feb 2009
Location: Victoria, Australia
Posts: 1,946
|
Also take the plate off A4000 boards to avoid surface rust that covers the Mouse / Joystick ports. It took about 9 hours to dry the board, I had to go out half way through so I stopped the oven and noticed some water left near the central AMP connectors for the bridge board so I dried it again when I got back. Very minor surface rust too on serial / parallel outer metalwork.
I will up the temperature on Frankenoven as mentioned before and make sure that the boards are dried in one go over I think 2 hours, if 50 degrees still isn't enough I will go to 60 degrees and no more, 120 degrees C is the temperature set of reflow ovens in their cool down stage but plastic on the Amiga board may be susceptible to higher temperatures, also some of the chip labels. Will get a horse hair brush and brush it, some residue from areas where capacitors leaked, anyone know what the chemical process is and what the residue could be, flaky, very slightly greenish / off white. |
|
|
|
10 April 2014, 13:07
|
#12 |
|
Precious & fragile things
Join Date: Feb 2009
Location: Victoria, Australia
Posts: 1,946
|
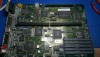
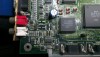
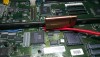
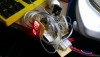
A Hash Of Photos
|
|
|
|
10 April 2014, 13:19
|
#13 |
|
Precious & fragile things
Join Date: Feb 2009
Location: Victoria, Australia
Posts: 1,946
|
Shots are Left to Right.
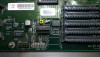
1. Board before any work done other than capacitor removal 2. Close up sound area caps removed 3. Battery area before cleaning 4. After vinegar bath with two solderability test points on F245 5. Temperature sensor held in place, note: not final solution just showing how it will work. 6. Sound area after wash in lemon juice / water and follow up on pads with Contact Cleaner 7. Temperature sensor circuitry, TMP36, PIC 16F872, 74HC573 display drivers 8. Board on baking plate on top of the bench top oven, tray is held in place by 4 rivets, A4000 board held in place by 2 screws 9. Battery area after wash in lemon juice / water and CC after 10. Same as above 11. Overall hot plate, base, board, temperature sensor on my perpetually grotty work bench The conclusion is that the lemon juice / water combination works extremely well with just a mild brushing needed after the wash / dry is completed. The lemon juice doesn't remove flux residue so you need to do this yourself before washing the board using Contact Cleaner or whatever else, isopropynol etc. This A4000 is my test board and I think after the capacitors are done it will be a very good board for a long time to come, will post final photos when it's finished. |
|
|
|
11 April 2014, 05:01
|
#14 |
|
Precious & fragile things
Join Date: Feb 2009
Location: Victoria, Australia
Posts: 1,946
|
A solution for the TMP36, using a female bullet crimp, opening up both ends and drilling a hole through it. The wire is rated to 200 or 300 degrees. Next step is to heat up an A600 scrap board and see what melts, then the A4000, wouldn't relish the idea of having to remove the coprocessor slot or the bridgeboard sockets.
First temperature test on A600 board, the cookie tray it's sitting on started to buckle so I will need to get a proper 3mm+ steel plate, possibly 5mm. 
Last edited by Loedown; 11 April 2014 at 06:13. |
|
|
|
12 April 2014, 06:52
|
#15 |
|
Precious & fragile things
Join Date: Feb 2009
Location: Victoria, Australia
Posts: 1,946
|
So I got myself an 8mm chunk of steel plate today. I will need to modify the temperature sensor slightly as it reads more accurately off the leads than it does the body of the TMP36, this I knew anyway but tried to semi-fudge it if you will. Will add a copper plate or similar to the ground pin and have that sit on the board instead for a more accurate reading. I can certainly get the board to the desired 120 degrees and the plate maintains that temperature evenly over the board, I am seeing less than 3 degrees of variation from the edges to the centre, understandably it takes some time to cool down.
|
|
|
| Currently Active Users Viewing This Thread: 1 (0 members and 1 guests) | |
| Thread Tools | |
 Similar Threads
|
||||
| Thread | Thread Starter | Forum | Replies | Last Post |
| A1200 power pinout on the pcb? | spoUP | Amiga scene | 4 | 21 June 2013 02:00 |
| HomeMade PCB | coze | support.Hardware | 11 | 13 March 2011 00:55 |
| Wrinkles in PCB | PowerPie5000 | support.Hardware | 10 | 11 December 2010 15:21 |
| Looking for PCB wizzard | kolla | request.Other | 5 | 11 August 2010 12:12 |
| [req] A1000 PCB schematics | Amiga1992 | support.Hardware | 2 | 01 November 2001 15:35 |
|
|


