
|
 25 February 2008, 13:59
|
#61 |
|
AmiBay MegaMod
Join Date: Mar 2007
Location: Manchester, UK
Age: 62
Posts: 1,163
|
... and remember, a good flux is very important, I use Fluxite or Chipquik, they have never let me down yet.
A good quality fine grade resin-cored solder helps a lot too. For SMD work, I use an 12 Watt Antex soldering iron with a needle tip, Antex irons are the mutt's nuts as far as I am concerned. I have higher wattage irons, but they don't get used as much as the 12 Watt iron. If I need anything more heavyweight than this, I use a Solderpro 70 gas iron with a hot air blower tip, this can remove TSOPS easily with no mess. If I really need the big guns, I get the paint stripper gun out. Mind you, I have been doing this for 20+ years..... Merlin |

|
|
25 February 2008, 15:04
|
#62 |
|
-
Join Date: Jul 2003
Location: Helsinki / Finland
Age: 43
Posts: 9,955
|
So to all beginners, a good rule of thumb when using a paint stripper is to often gently try and knock out the chip.. You want to get it out as soon as possible to avoid burning the PCB.
But use too much force and you'll lift traces. It's best to practise on some junk PCBs first. |
|
|
|
25 February 2008, 16:09
|
#63 |
|
AmiBay MegaMod
Join Date: Mar 2007
Location: Manchester, UK
Age: 62
Posts: 1,163
|
It's also best to use the hot air paint stripper gun on it's lowest setting, so that the component heats up gently, too high a setting can burn the PCB as Jope states above.
Too high a setting can also blow components out of place or off the board, not good!! I have removed A600 main chips from an old board and chips from SIMMs with my trusty Black & Decker... Merlin |
|
|
|
26 February 2008, 07:00
|
#64 |
|
-
Join Date: Jul 2003
Location: Helsinki / Finland
Age: 43
Posts: 9,955
|
When you're just stripping a board of chips it doesn't matter that much.. Just blast the chip for a while, then bang the board upside down on the table.. Repeat until what you heated falls out. :-)
But if you're repairing something then it's more important to apply only just enough heat to the area to melt the solder. |
|
|
|
09 March 2008, 06:53
|
#65 |
|
Registered User
Join Date: Mar 2008
Location: Kent UK
Posts: 10
|
err... Just a few hints from me.
SOLDER FUMES ARE TOXIC. IN SOME CASES THEY ARE LINKED WITH CANCER, INFERTILITY AND LUNG DAMAGE. WORK IN A VENTILATED AREA, PREFERABLY WITH SOME AIR EXTRACTION. This is No joke! I used to be an AV installer (think Plasma TVs, Audio systems, Projectors, Whiteboards, Expensive kit and Crestron control systems). One of the first things you get told is "The fumes from this stuff are toxic you know!" Tining wires is best done toward the end of the wire, not up the wire. Start from the wires insulation sleeve to the end of the wire. If you use too much and get a big blob of solder on the end of the wire, you can snip it off  NEVER GRAB AN IRON BY THE HOT BIT! (Seen this done! its not nice) NEVER GRAB AN IRON HOLDER BY THE METAL SPRING TYPE PART AFTER USING IT WITH YOUR IRON (I learned that one the hard way!) EYE PROTECTION COSTS PENNIES BUT EYES ARE NOT REPLACEABLE WEAR SHOES! DROPPING A HOT IRON ON YOUR EXPOSED FOOT IS PAINFUL Remember, the part you're working on will get hot as well. Ok, thats it. Safety facts over. happy soldering |
|
|
|
10 March 2008, 16:09
|
#66 |
|
Registered User
Join Date: Mar 2004
Location: finland
Posts: 1,849
|
Don't drop your iron! With good reflexes you can grab it in mid-air, but catching it on the element side may be painful; I've done it....
|
|
|
|
12 March 2008, 03:40
|
#67 | |
|
Turpentine
Join Date: Oct 2007
Location: Kent, United Kingdom
Posts: 744
|
Quote:
And I'm from Kent as well Could quite possibly be the same company. Could quite possibly be the same company.
|
|
|
|
|
24 April 2008, 11:07
|
#68 |
|
Ya' like it Retr0?
Join Date: Jul 2005
Location: United Kingdom
Age: 49
Posts: 9,768
|
@All
I found this Deal on Fleabay, and its that good i figure i would mention it here http://cgi.ebay.co.uk/SMD-KADA-852D-...QQcmdZViewItem Its a KADA 850D+ (the bigger brother to mine) for £65 to your door 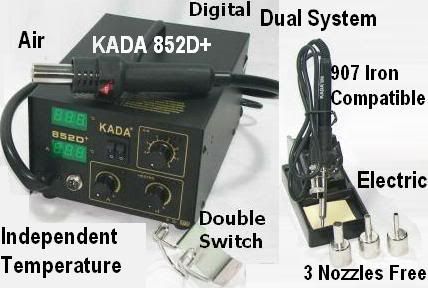 features include
I am seriously thinking of getting this bad boy! if anyone wants to really get into this level of stuff, this really is a great bit of kit for the price![*] Last edited by Zetr0; 24 April 2008 at 12:00. |
|
|
|
24 April 2008, 11:49
|
#69 |
|
Novice in the Black Arts
Join Date: Nov 2004
Location: Kingston upon Hull
Age: 48
Posts: 263
|
That is a fine deal Zetro, I think I probably paid a little less than that for my seperate hot-air and soldering iron stations, but they have no temperature display.
Plus replacement elements and tips... Might be tempted to buy that puppy for myself and sell my old hot air station. Regards Rich EDIT: I notice is ships from China though, could be a long delivery time, and you may have to pay VAT on top. If you DO have to pay VAT, you'll also get whacked with the ~£15 mishandling fee by Parcelfarce. |
|
|
|
24 April 2008, 11:58
|
#70 |
|
Ya' like it Retr0?
Join Date: Jul 2005
Location: United Kingdom
Age: 49
Posts: 9,768
|
@boot_wb
its tempting isnt it, I have to admit, all the stuff so far i have from china, has not had vat on top, or mis-handling fee thats not to say one wouldn't, after all everyone here knows that the postal service (lol, yeah...right) in the UK, is like the evil galactic empire. :/ delivery on average, is 2 - 3 weeks... patience is worth its wait 
|
|
|
|
24 April 2008, 23:06
|
#71 |
|
Zone Friend
Join Date: Feb 2006
Location: Hertfordshire
Posts: 688
|
That's the machine I have on order at present Mr Zetr0.
It's been a week so far and the chap has just confirmed that the item has been shipped. I will let you guys know how long it takes to arrive, if I have to pay custom charges, build quality etc when it does land. And some pictures (now EAB compulsory!) |
|
|
|
24 April 2008, 23:19
|
#72 |
|
Ya' like it Retr0?
Join Date: Jul 2005
Location: United Kingdom
Age: 49
Posts: 9,768
|
!!!
|
|
|
|
02 May 2008, 00:23
|
#73 |
|
Zone Friend
Join Date: Feb 2006
Location: Hertfordshire
Posts: 688
|
Chaps,
The KADA 850D+ arrived today. Exactly two weeks from placing the order, but I have concerns that need answering before I can try it out and start singing it's praises. So here goes.. What's this and is it 240v? Web suggests it's American and possibly 110v. Attachment 16510 Customs also decided to have a game of footie with the back panel prior to delivery.. Attachment 16511 All advice welcome. Last edited by Magno Boots; 17 September 2008 at 23:05. |
|
|
|
02 May 2008, 00:37
|
#74 |
|
Ya' like it Retr0?
Join Date: Jul 2005
Location: United Kingdom
Age: 49
Posts: 9,768
|
@Magno
heys my friend, okay the plug is infact a euro plug type, you can either get a converter for around 3 quid or lop the end off and put a UK plug on , the sticker on the back states the juicey 220v ac is required, kinda handy as only civilized societies have such a power phase  hmmm back panel brusing is a little concerning... best thing would be plumb it up and fire away.... for give the pun, but keep us posted... i am looking to buy one this month if money go's well
|
|
|
|
05 May 2008, 02:38
|
#75 |
|
Zone Friend
Join Date: Feb 2006
Location: Hertfordshire
Posts: 688
|
@ Zetr0 (RE:KADA852D+)
I hacked the US moulded plug off as suggested and fitted a UK plug with no problems .Firstly Everything in the picture you posted above arrived as described. There seems to be one spare element with the package and two free. So three in total. Construction is good and the unit looks professional although the accessories could be a little better. The chrome iron tip was binned and replaced with one of better quality. Never mind though because the actual working of the machine is excellent! The heat build up time is non existent. Full heat on the iron takes less than one minute and the hot air is utterly unbelievable. The digital display means little to me as a novice (all put to max!) but it is very sensitive and can actually be set to the exact temp that may be required. The online tracking provided by the seller is very good and shows exacly where your item is at the present time. Delivery took fourteen calendar days. My mobile number was printed on the address label which I wasn't too happy about. Packaging is ok and comprises of factory box / styrene followed by bubble wrap and miles of parcel tape. To sum up.. A fantastic piece of kit for the price; which far exceeds my needs. There are many hours of fun to be had with this and I would recommmend it without hesitation. If you need a hobby, look no further. BTW.. I managed to find some solder paste tubes from ebay Germany at half the UK online price. Just search for 'AOYUE'. Goods arrived within 5 days. All I need now is something that actually needs repairing. Cheers |
|
|
|
05 May 2008, 12:18
|
#76 |
|
Ya' like it Retr0?
Join Date: Jul 2005
Location: United Kingdom
Age: 49
Posts: 9,768
|
@Magno
thanks for the update, I am really glad that you are liking the unit, its little brother that i have is a god send, so i can on image at present I think i will have to get one of these if finances permit this month. I will say thats a great deal, especially with 3 extra heating elements, mentioning which... it may be best not to run it at full heat on the air gun as its likely to kill the element in 5 minutes  I found that although it takes a few more seconds running mine at 380 is perfect 99% of whats needs must.... infact.... Now I use an £10 Iron in a vice as a hot table... lump the pcb on that.... slap the flux on and use the hot air.... 20 seconds and virtually everything will just lift off... again... thanks for the follow up my friend
|
|
|
|
13 June 2008, 21:06
|
#77 |
|
Amiga-less!
Join Date: Feb 2005
Location: UK
Posts: 1,350
|
I think the whole thing about needing an expensive iron etc is not true.
I only use 6 quid iron that I got off fleabay (plugs straight into the wall). The tip was slightly big so I filed it down some. So far my projects have been: Making up cables Fixing a scandy Adding the extra ram slot on a Apollo 1240 Building a 30W amplifier Building a 7W amplifier Chipping a PSX (with many thanks to Zetr0!) Fitting some awful speakers into a car (had to solder straight to head unit  ) )I have never had any troubles with it. |
|
|
|
15 July 2008, 11:06
|
#78 |
|
Registered User
Join Date: Feb 2008
Location: Sydney, Australia
Age: 54
Posts: 100
|
Looking for guidance !
Hi,
I've got myself two of these beauties from ebay, one for my A3000 and one for my A2000... they have the diode to prevent recharging so I'm hoping they will be a good replacement for the already removed barrels in both miggys. I've had them both for over a month and I still haven't plucked up the courage to solder them onto the motherboards...  I've read through all the soldering hints but still lack the confidence to do it having never soldered anything before... I have an iron ( just a plug in the wall type) with a very fine tip and some solder and a small tub of flux given to me by my inlaws ( who can both solder). What do you experienced chaps recommend I do? A) Give it a go myself in the hope I don't destroy the motherboard. or B) Bite the bullet and ask my mother & father in law to do it for me therefore confirming all the misgivings they had about me and my usefulness? If the answer is "A", can I just solder it whilst the motherboard is in place or does this type of soldering need to be done from the underside of the motherboard? Any chance you could give me a step by step guide on what I should do? Embarrisingly yours, Brakus |
|
|
|
15 July 2008, 13:13
|
#79 |
|
Ya' like it Retr0?
Join Date: Jul 2005
Location: United Kingdom
Age: 49
Posts: 9,768
|
@Brakus
step by step... okay this can be done Step 1 Remove and clean the board / area with non-smear window / lens cleaner, its cheap and damn good! Step 2 holding the unit in place, *use masking tape* put the motherboard upside down, get a small brush (like a synthetic art brush) and brush the flux onto the pins and board. NOW heat your soldering iron, I am assuming that you have a generic 30watt el-cheapo here, this is okay for this job... soo... lets TIN the end of the iron with some solder... if this doesnt take, brush a bit of flux on, and then attempt again... if this STILL wont take you will need to dabb the tip in a metal scouring pad and try again. eventually some will stick. Step 3 in one hand you will be holding .022 solder and in the other the tinned soldering Iron, from here you touch the board and component lead at the same time while adding solder to the joint... the flux will sizzle and allow for all round heating of the component and surface with a wonderful rosin smell Mmmmmmm. this should take no more than 5 seconds. * under 2 if you are pro * [important] After 5 seconds YOU MUST COME OF CONTACT or you will run the risk of damaging the board, if unsure please practice on a non important bit of junk first (NOTHING BEATS EXPERIENCE HERE!!!), goto the local recycle and take some electronic components and PRACTICENow repeat this step for as many component leads you have. JOB *ALMOST* DONE Step 4 Cleaning the area after, this might sound trivial, but Flux is more acidic than most battery explosions!!! so you MUST clean it after use... I use lens cleaner / non-smear window cleaner (you can get the latter in can or bottle) Liberlly cover the area and clean with cloth / tissues once clean the job is DONE! well done I hope you feel a little more useful around the house
|
|
|
|
16 July 2008, 10:54
|
#80 |
|
Registered User
Join Date: Feb 2008
Location: Sydney, Australia
Age: 54
Posts: 100
|
Zetr0, you are a gentleman,
Thank you for the step by step, I will follow it this weekend on the 3000 (it's nice and quiet in the house on Saturday mornings, everyone else sleeps in and I hide in the Amiga room ). I've got some old bits and pieces I can practice on & will let you know how I get on... Cheers again! |
|
|
| Currently Active Users Viewing This Thread: 1 (0 members and 1 guests) | |
| Thread Tools | |
 Similar Threads
|
||||
| Thread | Thread Starter | Forum | Replies | Last Post |
| Amiga gfx mode, i need some hints... | Raislin77it | Coders. General | 2 | 01 March 2013 18:21 |
| Hints on restoring mouseball appreciated.. | Turran | support.Hardware | 6 | 25 June 2012 16:10 |
| Hints for an AROS machine | jman | Amiga scene | 4 | 14 December 2011 20:08 |
| Hints from within the GUI | AmigaBoy | request.UAE Wishlist | 13 | 25 April 2007 18:07 |
| I need GVP HD8+ hints | utri007 | support.Hardware | 1 | 01 March 2007 03:51 |
|
|


