
|
 02 December 2014, 02:17
|
#81 |
|
Registered User
Join Date: Nov 2010
Location: london / uk
Posts: 378
|
I have created a very quick blog post on my website - explaining how to import IFF format tile / sprite sheets into reality - Tutorial 2 will show you how to use the tiles in the map tool to create a room.
Reality Game Creator - Tutorial One - Using the Graphic Convertor to convert sprites / tiles to GRA format. 4/12/2014 0 Comments Welcome to our first tutorial for Reality Game Creator. We are looking at this package with focus on the Adventure Game skeleton Disk which allows you to create a Dizzy Adventure game. The graphics tool in reality is very basic and therefore we recommend you use a stand alone graphic package like Deluxe Paint and import your tiles and sprites sheet. To do this you need to remember two things. Firstly colour 0 is used for transparency Secondly, colour 1 is used for importing the tiles and you therefore need to create a border for each tile/ sprite in this colour. Once you have created your tile or sprite sheet in deluxe paint you need to load up the Reality Master disk. Then select Graphic convertor from the options. 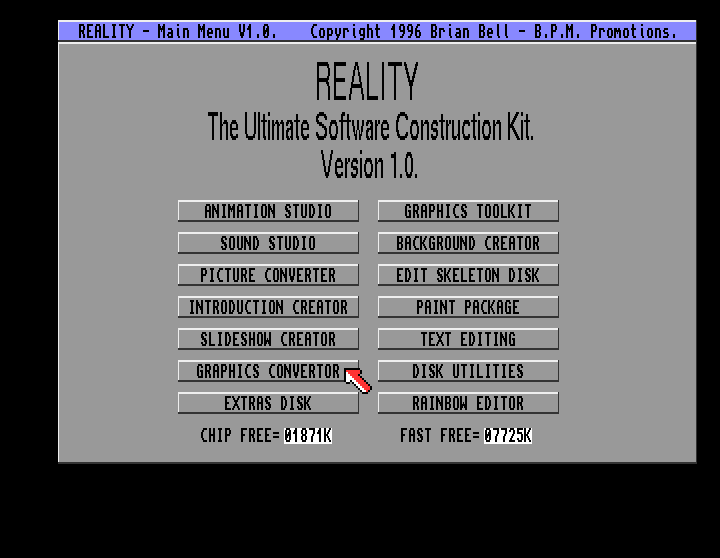 Once in the graphic convertor - select load IFF. In the example below we are loading in dmtiles2.iff 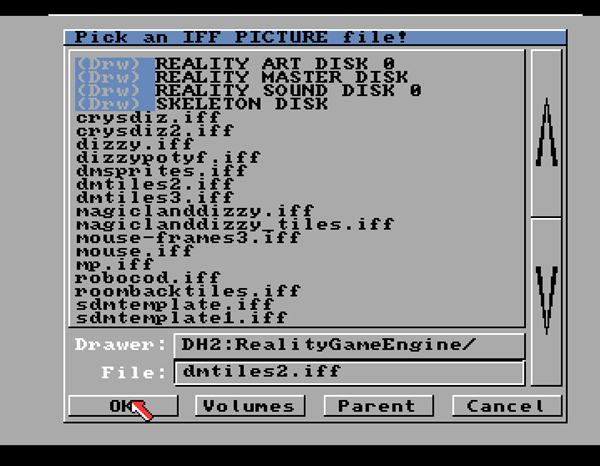 Once you click on OK the file is loaded in. If you have given your tiles / sprites a border using colour one, then Reality will automatically grab them. 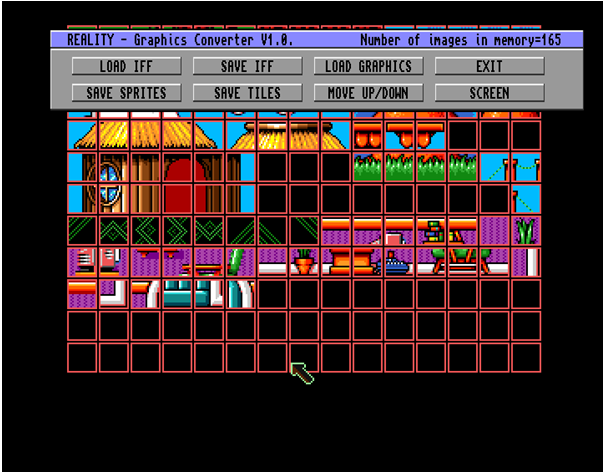 To see if the import has worked correctly, check the top right hand corner where you will see the text – Number of images in memory – if this number is greater than one then your tiles / sprites have been grabbed ok – in this case 165 background tiles have been identified. What we now want to do is save this background tiles in the GRA format used by Reality and therefore we click on Save Tiles 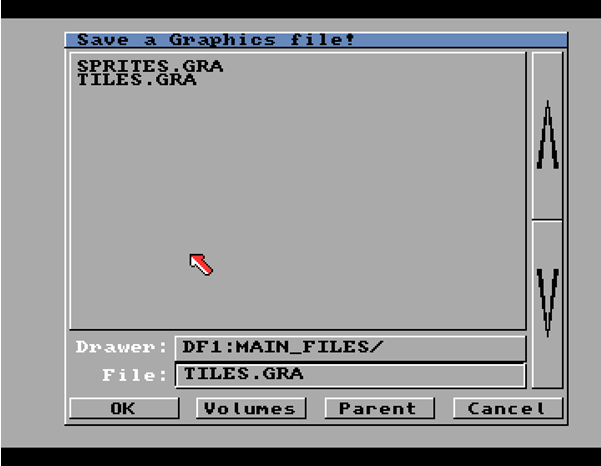 To use the tiles in your game, you need to save the file to your skeleton disk.
You need to overwrite the TILES.GRA file which is located under the main files directory on the skeleton folder. This is the end of our first tutorial. Tutorial two will look at using the tiles in the map editor to create a room. |

|
|
02 December 2014, 11:50
|
#82 |
|
Registered User
Join Date: Dec 2013
Location: GR
Age: 46
Posts: 1,416
|
Nice job, need some program then to separate tiles, i cannot imagine someone to manually separate 150 tiles.
|
|
|
|
02 December 2014, 19:02
|
#83 |
|
Amiga Hardcore Gamer
Join Date: Apr 2005
Location: Sweden
Age: 46
Posts: 1,207
|
Wonderful work both amigapd and nobody. Will look at Reality again this weekend. Since i have just discovered that i can't do the game i want with Backbone.
I have heard that Reality have its own format for music and there is no way convert .mod to that format? I really hope you can do that. Because i want music in my games. |
|
|
|
02 December 2014, 20:40
|
#84 |
|
Junior Member
Join Date: Mar 2002
Location: Exeter, Devon, UK
Age: 49
Posts: 1,705
 |
Huge
 from me! from me!I have spent so much time wondering if I could ever get my head around this program. Ever since it was bundled on a CU Amiga CD (or was it Amiga Format?) Something that has bothered me from day one! It may seem like running before I have learnt to walk but, if it is indeed based on Amos Pro... can things be chucked through a compiler? |
|
|
|
03 December 2014, 00:07
|
#85 |
|
Registered User
Join Date: Dec 2013
Location: GR
Age: 46
Posts: 1,416
|
Judging by the speed of the program it should be compiled. The shoot em up game is (almost) A500 Blood Money speed and potential. Using some huge sprites, dozens of objects and smooth scrolling at all times.
Amigapd what program you used to separate tiles? I had some success with tile studio on PC (1 pixel border around all tiles). Last edited by nobody; 03 December 2014 at 00:20. |
|
|
|
03 December 2014, 00:30
|
#86 |
|
Registered User
Join Date: Nov 2010
Location: london / uk
Posts: 378
|
Reality Game Creator - Tutorial 2 - Background Editor
2/12/2014 0 Comments The Reality Master disk contains a map editor. To access it you need to select Background creator from the main menu. 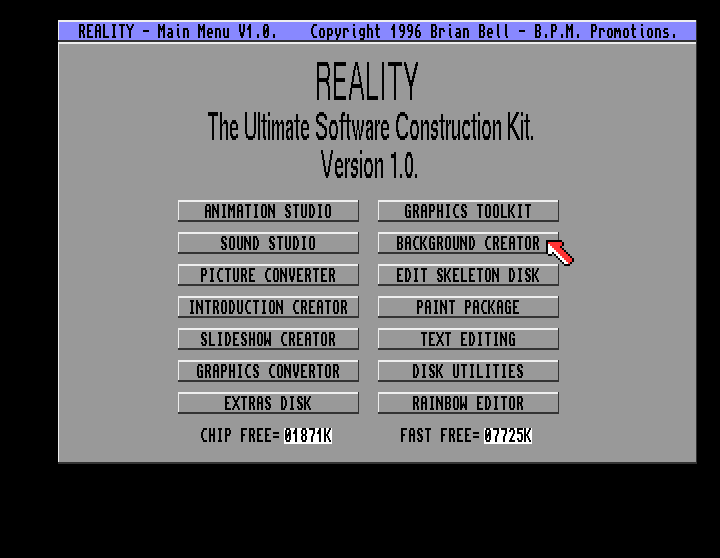 To use the Background creator you need some background tiles. We created these in tutorial one. Select Load from the main screen in the Background creator. 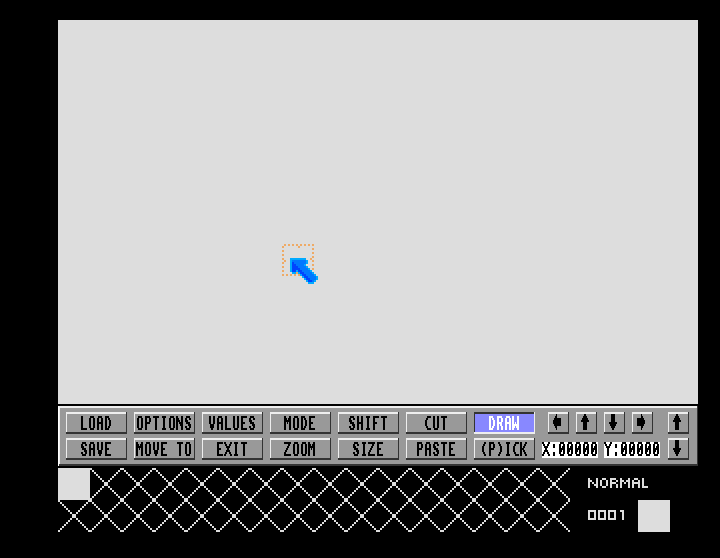 When you select load you are presented with three options. Load Map - This is the map file which remembers the order you placed the tiles Load Values - This sets values for the background tiles which determines how the tiles interact with the player character e.g. are the tiles solid or non solid. Load Tiles - These are the tiles which make up the map. You need to load the files in the following order Load tiles first Then load map Then load values All these files are saved on your skeleton disk under the main files folder. 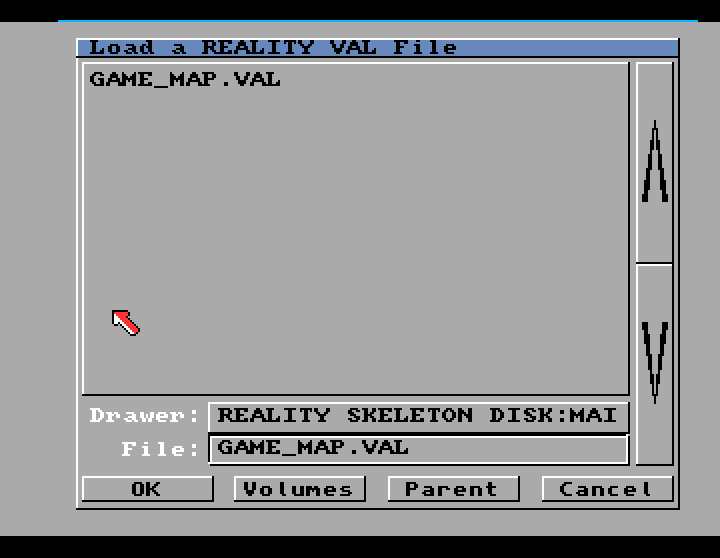 A quick note about the values screen. When you select values you will be confronted by your tiles (as long as you have loaded them in) and numbers next to each tile. I have identified the following for the tiles used in the Adventure Skeleton disk Value 0 = no affect Value 10 = used for ladder tiles Value 50 = used for solid platforms - player can walk on them and land on them Value 51 = these seem to reduce energy if player lands on them. 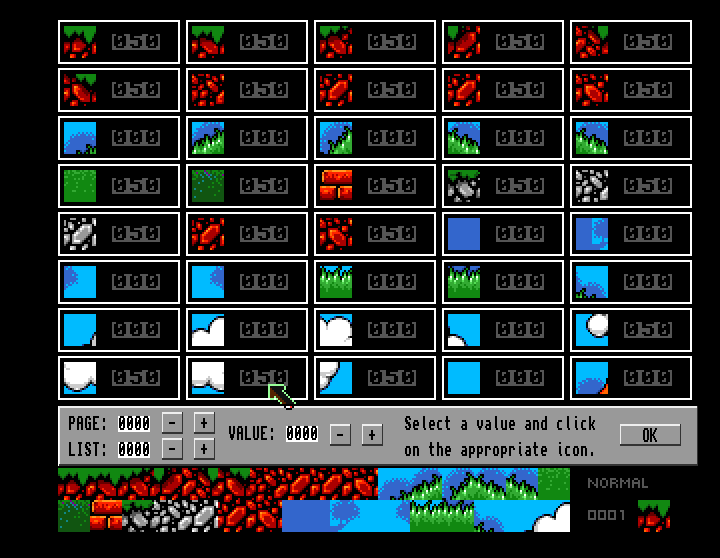 Quick note about the map size option. Select Size from the main screen and you will see you map and the option to increase the width and height of your map. Each screen is 20 tiles wide. Therefore if you want a map seven screens wide the map width needs to b 20 X 7 = 140. If you want the map to be 10 screens wide you need to increase it to 200. Each screen is 12 tiles tall. Therefore if you want a map 4 screens tall you need to set the height to 4 X 12 = 48. In the example below (and the map used by the default game on the skeleton disk) the map is 140 wide (7 screens) and 48 tall (4 screens). The program seems to be able to have very large maps but for your first game start small and add extra areas on once you are confident with package. 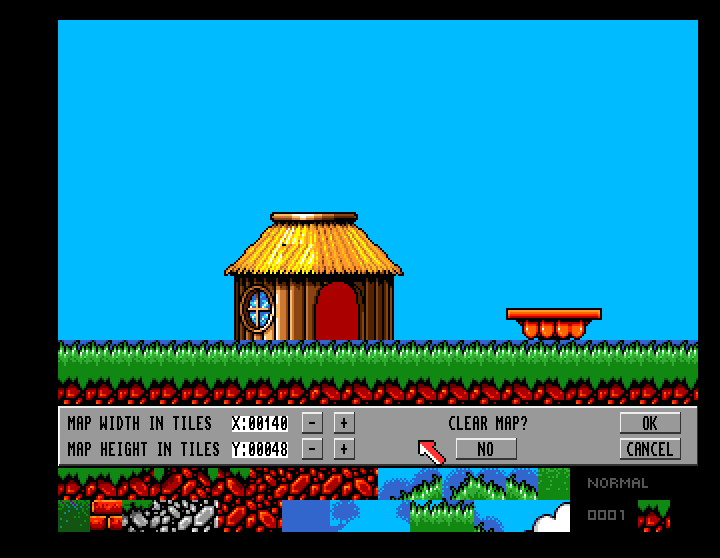 Quick note about the Zoom function. If you have a large map this option allows you to jump to a particular part of the map. As we have changed the tiles to the default game the map is going to look very jumbled. 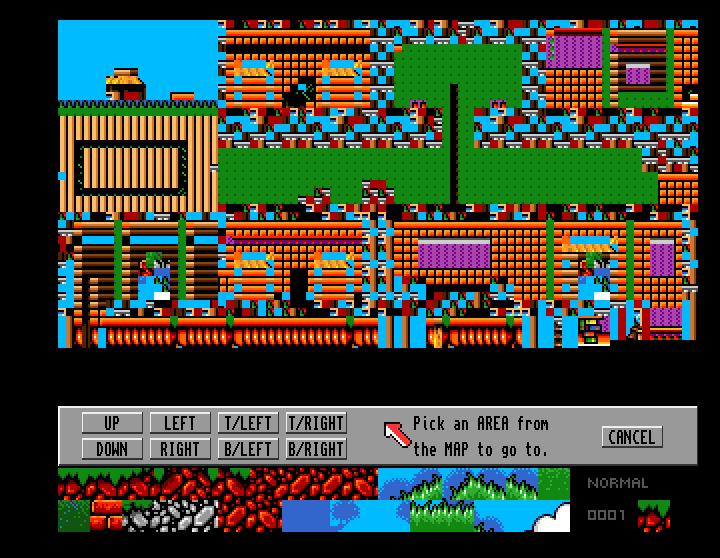 Now for the fun part. The drawing of the map. The two arrows to the right - one pointing up and one pointing down, allow you to scroll through the tiles. The smaller arrows to the left allow to scroll around the map. I really can't emphasize the need to start small. It gets very confusing if you start with a back map. Work on one room first (remember the 20 tiles wide and 12 tiles tall dimensions to map out the screen first). Use your mouse to select the tile you want, the current selected tile is shown in the bottom right corner. Left mouse button places tile and right mouse button will undo last change. Remember the map will automatically sort out the code for moving to the next room. Therefore if you include a tile with 0 value on the bottom, the character will fall downwards to the screen below. If you don't want this to happen include a tile with a solid value of 50. Similarly if you don't want the platyer to move right, include a series of tiles with value 50 to the right of the screen. If you set your tile values incorrectly you can get strange effects, like the player's character disappearing or even walking in the opposite direction. 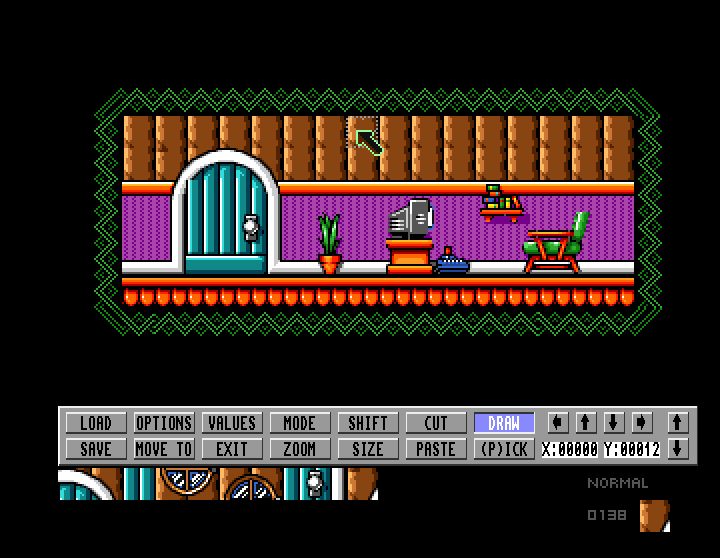 If you have used a map editor before, this is quite self explanatory and easy to use. I have never used a map editor before and created a series of rooms in minutes.
That ends tutorial two. The next tutorial will either look at sprites or setting zones. The aim is to create a simple action where the player enters the door of the house and gets transported to the living room and then when they exit the blue door they go back to screen one. Remember to save your map and values once you have made changes. These should be saved to your skeleton disk. Last edited by amigapd; 03 December 2014 at 00:46. |
|
|
|
03 December 2014, 00:33
|
#87 | |
|
Registered User
Join Date: Nov 2010
Location: london / uk
Posts: 378
|
Quote:
In response to earlier quesitons, I don't think it is possible to add parallex scrolling, but I am only looking at the adventure skeleton disk. In terms of music files, I haven't looked at that yet, but I recal reading somewhere that there was mod file support added. The package probably does use its own music file system, in the same way that it uses its own graphic and map file format. The area which I will need some time and help on is understanding the flag setting part of Reality - I ve worked out how this is used to include baddies and set movement patterns - what I need time on is how use it for actions involving objects. It shouldn't be too difficult, if we use the sample game as a reference point. Last edited by amigapd; 03 December 2014 at 00:41. |
|
|
|
|
03 December 2014, 20:22
|
#88 |
|
Junior Member
Join Date: Mar 2002
Location: Exeter, Devon, UK
Age: 49
Posts: 1,705
|
Ok I spent some time pulling everything related to Reality together!
I am going to put some real effort into trying this program out. So first off, im hunting for some Dizzy stuff to mess around with  EDIT: This is a bit lazy! But can I have the Dizzy tileset please? I want to mess about firstly and then make my own stuff. Last edited by ElectroBlaster; 03 December 2014 at 20:56. |
|
|
|
03 December 2014, 23:59
|
#89 | |
|
Junior Member
Join Date: Mar 2002
Location: Exeter, Devon, UK
Age: 49
Posts: 1,705
|
Quote:
To convert *.mods to a format that Reality will accept is simple-ish... Use Amos! I need to confirm it but some years ago I needed to find out if I could do it and it worked! You need to import a protracker module and the save it out as *.mus. I think? Then the Reality Sound Studio should accept it
|
|
|
|
|
04 December 2014, 00:16
|
#90 |
|
Registered User
Join Date: Nov 2010
Location: london / uk
Posts: 378
|
It probably doesn't look much but but have finally worked out how to get the character to move between two rooms. Will explain how in tutorial 4 (tutorial 3 will be a quick recap on sprites and palettes)
[ Show youtube player ] In the video the animation looks more jumpy than when actually playing it on my laptop - I think it is probably due to my screen capture software. Don't know why, but had an issue with the character not interacting with the platform tiles correctly and walking either beyond where he should or stopping too early - managed to correct it by using the X offset option (more about that in tutorial 4 too). |
|
|
|
05 December 2014, 21:33
|
#91 |
|
Amiga Hardcore Gamer
Join Date: Apr 2005
Location: Sweden
Age: 46
Posts: 1,207
|
I'm already stuck in the first part of the tutorial. When i choose my image from the graphics converter i get this screen and it never disappears.
 I have tried to save my image with Dpaint and PPaint and with all kind of resolutions. (320x200, 320x256, 16, 32 colors etc). I first thought it could my WinUAE configuration. But tried different settings with no luck. Any thoughts what the problem might be? 
|
|
|
|
05 December 2014, 22:26
|
#92 |
|
Registered User
Join Date: Dec 2013
Location: GR
Age: 46
Posts: 1,416
|
Maybe color of the border of tiles is not color 1?
|
|
|
|
05 December 2014, 22:39
|
#93 |
|
Registered User
Join Date: Nov 2010
Location: london / uk
Posts: 378
|
I think you might need a space between the border and the next tile. Have a look back at my tutorial and you will see each tile is separated by a gap of one pixel and each tile is surrounded by its own border. Your tiles share a border on each side.
I'll attach my current tile set. In terms of the complete Dizzy tile set, I have that as a separate IFF,file I think it is too big to load in to reality or I am just too impatient to wait for it to be loaded in. Or it could be the same issue as you have in that the tiles share a border rather than having their own individual border and a space between the next tile. I am currently copying and pasting the ones I want into my tile set using Deluxe paint 4. |
|
|
|
05 December 2014, 23:00
|
#94 |
|
Amiga Hardcore Gamer
Join Date: Apr 2005
Location: Sweden
Age: 46
Posts: 1,207
|
You forgot to attach the image
 There is only a .info file in the archive (icon). There is only a .info file in the archive (icon).
|
|
|
|
05 December 2014, 23:05
|
#95 |
|
Registered User
Join Date: Nov 2010
Location: london / uk
Posts: 378
|
Doh - Take two
|
|
|
|
05 December 2014, 23:10
|
#96 |
|
Registered User
Join Date: Dec 2013
Location: GR
Age: 46
Posts: 1,416
|
Checked the tiles from adventure disk, seems color 0 is used for 1 pixel border between tiles and color 1 is used to draw around every tile.

|
|
|
|
05 December 2014, 23:13
|
#97 |
|
Registered User
Join Date: Nov 2010
Location: london / uk
Posts: 378
|
That is the approach that I have used too.
|
|
|
|
05 December 2014, 23:25
|
#98 |
|
Amiga Hardcore Gamer
Join Date: Apr 2005
Location: Sweden
Age: 46
Posts: 1,207
|
Thanks guys! Got it working
I have prepared a lot of graphics for my game. (It will be about 300 tiles i think). Now i need to find a fast way to create 16x16 boxes of my image so Reality can accept it. Perhaps someone know a tool for that? Doing it manually is very boring and will take a very long time. |
|
|
|
05 December 2014, 23:28
|
#99 |
|
Registered User
Join Date: Dec 2013
Location: GR
Age: 46
Posts: 1,416
|
This is my problem too. Had some success with tile studio on PC but only got 1 pixel border around tiles.
|
|
|
|
06 December 2014, 18:15
|
#100 |
|
Amiga Hardcore Gamer
Join Date: Apr 2005
Location: Sweden
Age: 46
Posts: 1,207
|
Have played around with Reality for a few hours now. Have learned a lot of stuff. But not sure if i can use Reality for my game because there seem to be a limit of how many frames your character can have. Only 7 frames? Can someone confirm? I need 10.
 Also, maximum frames for objects is 5 (enemies and stuff)? Haven't checked if there is a limit in backbone for this. Last edited by hipoonios; 06 December 2014 at 18:22. |
|
|
| Currently Active Users Viewing This Thread: 1 (0 members and 1 guests) | |
| Thread Tools | |
 Similar Threads
|
||||
| Thread | Thread Starter | Forum | Replies | Last Post |
| 3D construction kit | dlfrsilver | project.SPS (was CAPS) | 11 | 02 July 2011 03:57 |
| 3D Construction Kit | otro | request.Apps | 4 | 19 October 2007 22:18 |
| 3D Construction Kit II | Solid Snake | request.Apps | 6 | 13 November 2006 17:09 |
| 3d construction kit? | gimbal | request.Apps | 3 | 12 January 2005 13:01 |
| 3d Construction kit 2 | thinlega | MarketPlace | 0 | 25 October 2002 22:05 |
|
|


