
|
 01 March 2018, 15:31
|
#21 | |
|
Registered User
Join Date: May 2001
Location: ?
Posts: 19,644
|
Quote:
Funny I just read, the mini x-pander does not work with 1541 Ultimate! |
|

|
|
02 March 2018, 02:15
|
#22 |
|
Ruler of the Universe
Join Date: Mar 2010
Location: Lanzarote/Spain
Posts: 6,185
 |
Eeeeh... The thing is that I didn't contact the seller and now after your comments I'm not sure if it will work with the Ultimate (my only point of having this), maybe he didn't try it even.
... So wish me luck 
Last edited by Retrofan; 02 March 2018 at 02:24. |
|
|
|
02 March 2018, 03:02
|
#23 | ||
|
Registered User
Join Date: May 2001
Location: ?
Posts: 19,644
|
Quote:
http://idoregesz.hu/product/expansio...commodore-c64/ Quote:
|
||
|
|
|
02 March 2018, 04:02
|
#24 | ||
|
Ruler of the Universe
Join Date: Mar 2010
Location: Lanzarote/Spain
Posts: 6,185
|
 Thanks again mate; maybe I read that and I forgot when I read your comments. It was very late and I was more than tired. Thanks again mate; maybe I read that and I forgot when I read your comments. It was very late and I was more than tired.Now, I'm worried about my homemade PSU. I've edited my concerns, but I will repeat them here. It's a copy and paste. NOTE: If you have seen how I make my posts, I use to edit them a LOT (my bad englsh -lol, my mechanical keyboard-/my aim for perfection/new ideas that come to my mind, etc), and I also don't like to make new posts just to be the first in the list of new posts; I prefer just to update them and in the case that you are interested, just search&read the updates. Well, to the point, this is what I just edited some minutes ago: Edit: Now, taking a look with the multimeter: Robocop II cartridge inserted. Booting it with the homemade PSU and having the multimeter black pin connected to ground on the cart port and the red one connected to the first (upper) pin where the led connector plugs in, it shows 4,120 volts. Using the Ebay PSU and making the same it shows 4,49/4,5 volts. Remember that I'm using the original cable of the C64 PSU connected to the power saver plus the cable from it to the C= power din connector... I'm losing a lot of volts with so long cables. I'm actually thinking in just shortening the cable. Remember that it is showing some wonderful 5,1 volts from the homemade PSU using the original cables. You know that it all depends in the lenght of the cable and the thickness it has. Edit: This right angled adapter has to work perfectly well with the Ultimate as Akira commented. I've received a nice email from the seller that is following this thread too  Quote:
 BTW, take a look at the cables he is using. It's clear that he looks for the best components. Also, read this part of the description: Quote:
This is the store Peter has, recommended : http://idoregesz.hu/Ups... Out of Stock... It seems that this thread has attracted more visitors to his site Another thing. I've ordered a couple of "7 pin DIN REAN gold plated contacts" as I will make a new shorter cable for the PSU. And I've also painted the Ultimate II+ letters black. This way it matches perfectly well with my new C=64 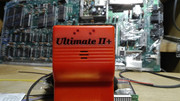 I made something similar time ago with the black Ultimate II painting the letters white. Ahem... I haven't connected this new Ultimate II+ yet. I'm only downloading games and demos for the usb stick and that's all. I also have pending my bwack's kernal switcher mod. I've just got to get all of the pieces of hardware/programmed chips to solder them all together and try it. And the last edit is just to tell that today is/was my birthday I've got an unopened parcel as my gift here since like three months ago that "has to contain" a C=128 with some more things that costed me 50€ -a real bargain-. It is lacking a PSU and a key, but in this long time I've bought both things. Today's Edit 05/03: I actually have very few time if I have any. In this time I've shortened 25 cms the cable that my Ebay power saver has (from it to the C=) and I have pending to shorten the cable between the PSU and it (come on, it's like one meter and a half of cable to connect two things that are one beside another). I just don't think I'll use the REAN din connector. I think that I just will cut the long cable the C=64 PSU originally uses. This PSU is modded to be seen (showing the volts and current on screen), so a short cable is what it needs. Cutting like 1,25 meters of cable I think I'll get near 0,5 volts more. About my C=128, it's still unopened in the box. I won't open it till I finish this mod and also mostly because I don't have room for more than a project at a time. Well, in fact the list of things pending includes for example getting the parts and mount the bwack's kernal switcher and later install it/ Getting the parts to try to rescue my dead C=64 "left for parts" mobo / and Three more unrelated things that also take time, like as an example to change the fuel pump and make an oil change of my 1972 VW Beetle... . And a lot of things more than I won't explain here but that take a lot of hours.To finish today's edit just to comment about my bwack's kernal switcher board. Yesterday I was told that the boards (3) have been made ant that they are on the way and today I've been also told that the chips have been programmed are that they have just been sent. I already have some ceramic caps and I'm also awaiting for some resistors. Edit: I'm now only awaiting for the bwack's board and the programmed chips
Last edited by Retrofan; 28 April 2018 at 01:57. |
||
|
|
|
10 March 2018, 23:26
|
#25 |
|
Posts: n/a
|
Btw, that VU meter looks amazing.
|
|
11 March 2018, 23:14
|
#26 | |||||
|
Ruler of the Universe
Join Date: Mar 2010
Location: Lanzarote/Spain
Posts: 6,185
|
Quote:
 . And welcome to EAB. . And welcome to EAB.There are two guys more in Youtube trying to use this VU meter: GadgetUK164 that has told that is planning to use it inside a clear C=64 case and also Retro Marky that has now installed another VU Meter the same internal way with a clear case and has showed his mod after chatting with him about my mod: [ Show youtube player ] I think that it's better to have it just like I've made it. Edit: About Peter's cartridge angled adapter, he yesterday told me: Quote:
Quote:
Quote:
And also I won't get any benefit changing the original PSU din connector for a new gold platted REAN one using such a short cable, just my thoughts. I mean that you get more volts shortening the cable than using gold platted pins. Edit: Remember that these are just my opinions, the ones of a poor solder-junkie* *Wikipedia's definition about the "solder-junkie" term: Quote:
Last edited by Retrofan; 29 April 2018 at 02:32. |
|||||
|
|
|
25 March 2018, 20:32
|
#27 |
|
Ruler of the Universe
Join Date: Mar 2010
Location: Lanzarote/Spain
Posts: 6,185
|
So the angled cartridge adapter has arrived and it works great
[ Show youtube player ] What a pity that in the video you can't see that the "Ultimate II+" letters have been painted BLACK. Yes, they are black although Youtube insists showing them red or whatever. BTW this is the very first time that I use this wonderful Ultimate II+, so don't ask me why I do not use the crt version of the game but the D64; it's just that I haven't tried any before and I don't know if they have the same intro that I want to listen. I've fixed the problem I had with the PSU just connecting the 5v cable for the volts meter from the board's dc 5v output instead that in the middle of the cable as I was doing. I've also shortened the cables and changed the psu din connector using a Rean one with golden pins: 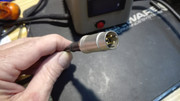  Edit: If you are wondering what's that switch that hasn't a hole in the rear part, that's a JiffyDos one, but I want to use Bwack's one instead. I still have to get a part to try to install it. Edit: Things to fix: I'll have to paint it again. (Edit 27/04: Done) I didn't use plastic primer and the paint shows now some fissures on the right. And I'll also add a diode to the connections of the audio, as I'm seing some bars in the video on screen. (I'm not so sure that they were there for real, but just in case). (Edit 27/04: My problem was that I was using a scart switcher plugged in to the main scart switcher. Using just the good one the image is perfect.) As you can see, it's a complete show running it in the dark :[ Show youtube player ] Last edited by Retrofan; 29 April 2018 at 02:35. |
|
|
|
09 April 2018, 01:52
|
#28 |
|
Ruler of the Universe
Join Date: Mar 2010
Location: Lanzarote/Spain
Posts: 6,185
|
Just to show something. I've seen new C64 "clear" cases, but I can't find a link to a C64 breadbin one. I know there is one, but I can't find the link, so please share it.
In any case, just to comment that while I'm re-painting the top part of the case, I've put the clear C64 breadbin dust cover I bought in Ebay over it, just to keep it without dust:  It's in fact more transparent than the C64C translucent new case. Yep, my idea is that having a complete C64 cover made the way that the C64 dust cover is, it could be nicer than the commented translucent C64C version is. Last edited by Retrofan; 09 April 2018 at 02:14. |
|
|
|
09 April 2018, 05:59
|
#29 |
|
Unregistered User
Join Date: Sep 2012
Location: Copenhagen / DK
Age: 43
Posts: 4,190
|
I don't think there's a clear breadbin case.. I've only ever seen the C64C project.
|
|
|
|
14 April 2018, 01:47
|
#30 |
|
Ruler of the Universe
Join Date: Mar 2010
Location: Lanzarote/Spain
Posts: 6,185
|
I can't find it now, but I found something, an image that I don't find.
In any case it could be easily done. Just take a look to how my breadbin looks like while I'm painting the top part (it's ready again now) and I've put the new dust cover over it: 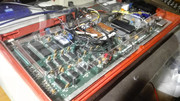 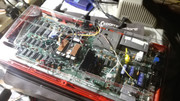 It looks much better I believe, so something could be done this way I think. BTW about the latest image hosting place I selected; postimage.org... "postimg.ORG domain is locked by Registry, no prior notice." So those images have been deleted now forever. Last edited by Retrofan; 14 April 2018 at 02:03. |
|
|
|
14 April 2018, 16:29
|
#31 | |
|
Banned
Join Date: Aug 2005
Location: London / Sydney
Age: 47
Posts: 20,420
|
Quote:
Trust me though I've tried a good 5 or so image hosting sites. |
|
|
|
|
14 April 2018, 16:37
|
#32 | |
|
Banned
Join Date: Sep 2011
Location: Cardiff, UK
Age: 51
Posts: 2,871
|
Quote:

|
|
|
|
|
14 April 2018, 17:10
|
#33 | |
|
Ruler of the Universe
Join Date: Mar 2010
Location: Lanzarote/Spain
Posts: 6,185
|
Quote:
|
|
|
|
|
14 April 2018, 18:35
|
#34 |
|
Banned
Join Date: Aug 2005
Location: London / Sydney
Age: 47
Posts: 20,420
|
That suck. I don't have an account, select Start Uploading, navigate to / double click the image, select Upload and grab the desired format URL.
|
|
|
|
14 April 2018, 22:48
|
#35 |
|
Ruler of the Universe
Join Date: Mar 2010
Location: Lanzarote/Spain
Posts: 6,185
|
Thanks Damien. That works, but I would like to have a thumbnail image as I'm using instead.
Edit: Postimage.org works again, but some old links don't seem to work. Last edited by Retrofan; 29 April 2018 at 02:38. |
|
|
|
15 April 2018, 02:34
|
#36 | |
|
Ruler of the Universe
Join Date: Mar 2010
Location: Lanzarote/Spain
Posts: 6,185
|
Just to show the internals of my VU meter. I've got to say that it comes in two parts, so you have to solder the leds to the board. I forgot to desolder the momentary switch there and when I thought about using an external switch I didn't like the idea of desoldering 48 pins
 So I just tried soldering the external switch connected to the existing one:  I didn't believe it could work, but it does as you've seen. Right now I've found why: https://www.sweetwater.com/insync/momentary-switch/ Quote:
Links to see how it works: Please play it from minute 2' 21" better: [ Show youtube player ] And the first, using the switch: [ Show youtube player ] Edit: I've changed now the 5V regulator, just in case. And also I'll explain now how I've made the stands for the VU meter board. I've cut and sticked with epoxy two 5 or 4mm (I don't remember) pieces from some case that had them (made for using screws). As the stands have to be very short, I didn't like the idea of using screws as I thought that they could make too much pressure on them and also then it could happen that those screws could fall over the mobo making some short. So I decided to use/find some plastic replacement for the screws. I've finally taked a cotton Q-tip, cutted it, applied fire with the lighter and then I've flattened it on a side with the flat surface of a wet knife (this method has now been patented ).Edit 2: Changing the 5v regulator I'm getting more volts now, 4,6-7 or around. I think I will add an on-off switch to the VU-meter board so it won't work if I wish. Maybe I'll add a flat led for that too The vertical cartridge adapters are back in stock. Ahem... I've been forced to get another
Last edited by Retrofan; 19 April 2018 at 03:57. |
|
|
|
|
19 April 2018, 02:48
|
#37 |
|
Ruler of the Universe
Join Date: Mar 2010
Location: Lanzarote/Spain
Posts: 6,185
|
Offtopic post
Do you remember that I said that I was going to try to repair my "left for parts for years" C64 mobo?
Today I've received the last part that it was missing (ahem; that I took from it); the power din connector (this is his story). I've had to twist a bit the two front pins but the new one fits perfect. I've soldered it, connected the cables, powered it on... and the C64 has booted like the first day it was ever tried .Using the Dead Test cartridge everything was fine but the sound... No sound. The 8580 was also getting too hot although checking the voltages they were right. So as I've seen that I had a spare one left I've changed it... and now it all works like a charm  Next step will be to change the caps, put thermal heatsinks and install it inside a nice case that I've bought. I've also had to buy a set of screws as I didn't have them either. Last edited by Retrofan; 28 April 2018 at 00:53. |
|
|
|
28 April 2018, 00:48
|
#38 |
|
Ruler of the Universe
Join Date: Mar 2010
Location: Lanzarote/Spain
Posts: 6,185
|
Now I've installed a Bwack's kernal switcher. It is great because you can switch among four different kernals and you have different led colors for each one. You just have to press for a second the Restore key* and then you select the one you like to be booted
  I've also installed a switch for the Vu meter leds, so you can switch it on or off. I've had to modify an on-off button switch as I didn't find any with such a tiny button as the momentary one has. I've also put a flat led for it on the left side, but I'm awaiting for a blue one. The mod isn't finished yet. I want to add a fan over the sids (I will see if it gives any problem) and I'll surely change the crystal of the video. *(Edit) Just to comment something. I've seen that there are (what I've found) two places to get a set of caps for a C64. I want to recommend Console5.com. And talking about the Restore key, they add: "Also includes a 4.7nF capacitor for C38. Exchanging the factory 51pF for this 4.7nF capacitor returns soft-touch function to the RESTORE key." Last edited by Retrofan; 19 July 2018 at 02:47. |
|
|
|
28 April 2018, 07:55
|
#39 | |
|
Registered User
Join Date: May 2001
Location: ?
Posts: 19,644
|
Quote:
|
|
|
|
|
28 April 2018, 10:24
|
#40 | |
|
Ruler of the Universe
Join Date: Mar 2010
Location: Lanzarote/Spain
Posts: 6,185
|
Quote:
Edit: I'm thinking now that it seems more related to the modulator. I've got new caps there though. So I'm actually looking for some modern modulator replacement. And another thing: I've bought an external VU meter for another C64. I'll also change the voltage regulators with new RECOM DC-DC converters just like Jan Beta showed today
[ Show youtube player ] . They cost an arm, but...Many thanks to him for making such great videos. Edit: I've added a 12v fan. It runs fast and it's very silent. I've used diodes too. There is no noise in the image in the Tv. Thanks to GadgetUK for his video installing a fan: [ Show youtube player ] 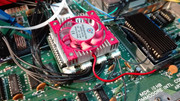  I don't know if it's normal that I have like 10,15V in the C19. I haven't changed the 12V regulator yet. Edit; I've changed the fan. The one I've showed was slow as hell, no airflow. No photos but it's cooler now. Last edited by Retrofan; 30 April 2018 at 00:08. |
|
|
|
| Currently Active Users Viewing This Thread: 1 (0 members and 1 guests) | |
| Thread Tools | |
 Similar Threads
|
||||
| Thread | Thread Starter | Forum | Replies | Last Post |
| Fs-c64 | Bladeforce | support.FS-UAE | 3 | 11 October 2015 22:32 |
| Last Ninja Remix C64 cart, and Myth C64 cart | laffer | MarketPlace | 0 | 15 January 2014 21:38 |
| c64 .DATS and playing games on the C64 hardware | pubzombie | Retrogaming General Discussion | 22 | 15 April 2011 13:40 |
| C64/3D vs C64/3D vs Picasso IV (or both) | alewis | support.Hardware | 19 | 30 November 2006 11:36 |
| c64 | Traquer | MarketPlace | 20 | 31 January 2006 11:35 |
|
|


