
|
 03 November 2014, 16:15
|
#1 |
|
Hardware Design Engineer
Join Date: Jan 2013
Location: www.KMTech.co.uk
Posts: 372
|
Gotek Extension Board - Prototype ready and working perfectly, pics & video
Here's the first prototype of the Gotek extension board. Some of you may have seen the 3D software generated pic I posted last week.
This board interfaces with a Gotek drive and lets you mount the drive inside your case and have full access to the controls from the outside in a suitably retro manner. I works perfectly, and is really cool to use. I decided to go with high quality image-change buttons. I'm glad I did now as they are much nicer to use than the cheap and cheerful ones fitted to Gotek drives as standard. This board is designed to fit inside the A500 and A1200. It mounts inside the A500 with four adhesive mounting posts. The A1200 mounting system is more solid as it uses the same mounting points as the system LEDs (and two adhesive mounting posts). If anyone is interested I will post some pics showing how the board and the Gotek drive connect together. I have another nine of these boards that I will be selling from my eBay store (if they sell ok I will have more made). I was thinking two purchase options: 1. Kit form. The board will have the buttons, USB port, USB patch cable, LEDs and pin headers pre-fitted, the buyer would need to fit the numeric display, and solder Dupont connectors to the Gotek LEDs and buttons. The buyer would need to provide his own Gotek drive. 2. Fully assembled. This would comprise of a fully modded Gotek unit, and a fully assembled extension board. The buyer would just need to connect it all together and install it inside the case. I may even sell a complete computer with everything pre-fitted if there was enough interest. Here are some pics of the A500 installation, and a Youtube video link: [ Show youtube player ]  
|

|
|
03 November 2014, 17:12
|
#2 |
|
Registered User
Join Date: Jan 2013
Location: Coventry/UK
Posts: 63
|
Very nice solution. Ill definitely have one when they are available. How much do you think they will cost in kit form?
|
|
|
|
03 November 2014, 17:19
|
#3 |
|
Registered User
Join Date: May 2013
Location: UK
Age: 44
Posts: 351
|
great colour choice
 wasn't sure if the red would go with the blue, but they're such small points the red just helps highlight the function, and ties well with the red display. wasn't sure if the red would go with the blue, but they're such small points the red just helps highlight the function, and ties well with the red display.
|
|
|
|
03 November 2014, 17:25
|
#4 | ||
|
Hardware Design Engineer
Join Date: Jan 2013
Location: www.KMTech.co.uk
Posts: 372
|
Quote:
Quote:
|
||
|
|
|
03 November 2014, 19:45
|
#5 | |
|
Registered User
Join Date: Jan 2013
Location: Coventry/UK
Posts: 63
|
Quote:

|
|
|
|
|
04 November 2014, 11:05
|
#6 | |
|
Hardware Design Engineer
Join Date: Jan 2013
Location: www.KMTech.co.uk
Posts: 372
|
Quote:
For any one else who might be interested in this item, I need time to prepare the assembly instructions. It's not too difficult to assemble - there are eight wires to solder which any beginner could do. The numerical display needs modding to move the four pin headers a few mil. This is also very easy if you do it right, but not so easy if you go about it the wrong way. I don't want any accidents, so I want to take my time and write some very clear instructions. Below is a pic of what the kit will look like (there will be approx eight more wires and a few more bits and bobs). Also a few pics of the A1200 intallation.  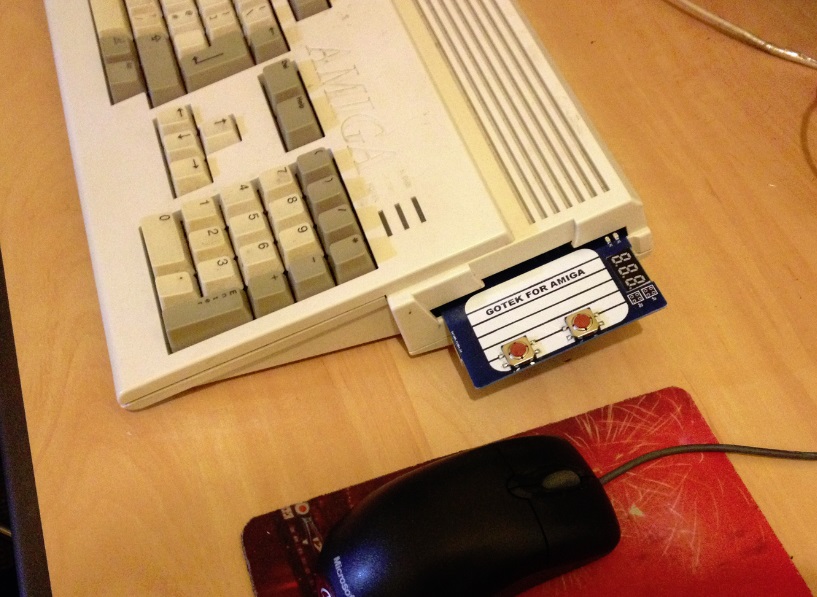 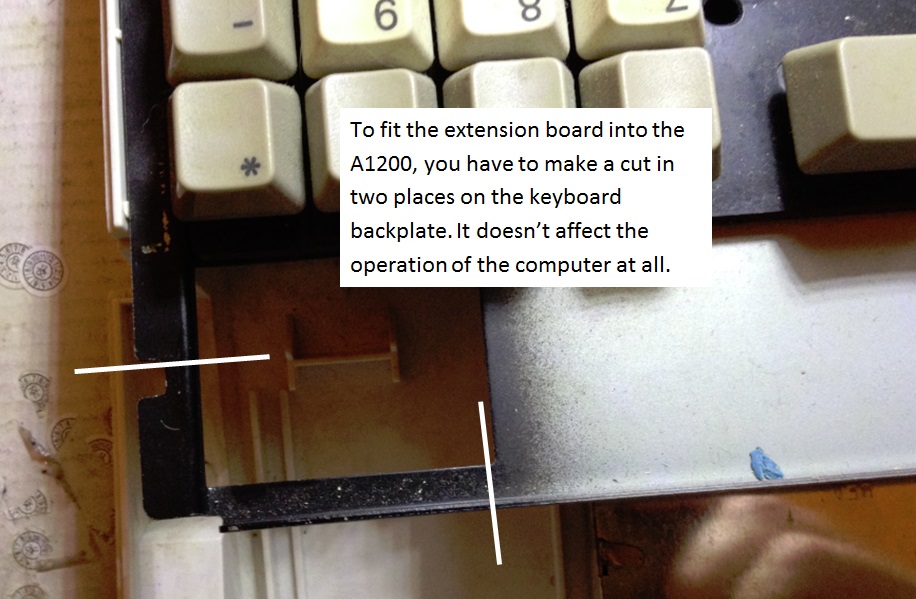 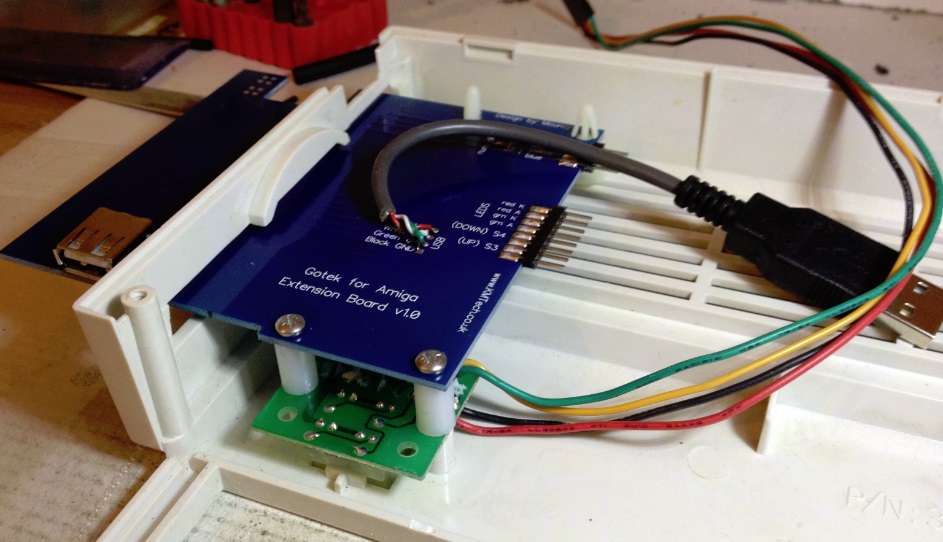 The first batch of 8 of these boards is now on sale in my eBay store. Last edited by Mounty; 07 November 2014 at 13:13. |
|
|
|
| Currently Active Users Viewing This Thread: 1 (0 members and 1 guests) | |
| Thread Tools | |
 Similar Threads
|
||||
| Thread | Thread Starter | Forum | Replies | Last Post |
| I am working on a FPGA board (prototype) | K.C.Lee | Amiga scene | 53 | 26 August 2019 12:51 |
| Gotek floppy emulator not working | Cooljerk | support.Hardware | 10 | 16 October 2014 08:27 |
| Where can I find a Zorro prototype board? | gulliver | Hardware mods | 6 | 04 July 2013 11:20 |
| Working Natami Prototype | gilgamesh | Amiga scene | 51 | 29 May 2010 22:29 |
| A1200 - Is this an extension board? | HRMeinert | support.Hardware | 7 | 14 May 2009 19:39 |
|
|


