
|
 12 August 2013, 18:40
|
#1 |
|
Disco Dynamite !!
Join Date: Aug 2013
Location: Chester Le Street, Co. Durham
Age: 47
Posts: 18
|
Opening up an A500 'heavy' power brick??
Hi guys. Does anyone know how to open up / get into a 1990 'heavy' style A500 power brick ?? I need to replace the outgoing cable but there ain't no screws or owt !? Help !!
|

|
|
12 August 2013, 19:09
|
#2 | |
|
Computer Nerd
Join Date: Sep 2007
Location: Rotterdam/Netherlands
Age: 47
Posts: 3,751
|
Quote:
|
|
|
|
|
12 August 2013, 19:19
|
#3 |
|
Disco Dynamite !!
Join Date: Aug 2013
Location: Chester Le Street, Co. Durham
Age: 47
Posts: 18
|
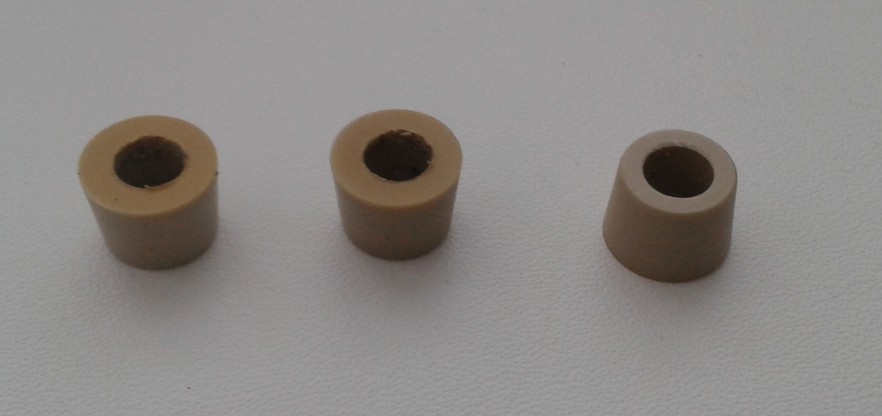
Hmmmmmm... pic attached. i can't find any way of getting to the screws (pads removed) !? Utter mystery !! lol
Last edited by discopete; 12 August 2013 at 19:46. |
|
|
|
12 August 2013, 19:32
|
#4 | |
|
Registered User
Join Date: Sep 2006
Location: Thunder Bay, Canada
Posts: 4,323
|
Quote:
|
|
|
|
|
12 August 2013, 19:55
|
#5 |
|
Disco Dynamite !!
Join Date: Aug 2013
Location: Chester Le Street, Co. Durham
Age: 47
Posts: 18
|
Okay... sounds like a plan. I didn't want to destroy the case as it is beautifully white (untarnished by time !!)... If I had my way these power bricks would all be replaced by modern day compats... but the people I do refurbs for generally want the originals. Hey ho... lets drill it

|
|
|
|
12 August 2013, 20:21
|
#6 |
|
-
Join Date: Jul 2003
Location: Helsinki / Finland
Age: 43
Posts: 9,861
|
Yeah, just puncture the pads, the screws are in there.
Don't take a screwdriver to the seam between the halves, undo the screws first. :-D |
|
|
|
12 August 2013, 20:29
|
#7 |
|
Disco Dynamite !!
Join Date: Aug 2013
Location: Chester Le Street, Co. Durham
Age: 47
Posts: 18
|
Yeah, tried opening the two halves at the mid point but no... not happening !! lol
|
|
|
|
12 August 2013, 22:40
|
#8 |
|
Unregistered User
Join Date: Sep 2012
Location: Copenhagen / DK
Age: 43
Posts: 4,190
|
Use a small self-tapping screw into the 4 circles. When it bites, pull out the cap and you'll see the screw. No need to replace the now destroyed cap. Does it look that bad with 4 visible screws?
|
|
|
|
14 August 2013, 12:18
|
#9 |
|
Old Hippie user
Join Date: Jul 2013
Location: Hjortkvarn Sweden
Posts: 43
|
One way to make it look better would be to change the screws to Torx same size and get som plastic caps for the torx screws.. The ones that is made to fit in the torx hole on the screw to cover the screw.. commonly used to hide screws in furniture...
|
|
|
|
14 August 2013, 19:34
|
#10 |
|
Disco Dynamite !!
Join Date: Aug 2013
Location: Chester Le Street, Co. Durham
Age: 47
Posts: 18
|
Yeah, that sounds cool. So am I right in thinking that those four circles are where I should be very carefully aiming the drill ??
Also - same kind of subject. I have an A500 PSU and an A500+ board. Now I know the 500 and 600 bricks were different currents (voltages too.. slightly !?) The 500 PSU initially powers the 500+, but does the 500+ require more juice on a permanent basis. I'm having such problems with these I am quite literally going to make a new 'stable' bench test supply for working with... but it's what's 'acceptable' to mix and match when doing up and selling. I have always stuck rigidly 'must be correct supply for model'... but my question is... does it?? |
|
|
|
14 August 2013, 21:18
|
#11 |
|
Registered User
Join Date: May 2010
Location: Helsinki, Finland
Posts: 1,341
|
They all nominally supply the same voltages, +12V, +5V and -12V. You can use any of them with any machine (A500/A600/A1200). There will be slight individual differences in the voltage with any two supplies but it's just a question of design/manufacturing tolerances, not because it is intended.
The current rating doesn't really matter in the case of an unexpanded system, but once you start adding accelerators and things you may need more power. |
|
|
|
14 August 2013, 21:20
|
#12 |
|
Unregistered User
Join Date: Sep 2012
Location: Copenhagen / DK
Age: 43
Posts: 4,190
|
Yes, the four small circles are conical plugs which covers the screws. Can't see how to get them out without damaging them.
All Amiga 500, 500+, 600 & 1200 PSUs can be interchanged as long as we talk about non-expanded machines. I don't think the 500+ needs more power than the 500 as usually power goes down with later production chips. I think my 1200 is the one which uses least power compared to the 500 and 600s. I'm not sure if maybe the early 500s needed a bit more power. |
|
|
|
14 August 2013, 21:28
|
#13 |
|
Disco Dynamite !!
Join Date: Aug 2013
Location: Chester Le Street, Co. Durham
Age: 47
Posts: 18
|
Ah brilliant.
It just seems that each one has the model number of it's 'shipped' counterpart moulded into the underside plastic but I wasn't too sure. But that's great... I thought that despite having different things on the bottom, they all still appeared interchangeable. This HxC convert we're doing has a brand new A500 USA supply but it is a A500+ UK board (running the HxC module). It *seems* to work fine, just checking longevity Cheers, fine sirs  Pete |
|
|
|
15 August 2013, 01:04
|
#14 |
|
Registered User
Join Date: Jul 2005
Location: Australia
Age: 46
Posts: 666
|
A suggestion that may be worth trying if you haven't drilled the plugs already. Try hot-gluing something (screwdriver, nail, etc) to the plug and pulling it out, some dent repairers use this method along with a small slide hammer to pull dinged panels.
All this talk of power supplies got me curious so I grabbed my old A500 psu and was surprised to notice that mine is quite different to those identified by Ian Stedman or Chain, has anybody seen one of these Speedy-Tech supplies before? |
|
|
|
15 August 2013, 14:11
|
#15 |
|
Old Hippie user
Join Date: Jul 2013
Location: Hjortkvarn Sweden
Posts: 43
|
Best way to drill is to use a smaller drill at first like. 1-2mm an try to drill in the center.. then change to 6-8 mm to let a philips screwdriver get to the screws. loosen all 4 perhaps needed to loosen all a bit at the time and separate the halves to get more room for the screws to let go..
|
|
|
|
11 August 2017, 10:40
|
#16 |
|
Puttymoon inhabitant
Join Date: Mar 2007
Location: Tromaville
Age: 46
Posts: 7,539
  |
|
|
|
|
11 August 2017, 13:04
|
#17 |
|
Registered User
Join Date: Feb 2016
Location: New Forest
Posts: 196
|
OK I have like well over fifty of these bricks and they vary a lot. Some have covered holes some not. The position of the holes varies depending generally on where they were made. The depths of the screws also vary and can be quite close to the surface where others are over an inch down. Screws can be flat or dome and can be quite small dome headed screws.
The unit is heavy because I assume it is full of resin. I guess you would have to hope that they didn't simply glue the unit together and blank off the holes. There was also a brick for the 590 with the circular connector. I have always used these heavy bricks on my expanded A1200 machines. I struggled back in 1995 fitting a 1GB 3.5" to a 1200 and found the only way was to use a heavy brick. I have bought busted broken 500s off Ebay at times just to get the bricks. I have been running set ups for like decades now I guess using the bricks. They have been a life saver. scuzz http://www.scuzzscink.com/amiga/a_amiga_inframe.htm Last edited by scuzz; 11 August 2017 at 13:12. |
|
|
|
11 August 2017, 21:33
|
#18 |
|
Registered User
Join Date: Jun 2010
Location: PL?
Posts: 2,743
|
AFAIR screws are located at bottom, they may be or Torx type or special 2 pin safety screws - there are special safety bits sets available for this http://www.wolfcraft.com/en/products...s/p/index.html or similar.
As power supply is filled with epoxy resin then a recommend using rubber hammer to release epoxy from plastic case, sometimes thin blade must be used to separate epoxy from plastic walls. |
|
|
|
11 August 2017, 21:55
|
#19 |
|
Registered User
Join Date: Jul 2017
Location: Scotland
Posts: 34
|
I tool a Stanley blade round the bottom of the join on mines, No screws no caps nothing it was heat sealed and full of resin. I think the proper term is potted.
Anyways it was totally non serviceable |
|
|
|
11 August 2017, 22:00
|
#20 |
|
Puttymoon inhabitant
Join Date: Mar 2007
Location: Tromaville
Age: 46
Posts: 7,539
|
I have never heard about epoxy / resin flooded Amiga PSUs, all the heavy ones I opened had easily acessible guts and were heavy just because of the transformator inside. Unlike C64 bricks, that were all filled with epoxy afaik. Also all the bottom screws (various lenghts and positions) I met were for standard 4-winged screwdriver.
The lightweight PSUs (switchable) miss the heavy transformer inside, of course. There are TENS types of Amiga PSUs, though. Sometimes they differ in details, but they have different numbers. |
|
|
| Currently Active Users Viewing This Thread: 1 (0 members and 1 guests) | |
| Thread Tools | |
 Similar Threads
|
||||
| Thread | Thread Starter | Forum | Replies | Last Post |
| Recapping A500 + Light Brick PSU | marty | support.Hardware | 10 | 10 January 2017 06:34 |
| WTB: A500 power supply or A1200 power supply (USA model) | CMA Death Adder | MarketPlace | 7 | 01 October 2010 15:10 |
| is it good or bad to use a a1200 PSU"brick" with an A500? | lost_lemming | support.Hardware | 7 | 22 February 2010 21:44 |
| Amiga 1200 with CF card - safe to just power off at power brick? | kernoman | support.Other | 14 | 29 August 2009 19:31 |
| A500+ Power Connector | fool2cool | Hardware pics | 16 | 10 December 2007 18:24 |
|
|


