
|
 29 August 2019, 03:35
|
#21 | |
|
Registered User
Join Date: Dec 2015
Location: USA
Posts: 2,902
|
Quote:
Yeah could be. Some stuff is designed to be an output like it has a diode or a microfuse or a resistor or something to that effect is put between a connector and the 5V trace that leads to a connector that leads to a power supply. The idea being that most stuff isn't, that's it's just a piece of metal sticking out of a via or a pad that is connected to the 5V plane of a motherboard or an expansion card. I'm pretty sure if you googled enough you could find someone that did this exact thing with a CSPPC. But if you tried it and it went titsup, you can blame Mechy as I keep thinking he's the one that told me about it. I think because some people replace the fan on the PPC with just a drive connector type cable, leaving the original 2-pin fan connector free on the CSPPC. |
|

|
|
29 August 2019, 03:53
|
#22 |
|
Registered User
Join Date: Aug 2016
Location: Earth
Posts: 884
|
I don't use Google...I avoid it as much as possible. I use DuckDuckGo.com, they don't track or trace their uses. Thus, my Web usage has very little ads...in part. Google is part of some websites, so can't completely avoided. But I do my best. I also never use a noun as a verb. That goes against good grammar. One of my deep passions.
Hahahaha..if it went balls to the wall splat, then...there very possibly goes my CSPPC..which I've paid to have stuff done, and it wasn't "cheap". Unless someone shows without a doubt it'll be better than "Okay"...No..No, No...not touching that idea. Mischievous laughter. I LIKEY My CSPPC too much to do that..I would have to know for 100% sure it would be okay. Probably tomorrow, or pretty soon, I'll get some new copper wires...as your original idea is very appealing and I think I can now do it well and safely. |
|
|
|
29 August 2019, 04:22
|
#23 |
|
Registered User
Join Date: Dec 2015
Location: USA
Posts: 2,902
|
That was one of original ideas, it may or may not help you. You really don't want to grelbfarlk it and create more issues down the road that are mysterious and apparently only diagnosable by you to your future self that has no idea what you were thinking at the time.
|
|
|
|
29 August 2019, 04:47
|
#24 |
|
Registered User
Join Date: Aug 2016
Location: Earth
Posts: 884
|
Ahh, your handle now makes more sense. I tend to remember things I'm doing and have done. Not eidetic but I do tend to focus a bit. I also document stuff. I pretty cool with remembering projects...especially when it comes to my Amigas. A close person to me rather digs that I remember things pretty well also. Keep the mind active, learning and create new desires to do new things / adventures and you'll never get Alzheimer's. My grandmother got it, I know why, funny that her Religion didn't "Save" her from it. Fantastic person outside of that particular..."book" interest.
I adore knowing Why...and getting deep answers. You've helped with this why, now I'll implement it. Opps..it should be 6 copper wires not 3...since you have 2 coming out of each 3 connectors. Another reason to be focused. Don't "OOps." when doing that stuff. Or possible....Bbzzzz..Bbzzzz....Ohh, man...everything just stopped. To be very clear, the Pin 1 on the Amiga Power that connects to the Motherboard connector in that picture is what the camera is looking at, correct? |
|
|
|
29 August 2019, 17:31
|
#25 | |||
|
Registered User
Join Date: Jun 2009
Location: Dublin, then Glasgow
Posts: 6,334
|
Quote:
 Quote:
 In general, discounting things like semiconductors in the path, electricity doesn't have assigned inputs or outputs. What determines the direction of flow is the potential difference - higher always flows to lower. So, 5V always flows to 0V, hopefully doing work along the way like running a chip, purely because 0V is lower than 5V. In general, discounting things like semiconductors in the path, electricity doesn't have assigned inputs or outputs. What determines the direction of flow is the potential difference - higher always flows to lower. So, 5V always flows to 0V, hopefully doing work along the way like running a chip, purely because 0V is lower than 5V.The reason you might need to inject extra power is because a certain circuit might not be getting enough. When this happens, the potential is dropped due to the losses that prevent enough power arriving at that point. As a result, the potential present at the fan connector might actually be 4.8V instead of the 5V it should theoretically be. This is lower than the 5V available in the direct PSU connection, so this means the potential at the fan connector is lower than that of the PSU connector, and therefore, in electrical flow terms, it's an input. Energy flows in through this path, bumping the potential up from a marginal 4.8V to a healthy 5V. (All this is assuming the "conventional" model of electrical flow - in reality the energy flows from negative to positive, but that's only of concern for very, very low level stuff.) |
|||
|
|
|
29 August 2019, 19:24
|
#26 | |||||
|
Registered User
Join Date: Aug 2016
Location: Earth
Posts: 884
|
Quote:
Quote:
Quote:
Quote:
Quote:
|
|||||
|
|
|
20 September 2019, 13:14
|
#27 |
|
Junior Member
Join Date: Sep 2001
Location: No(R)Way
Age: 41
Posts: 3,188
|
I am also in the process of changing the psu for my 4000D, the Amigakit adaper looks abit simple, there is this adapter: https://retroami.com.pl/index.php?id...duct&id_lang=1 Anyone have any experience with this, its more expensive but if its better i am going to buy it.. Also does it matter what psu i get ?
Last edited by kriz; 20 September 2019 at 15:19. |
|
|
|
20 September 2019, 13:27
|
#28 |
|
Registered User
Join Date: Jun 2009
Location: Dublin, then Glasgow
Posts: 6,334
|
I don't know I'm afraid, but both adaptors are pretty simple. The most important thing is that you get a PSU that's stable at low loads. Unfortunately, most modern PSUs are made for PCs that primarily use 12V, and as such will require a minimum load on the 12V rail to keep it regulating. The Amiga primarily uses the 5V rail with very little 12V usage of around 0.1A or less (~1W). This is compounded by manufacturers rarely publishing the minimum load requirements for PSUs, instead concentrating on the maximum, which is more relevant for PCs. Your best bet of finding a suitable supply is to buy a quality branded one with a *lower* rating - no point in buying a 750W unit when your Amiga possibly only uses around 50W.
A dummy load can be applied to the 12V rail which might help some PSUs work better with low loads. A large wattage resistor using the chassis as a heatsink for example will increase the load on the 12V rail and might improve behaviour of marginal supplies. I recently built a custom adaptor that allows software power off as well as the use of momentary switches, but still doesn't negate the need of a carefully selected PSU. I used a Corsair SF450 SFX PSU for that build and it works fine, so that's an option for your setup too. |
|
|
|
20 September 2019, 18:17
|
#29 | ||
|
Registered User
Join Date: Aug 2016
Location: Earth
Posts: 884
|
Quote:
I talked to someone else a lot of people know that does the hardware stuff and understand voltages well. I'm sending my Amiga-Kit adapter and old Amiga original power supply for repair to him soon. Maybe once I *see* what he's done I'll understand it better from what previous replies have indicated. Quote:
https://www.amazon.com/StarTech-com-...996049&sr=8-14 This is what I bought. I didn't like the much higher price, but perhaps...that one is the better way to go?? I see it a lot in these kind of projects. Hmm! |
||
|
|
|
16 October 2019, 04:31
|
#30 |
|
Registered User
Join Date: Jun 2019
Location: BNE AU
Posts: 216
|
I'll be replacing mine with an ATX soon in my 4000D.
What are people doing for mounting the ATX unit? I've seen 3D printed mounts on thingiverse but they seem pricey when getting quotes to have one made up. |
|
|
|
16 October 2019, 09:43
|
#31 |
|
Registered User
Join Date: Jun 2009
Location: Dublin, then Glasgow
Posts: 6,334
|
A little while back I modded an A4000 with an SFX PSU and a custom PSU controller board. Unlike an ATX PSU, the SFX format has two screwholes that align with the original A4000 PSU holes, and the other two holes are positioned such that the screws still grip the case. This leaves the problem of the power switch and the gaping hole underneath the PSU on the back panel. I solved both of these with aluminium brackets to cover the hole, hold the power switch and the PSU control board.
I'd recommend an SFX PSU rather than an ATX anyway due to the size and mounting holes. If you don't know someone with a 3D printer, see if there are any hacker spaces or similar near you that have access to a 3D printer. They would be much cheaper than paying a company to manufacture them. An alternative approach would be to gut the original PSU and keep the housing, mounting a modern PSU inside it. This needs more work and destroys a potentially fully working A4000 PSU, but doesn't need brackets or 3D printed parts. |
|
|
|
16 October 2019, 13:42
|
#32 |
|
Guru Meditating
Join Date: Jun 2014
Location: England
Posts: 2,337
|
@quantum8
I use one of those thingiverse brackets of which you speak 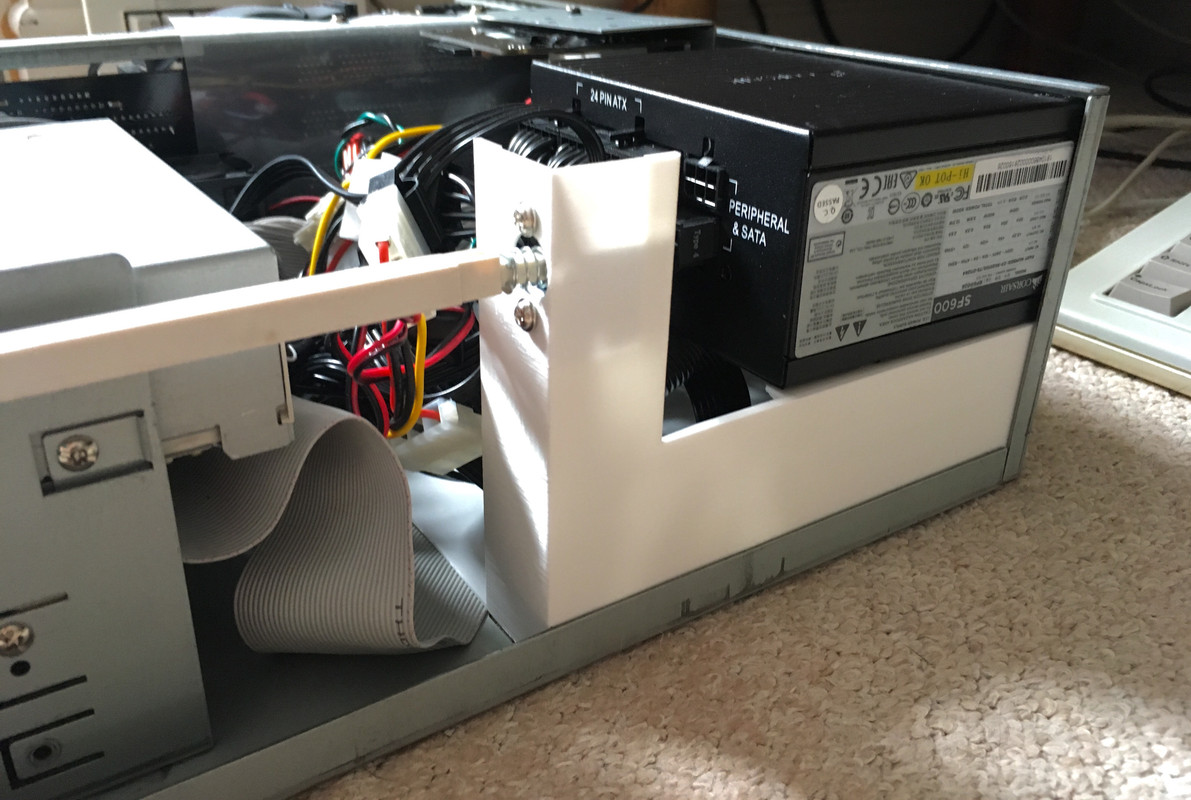
|
|
|
|
16 October 2019, 17:25
|
#33 |
|
Amigan
Join Date: Feb 2012
Location: London
Posts: 1,309
|
Nice. For those interested: https://www.thingiverse.com/thing:2792761
|
|
|
|
16 October 2019, 18:12
|
#34 |
|
-
Join Date: Jul 2003
Location: Helsinki / Finland
Age: 43
Posts: 9,861
|
I printed one of those too, but didn't get a PSU yet. :-) One of these days..
|
|
|
|
16 October 2019, 23:53
|
#35 |
|
Registered User
Join Date: Jun 2019
Location: BNE AU
Posts: 216
|
@trixster very nice! Looks sturdy. What was the infill % you used there?
The quote I got from some local makers were far too expensive; a couple hundred dollars. I was hoping some of my friends would have bought a printer by now as I don't have the space for one. 
|
|
|
|
17 October 2019, 19:40
|
#36 |
|
Amigan
Join Date: Feb 2012
Location: London
Posts: 1,309
|
For a couple hundred dollars you can buy a 3D printer like an Ender 3 which is easily capable of printing this!
|
|
|
|
17 October 2019, 21:23
|
#37 |
|
Registered User
Join Date: Aug 2016
Location: Earth
Posts: 884
|
That's a bit pricey for me to buy for 1 print.
Jope, how much does it cost to print it? |
|
|
|
18 October 2019, 09:22
|
#38 | |
|
-
Join Date: Jul 2003
Location: Helsinki / Finland
Age: 43
Posts: 9,861
|
Quote:
|
|
|
|
|
18 October 2019, 09:27
|
#39 | |
|
Registered User
Join Date: Feb 2007
Location: Melbourne, Australia
Age: 41
Posts: 3,772
|
Quote:
Even the best electricians are scared of electricity. It's one of the most dangerous things on the planet. |
|
|
|
|
18 October 2019, 09:33
|
#40 |
|
Guru Meditating
Join Date: Jun 2014
Location: England
Posts: 2,337
|
The one I ordered through thingiverse (made by treatstock) cost $35 plus postage.
|
|
|
| Currently Active Users Viewing This Thread: 1 (0 members and 1 guests) | |
| Thread Tools | |
 Similar Threads
|
||||
| Thread | Thread Starter | Forum | Replies | Last Post |
| FS: ATX power supply setup for Amiga | shuttlepilot | MarketPlace | 3 | 21 July 2015 18:01 |
| ATX power supply and Amiga 1200 | HardStep | support.Hardware | 5 | 02 February 2006 21:06 |
| Power supply for expanded Amiga 1200 | haynor666 | support.Hardware | 14 | 20 July 2003 11:13 |
|
|


