
|
 02 June 2018, 14:09
|
#1 |
|
Registered User
Join Date: Oct 2008
Location: Finland
Posts: 643
|
Digital Joystick to USB Adapter (diy, cheap and easy)
I have a bunch of male connectors with short cables left over from my KTRL CD32 controller project that I need to find use for.
I remembered that the Arduino Pro Micro (and Leonardo, boards with the ATmega32u4 chip, 5V, 16MHz) can be programmed to be interpreted as HID gamepads when connected to a USB port. The Arduino Pro Micro is very small and cheap versions can be bought for 3-4€ on eBay. It was very easy to program the Arduino to read inputs from an Atari style joysticks (directions + two buttons supported). I wrote the program last night, I will maybe make it support CD32 gamepads later (firmware can be upgraded over USB). I used a Joystick library for the Arduino Pro Micro, I haven't yet tested the latency properly, but from the gamepad settings in Windows it seems fine. My part of the code can't be optimised any more, I use direct port manipulation and bitwise operations to check inputs. This is what's needed: 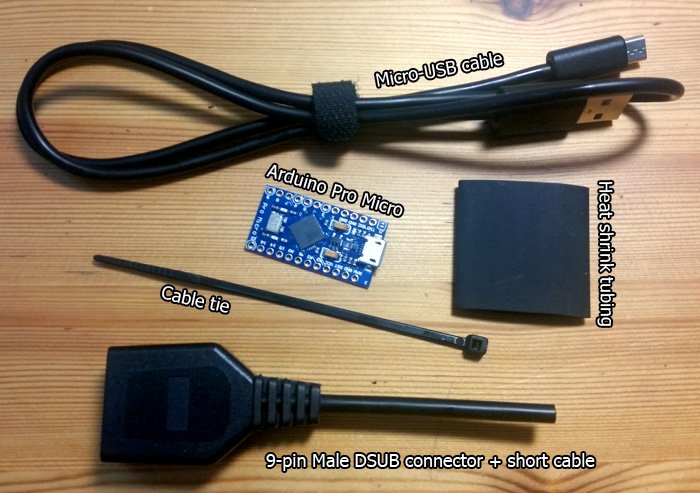 Note!: Use the new connections and source in my post below. Let me know if you need compiled binary files. You will also need the firmware I wrote: arduino-pro-micro-digital-joystick.zip. You should be able to program the Arduino with this tool: https://github.com/p1ne/arduino-leonardo-uploader If you use a connector + cable like I did, you only need to solder the nine wires to the Arduino like so: Code:
DSUB Pin Arduino Pin ----------------------------- 1 A0 2 A1 3 A2 4 A3 5 2 6 3 7 VCC 8 GND 9 4 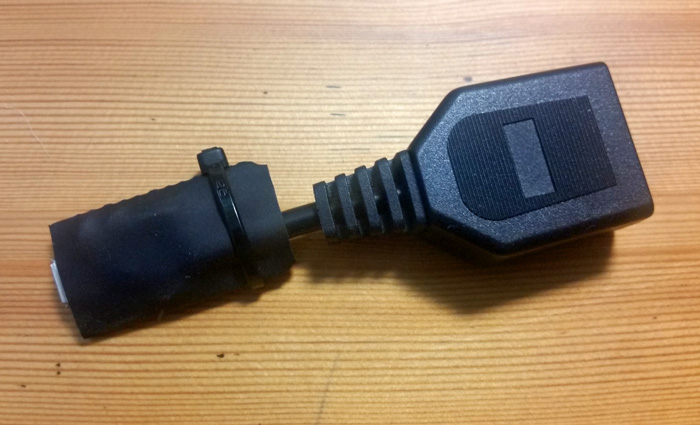
Last edited by MickGyver; 05 June 2018 at 21:39. |

|
|
02 June 2018, 14:45
|
#2 |
|
Registered User
Join Date: May 2014
Location: inside the emulator
Posts: 377
|
This is really nice! Didn't even know of that board, opens up some possibilities for cheap and quick interfaces.
Any idea if it would possible to add Amiga mouse support? The board/firmware would have to support act as an USB composite device. |
|
|
|
02 June 2018, 16:32
|
#3 | |
|
Registered User
Join Date: Oct 2008
Location: Finland
Posts: 643
|
Quote:
|
|
|
|
|
03 June 2018, 10:29
|
#4 | |
|
Registered User
Join Date: Oct 2008
Location: Finland
Posts: 643
|
Quote:
|
|
|
|
|
04 June 2018, 22:39
|
#5 |
|
Registered User
Join Date: Jan 2014
Location: Somerset, UK
Posts: 547
|
Thanks for this. I have used up all my spare Pro Micros, so I've ordered some more to do this project.
|
|
|
|
05 June 2018, 21:29
|
#6 | |
|
Registered User
Join Date: Oct 2008
Location: Finland
Posts: 643
|
Quote:
 I had to try this out and I got an Amiga mouse to work with the Pro Micro. The movement is a bit jerky when moving the mouse slowly, need to fix that somehow (feel free to find a solution). I had to try this out and I got an Amiga mouse to work with the Pro Micro. The movement is a bit jerky when moving the mouse slowly, need to fix that somehow (feel free to find a solution).I'm now using these connections, same for the new joystick code below: Code:
Controller port Arduino Pro Micro ------------------------------- 1 (Up/V) 2 2 (Down/H) 3 3 (Left/VQ) 4 4 (Right/HQ) 5 5 (Button3/CD32 Latch) A2 6 (Button1/CD32 Clock) A0 7 (+5V) VCC 8 (GND) GND 9 (Button2/CD32 Data) A1 Code:
/*
    Amiga Mouse to USB with Arduino Pro Micro or Leonardo
    Version 0.9
    By MickGyver (Mikael Norrgard) 2018

    This program is free software: you can redistribute it and/or modify
    it under the terms of the GNU General Public License as published by
    the Free Software Foundation, either version 3 of the License, or
    (at your option) any later version.

    This program is distributed in the hope that it will be useful,
    but WITHOUT ANY WARRANTY; without even the implied warranty of
    MERCHANTABILITY or FITNESS FOR A PARTICULAR PURPOSE.  See the
    GNU General Public License for more details.

    You should have received a copy of the GNU General Public License
    along with this program.  If not, see <http://www.gnu.org/licenses/>.

    Connections:
    ****************************************************
    Controller port         Arduino Pro Micro / Leonardo
    -------------------------------
    1 (Up/V)                2
    2 (Down/H)              3
    3 (Left/VQ)             4
    4 (Right/HQ)            5
    5 (Button3/CD32 Latch)  A2
    6 (Button1/CD32 Clock)  A0
    7 (+5V)                 VCC
    8 (GND)                 GND
    9 (Button2/CD32 Data)   A1

    TODO:
    - Find a way to smooth out the values for slow mouse movement.
    - Mouse doesn't work after computer sleep, need to fix that
*/

#include <Mouse.h>

#define MOUSE_SPEED 10

const byte pins[7] = {A0,A1,A2,2,3,4,5};

// Mouse Y on pins 2 and 4 (joyport pins 1 and 3)
const int mouseYPinA = 2;
const int mouseYPinB = 4;
volatile int mouseYPos = 0;

// Mouse X on pins 3 and 5 (joyport pins 2 and 4)
const int mouseXPinA = 3;
const int mouseXPinB = 5;
volatile int mouseXPos = 0;

// Mouse button variables
const char buttonConstant[3] = {MOUSE_LEFT, MOUSE_RIGHT, MOUSE_MIDDLE};
const byte buttonBit[3] = {B10000000, B01000000, B00100000};
byte lastButtonState[3] = {1, 1, 1};
byte buttonState = 1;


void setup()
{
  // Initialize Input Pins
  for(byte i=0; i<8; i++)
    pinMode(pins[i], INPUT_PULLUP);

  // Mouse Y
  attachInterrupt(1, doMouseY, CHANGE);  // encoder pin on interrupt 1 (pin 2)

  // Mouse X
  attachInterrupt(0, doMouseX, CHANGE);  // encoder pin on interrupt 0 (pin 3)

  // Initialise mouse
  Mouse.begin();
}

void loop()
{
  // Mouse movement
  uint8_t oldSREG = SREG;
  cli();
  if(mouseXPos != 0 || mouseYPos != 0)
  Mouse.move(mouseXPos*MOUSE_SPEED, mouseYPos*MOUSE_SPEED, 0);
  mouseXPos = 0;
  mouseYPos = 0;
  SREG = oldSREG;

  // Mouse buttons
  for(int i=0; i<3; i++)
  {
    buttonState = !(PINF & buttonBit[i]);
    if(buttonState && !lastButtonState[i])
      Mouse.press(buttonConstant[i]);
    else if(!buttonState && lastButtonState[i])
      Mouse.release(buttonConstant[i]);
    lastButtonState[i] = buttonState;
  }
}

// Mouse Y interrupt (pin 2 change)
void doMouseY()
{
  if(digitalRead(mouseYPinA) == digitalRead(mouseYPinB))
    mouseYPos--; // Count up if both encoder pins are the same on pin change interupt
  else
    mouseYPos++; // Count down if pins are different
}

// Mouse X interrupt (pin 3 change)
void doMouseX()
{
  if (digitalRead(mouseXPinA) == digitalRead(mouseXPinB))
    mouseXPos--; // Count up if both encoder pins are the same on pin change interupt
  else
    mouseXPos++; // Count down if pins are different
}
Code:
/*
    Digital Joystick to USB with Arduino Pro Micro or Leonardo
    Version 0.9
    By MickGyver (Mikael Norrgard) 2018

    This program is free software: you can redistribute it and/or modify
    it under the terms of the GNU General Public License as published by
    the Free Software Foundation, either version 3 of the License, or
    (at your option) any later version.

    This program is distributed in the hope that it will be useful,
    but WITHOUT ANY WARRANTY; without even the implied warranty of
    MERCHANTABILITY or FITNESS FOR A PARTICULAR PURPOSE.  See the
    GNU General Public License for more details.

    You should have received a copy of the GNU General Public License
    along with this program.  If not, see <http://www.gnu.org/licenses/>.

    Connections:
    ****************************************************
    Controller port         Arduino Pro Micro / Leonardo
    -------------------------------
    1 (Up/V)                2
    2 (Down/H)              3
    3 (Left/VQ)             4
    4 (Right/HQ)            5
    5 (Button3/CD32 Latch)  A2
    6 (Button1/CD32 Clock)  A0
    7 (+5V)                 VCC
    8 (GND)                 GND
    9 (Button2/CD32 Data)   A1
*/

#include <Joystick.h>

// Set up controller
Joystick_ Joystick(JOYSTICK_DEFAULT_REPORT_ID,JOYSTICK_TYPE_GAMEPAD,
  2, 0,                  // Button Count, Hat Switch Count
  true, true, false,     // X and Y Axes, no Z Axis
  false, false, false,   // No Rx, Ry, or Rz
  false, false,          // No rudder or throttle
  false, false, false);  // No accelerator, brake, or steering

const byte pins[7] = {A0,A1,A2,2,3,4,5};

// Variables for reading pins
byte pinc = 0;
byte pind = 0;
byte pinf = 0;

// Button states
char buttonState = 0;
char lastButtonState[4] = {0,0,0,0};

void setup()
{
  // Initialize Input Pins
  for(byte i=0; i<8; i++)
    pinMode(pins[i], INPUT_PULLUP);

  // Initialize Joystick Library
  Joystick.begin();
  Joystick.setXAxisRange(-1, 1);
  Joystick.setYAxisRange(-1, 1);
}

void loop()
{
  // Read digital inputs
  pinc = PINC;
  pind = PIND;
  pinf = PINF;

  // Handle all inputs
  for(byte i=0; i<4; i++)
  {
    // Read input
    switch(i)
    {
      case 0: // Y Axis
        buttonState = !(pind & B00000001) - !(pind & B00000010); break;
      case 1: // X Axis
        buttonState = !(pinc & B01000000) - !(pind & B00010000); break;
      case 2: // Button 1
        buttonState = !(pinf & B10000000); break;
      case 3: // Button 2
        buttonState = !(pinf & B01000000); break;
    }
    // Has input changed?
    if(buttonState != lastButtonState[i])
    {
      // Set joystick axis or button
      switch(i)
      {
        case 0:
          Joystick.setYAxis(buttonState); break;
        case 1:
          Joystick.setXAxis(buttonState); break;
        default:
          Joystick.setButton(i-2, buttonState);
      }
      // Store "last" value to detect input change
      lastButtonState[i] = buttonState;
    }
  }
}
|
|
|
|
|
21 June 2018, 09:18
|
#7 |
|
Registered User
Join Date: Jan 2014
Location: Somerset, UK
Posts: 547
|
Hi,
I got my Pro Micro delivered and built your project. I used a small project box which I had laying around and mounted a D-type on the side of the box. I tested it on Windows XP, Android and Raspberry Pi and it was detected and worked. Thanks 
|
|
|
|
21 June 2018, 10:15
|
#8 | |
|
Registered User
Join Date: Oct 2008
Location: Finland
Posts: 643
|
Quote:
Good to know that it works on those systems too! Have you noticed any input lag issues? I'm just asking because I haven't "seriously" used it yet but from quick testing on Windows 7 I didn't notice any input lag.
|
|
|
|
|
21 June 2018, 13:15
|
#9 |
|
Registered User
Join Date: Jan 2014
Location: Somerset, UK
Posts: 547
|
Playing SWOS via Raspberry Pi 3 there seemed to be some delay in kicking. Timing/lag is quite crucial on SWOS with the pass/shoot so it's a good one to test emulation.
I used a Master System emulator on WinXP and Android and there seemed no lag, so I think it was probably down to the Raspberry Pi's emulation than the device. I will do some more testing. I will try it with my MiST (FPGA AMIGA) and play SWOS to see how it feels. |
|
|
| Currently Active Users Viewing This Thread: 1 (0 members and 1 guests) | |
| Thread Tools | |
 Similar Threads
|
||||
| Thread | Thread Starter | Forum | Replies | Last Post |
| New USB HID mouse / USB Joystick / Gamepad USB adapter for the classic Amiga | spidi | News | 191 | 21 February 2021 19:18 |
| Has anyone tried this 9 pin to USB joystick adapter? | TikTok | Retrogaming General Discussion | 5 | 27 July 2015 19:08 |
| USB Joystick Adapter | Specksynder | MarketPlace | 2 | 28 November 2013 08:44 |
| USB to DB9 - cheap adapter? | lifeschool | support.Hardware | 5 | 22 November 2012 22:47 |
| Amiga Joystick > USB adapter. | Smiley | Hardware pics | 10 | 16 September 2009 17:11 |
|
|


