
|
 06 December 2014, 20:31
|
#101 |
|
Registered User
Join Date: Nov 2010
Location: london / uk
Posts: 378
|
I am quite sure that is 7 frames in one direction - not in total.
My character has 6 frames walking right, 6 frames walking right, 2 frames for climbing a ladder, one frame for jumping. What is your game going to be and why do you need so many frames of animation? |

|
|
06 December 2014, 21:03
|
#102 |
|
Registered User
Join Date: Dec 2013
Location: GR
Age: 46
Posts: 1,416
|
Usually small sprites (16p) need 2 frames for walking. Medium need 4 and only the large ones, very high quality like Capcom's Street Fighter 2 need more.
|
|
|
|
09 December 2014, 18:08
|
#103 |
|
Phone Homer
Join Date: Jun 2006
Location: 5150
Posts: 5,773
|
In the Zone ive put DIZZY_Crystal Kingdom Level 1Tile set and .map
I dont know how to use reality but id like to put together a Dizzy Data disk |
|
|
|
10 December 2014, 01:14
|
#104 |
|
Registered User
Join Date: Nov 2010
Location: london / uk
Posts: 378
|
Have written up my third tutorial - tutorial 4 will be more exciting as we start looking at zones and moving the player character to a new location - after that we will look at interacting with characters and text boxes and then enemy movement patterns.
Reality Game Creator - Tutorial 3 - Sprite Sheet In tutorial 3 we are focusing on getting our sprites ready, before we start combining them with our background tiles and game map to start making our first level. Again we recommend you use a separate paint program to produce your sprites. When creating your sprites you need to remember the following: 1. use colour zero as your background colour - this colour is used for transparency. 2. use colour one as your border colour. 3. Each sprite must have its own border and there needs to be space between each of your sprites. 4. You must use the same palette as your background tiles. Below is an example of my WIP game sprite sheet. I have 6 frames for walking right and 6 frames for walking right ( I think you can have a maximum of seven frames). I have 0 frames for jumping and three frames for climbing. The reason for this is that I have just followed the structure of the original skeleton disk. The enemy sprites can have a maximum of 5 frames of animation. 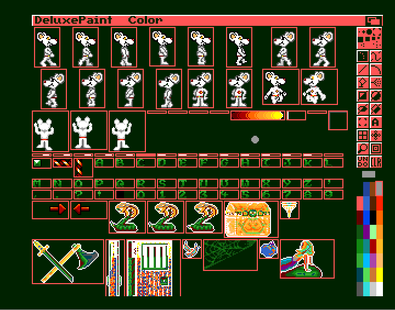 Once you have created your sprite sheet in your paint program you then need to convert it to the unique format for reality. Similar to the background tiles tutorial you need to load the Graphic Converter program from the Reality Master Disk. 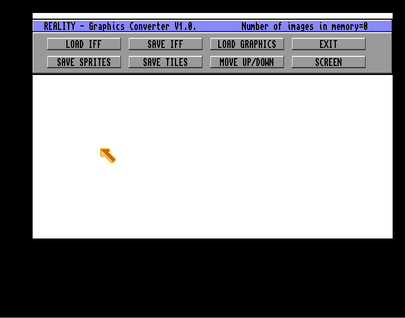 Once you have loaded up the Graphic Converter, you need to load in your IFF file. As long as your sprite sheet has followed the structure of using colour 1 to create a separate border for each sprite, and colour 0 for the background, then Reality will automatically cut your tiles. You will see the number of sprites converted in the top right corner, in the example below 194 sprites have been converted. 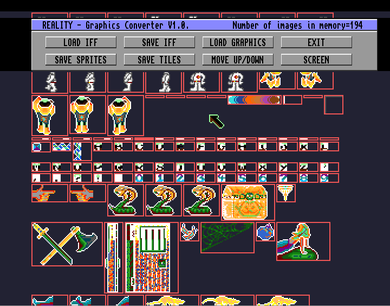 You now need to save the sprites in the format used by Reality. Select Save Sprites from the options. For the sprites to be used in your game, you need to save them on your skeleton disk. Remember to save the file under the main files folder and replace the Sprites.GRA file. 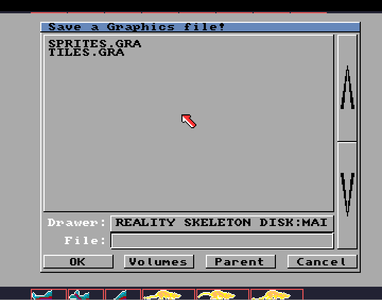 You should now have your own background tiles, background map and sprite files. For the next tutorial we will bring the map and sprites together and look at zones. Before ending this tutorial, we will just mention the palette file. In order for your game to display your sprites and background tiles correctly, you must ensure that you have the correct palette saved to your skeleton disk. To do this load your skeleton disk in reality (Reality seems to be a bit strange in that you have to place the skeleton disk into your disk drive after selecting edit skeleton disk from the Reality Master disk menu option rather than have it already inserted in your drive. 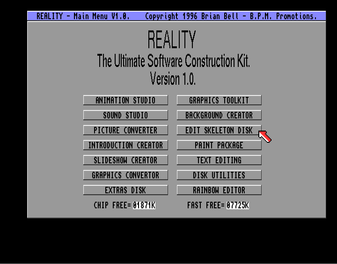 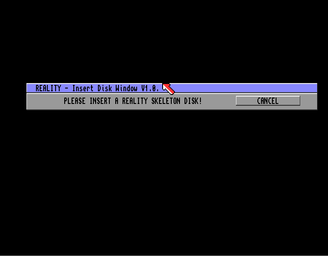 Once you have successfully loaded your skeleton disk all you need to do is select Grab Palette. Reality will then ask you to load an IFF file which contains the palette you wish to use. Load either your IFF file for your sprites or background tiles (they should both be using the same palette) and then Reality will save the file to your game disk. 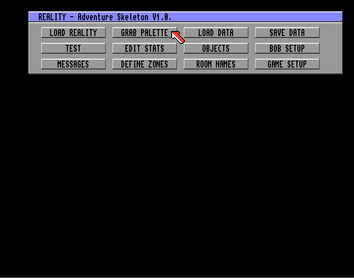
|
|
|
|
10 December 2014, 01:18
|
#105 | |
|
Registered User
Join Date: Nov 2010
Location: london / uk
Posts: 378
|
Quote:
|
|
|
|
|
11 December 2014, 01:27
|
#106 | |
|
Phone Homer
Join Date: Jun 2006
Location: 5150
Posts: 5,773
|
Quote:
|
|
|
|
|
11 December 2014, 02:03
|
#107 | |
|
Autistic 'n IRN!
Join Date: Jul 2012
Location: -
Posts: 2,979
|
Quote:
Dizzy : RetroGaming  Not only do we have the admins of Dizzy Age and Yolkfolk but also the legendary Oliver Twins , creators of the original Dizzy |
|
|
|
|
13 December 2014, 00:02
|
#108 |
|
Registered User
Join Date: Nov 2010
Location: london / uk
Posts: 378
|
Reality Game Creator - Tutorial 4 - Zones
12/12/2014 0 Comments We have previously explained how to create a sprite sheet and tile sheet and convert them into the format used by Reality. We have also given an overview of the map tool. Now we are going to start pulling together our sprites and background to create some in game action. The first thing we need to know about is zones. Each screen can have up to four zone areas where certain events can take place. For this example we are going to explain how to use zones to move the main character to a different location e.g. entering a house via a door. What you need to do is load the Reality game disk - then from the main menu select Edit Skeleton Disk. Once the skeleton disk is loaded you should have the 12 option menu screen shown below and you need to select Define Zones.  You will then be asked to select a location. You need to remember you map screen, in this example, I am going to creating a zone around a door in location 1 which will take me to location 8. To select a location, use the left mouse button to increase the number and the right mouse button to decrease the number. 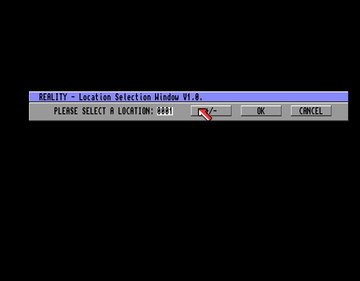 Once you have chosen your required location select ok. This will then take you to a screenshot of how your location currently looks. 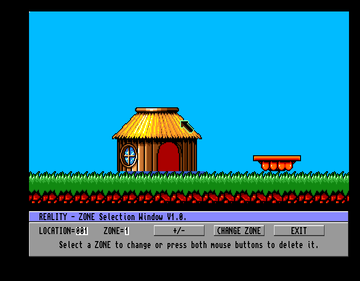 What we want to do is to draw a zone around the door, so that when the player activates this zone something happens - in this case they move inside the house. To draw the zone, you select change zone. You are then asked to select the top Left corner of the zone with the left mouse button. In this example we want the top left corner to be the top left corner of the door. 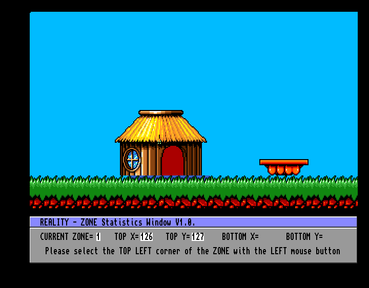 Having selected the top left area we are now asked to select the bottom right corner of the zone. For my game this isn't the bottom right corner of the door but extends down on the ground level. I have one block which of grass which is background rather than solid platform, so I must make sure that the zone extends to where the main character will be walking. 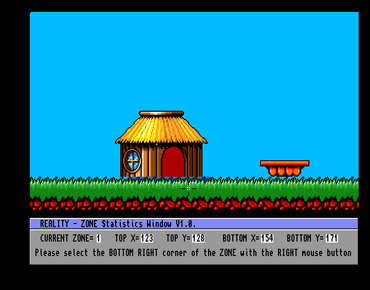 Once you have selected the bottom right corner the zone will appear as a white border. 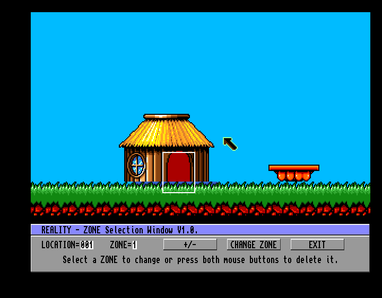 We have now successfully created our first zone for room one, but we now need to tell Reality what we want to happen when the player enters this zone. To do this we need to select exit from the Zone Selection Window and return to the main Skeleton Disk menu. From there we will select Game Setup. 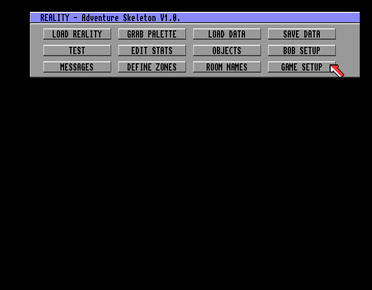 This is menu looks very confusing, and I am still working through the options to understand how everything works. Basically this menu allows you to specify how all the puzzles, objects, zones and other stuff interact with your player. The zones could be automatically activated by when the player walks into the area or alternatively the zone may only be activated if the player presses the fire button. To keep things simple, all you need to worry about at moment, is that you need to select the correct location. To select a location click on the location option. To increase the location number click on the location option with your left mouse button. To decrease the location number click on the location option with your right mouse button. 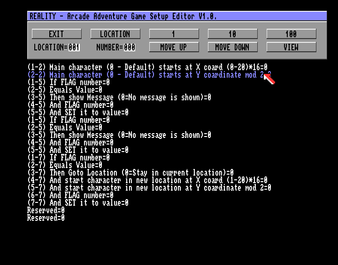 What you need to do now is use the move down option to scroll down the options until you get to the part which shows whether the player can enter zone 1, Zone 2, Zone 3 etc. We are interested in Zone 1 and we need to change the 0 to 1. To do this move your mouse over the relevant line and click the left mouse button. Remember the number at the top must be showing 1. To change the number click on the 1 button with your left mouse button to increase the number and use the right button to decrease the number. 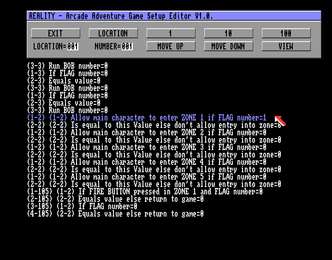 What we now need to do is tell Reality what location we want the player to be transported to. To do this scroll down the options again until you get to the option which says Then Goto Location (0=Stay in current location)=0. What you need to do is change the number to the location you want the player to move to, in our case 8 as we want the player to move to room 8. 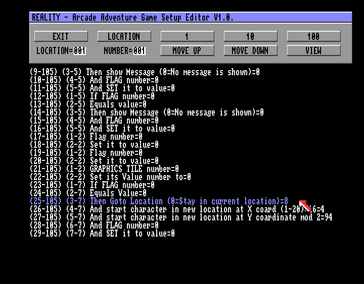 What you now need to do is repeat the same process for room 8, You need to go back to the Define Zones tool from the main option screen from the skeleton disk. Select room 8 and Draw a zone around the door. 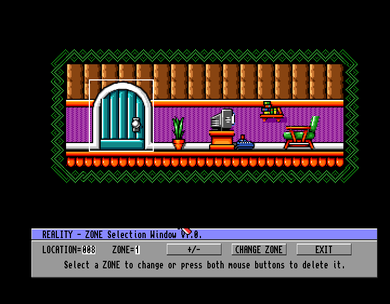 You then need to go back to the Game Setup tool from the main option screen from the skeleton disk. Remember to change the Flag for Zone 1 to = 1 for location 8 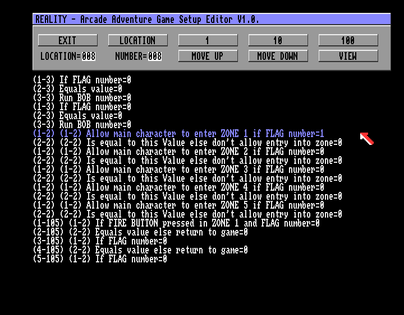 Remember to change the Goto Location option to location 1. 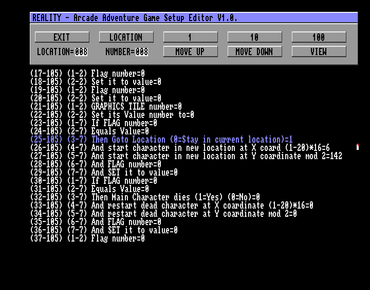 Lastly remember to save your data by selecting Save Data from the main menu from the skeleton disk.  Everything now should be complete for you to test the game. You may need to do some minor amendments to the start location of your character. In this example I've amended the start location as X = 4 and Y=94  |
|
|
|
13 December 2014, 00:55
|
#109 |
|
Registered User
Join Date: Nov 2010
Location: london / uk
Posts: 378
|
Reality Game Creator - Tutorial 5 - Messages
12/12/2014 0 Comments In this tutorial, we are going to build on our knowledge of zones and add in the text message function. By the end of this tutorial we will have a text message appear when the player presses the fire button in a certain zone. The first thing we need to do is draw a zone around where you want the text message to appear. Remember tutorial 3, select Define Zones from the Skeleton Disk menu option and draw a square around the part of the screen you want the player to interact with to obtain a message. In this example, I want the player to get a message if they press the fire button when infront of the TV. I have therefore drawn zone 2 around the TV. I have to keep Zone 1 for the door from tutorial 3.  Having created the Zone, we now need to go to create the message. To do this we return to the Skeleton disk main menu screen and select Messages. 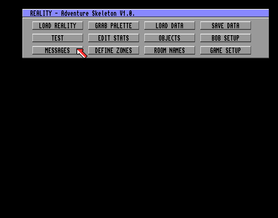 Once you select messages, you have the option to view existing messages or create new ones / amend existing ones. As this is a new game we are going to edit message number 1. To select different messages press the left mouse button on Mess No to increase the message number and use your right mouse button on Mess No to decrease the message. 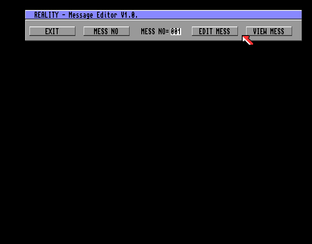 In this example we are going to create the Message "No time for watching TV". To do this we make sure the Mess No is showing 001 and we then select Edit Mess. 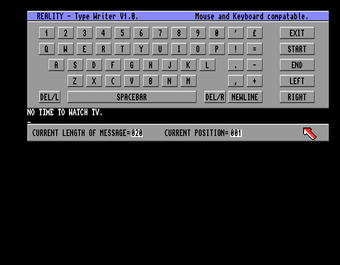 This brings up a keyboard which you use your mouse pointer to activate. This should be quite straight forward to use. Type your message and then select Exit. This will take you back to the Main Message option - from here you can select View Mess and this will show you how your message will look in the game. Right mouse button will exit the preview. Extra notes on message writing - Selecting new line once will show this character # If you are writing a long message you may want to use select new line twice ## This will create a new box giving you more characters to display your message. 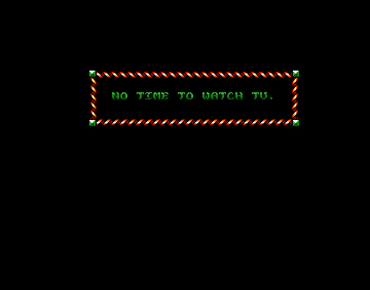 No its time to go back to the Game Setup screen we used in tutorial three. In this example, we adding a message in location 8 - so I need to change the location to 8. Then I need to scroll down to the relevant part which relates to zone 2 and change the flag setting to 1 for if the fire button is pressed. 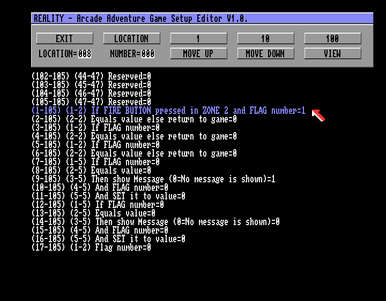 Scrolling down further, I get to the Then Show Message (0=No message is shown) = 0 and I change the 0 to the number of the message I want to be shown - in this case message number 1. 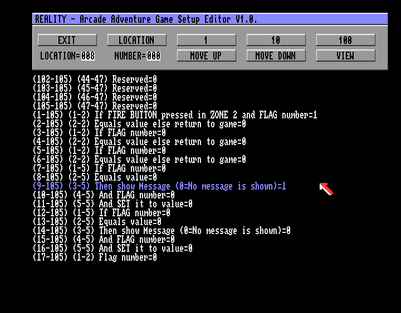 Now its time to Exit out of the Game Setup screen. From the main Skeleton Disk menu you need to select Save Data. Now select Test from the main skeleton disk menu and hopefully you should get the text message as you want in your game. 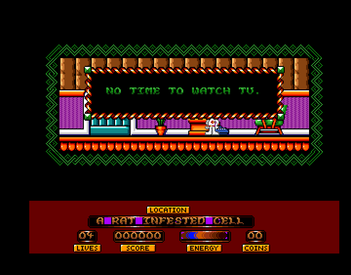 That ends the tutorial on messages. Next tutorial may be either adding enemies or using objects. |
|
|
|
20 December 2014, 02:25
|
#110 |
|
Registered User
Join Date: Sep 2009
Location: San Antonio, TX USA
Age: 50
Posts: 1,184
|
Does anyone know if the "Reality Game Creator" is a freeware?
Can you create commercial games with it? |
|
|
|
24 December 2014, 00:36
|
#111 |
|
Registered User
Join Date: Nov 2010
Location: london / uk
Posts: 378
|
I think Reality is probably abandonware -
The aim behind the software was that you could create shareware type of games - in terms of commercial games now - I doubt anyone would pay for a game made with reality. Work continues on the tutorials - the enemy one is next - have been busy creating some enemy sprites for my DM mouse game and have now worked out how to add them to a room (mouse and rat) Hope to have this tutorial written up in the next two weeks. 
|
|
|
|
26 December 2014, 13:24
|
#112 |
|
Registered User
Join Date: Nov 2010
Location: london / uk
Posts: 378
|
Reality Game Creator - Tutorial 6 - Enemies
In this tutorial we are going to look at adding enemies to rooms. We do this by editing Bobs. The first thing to do is load up the skeleton disk and from the main menu select Bob Setup. 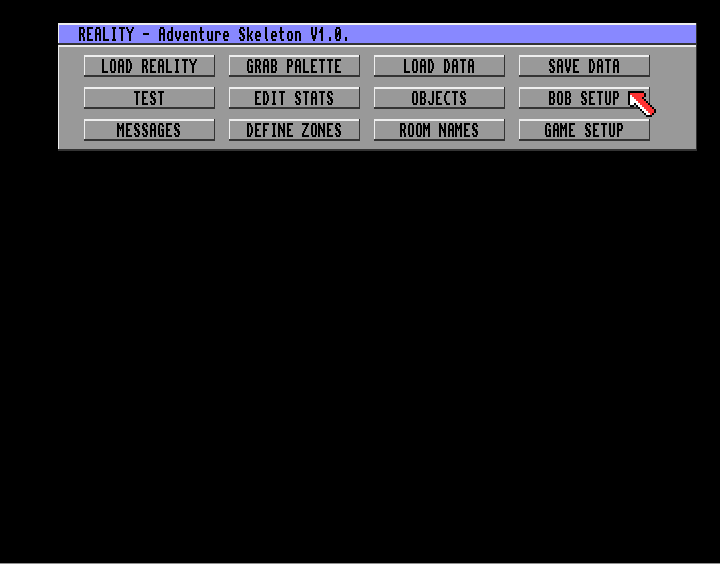 Bobs are the special objects for the game. They are mainly used for enemies but can also be used to provide animated static background items e.g. torches or waterfalls. In this example we are going to use the bob setup to create an animated horizontal rat baddie. Selecting Bob Setup will take you to the Bob Editor as shown below. 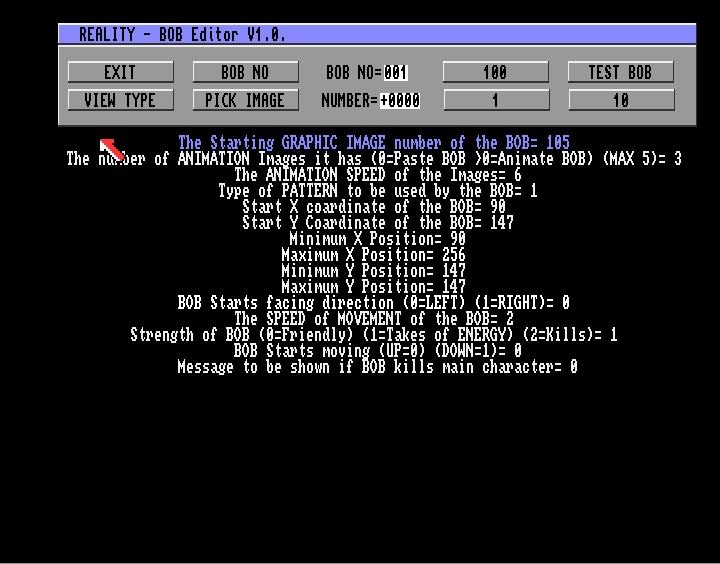 The first thing we need to do is locate the graphic image we want to use. To do this click on Pick Image and this will take you to a screen where you can scroll through your graphics. 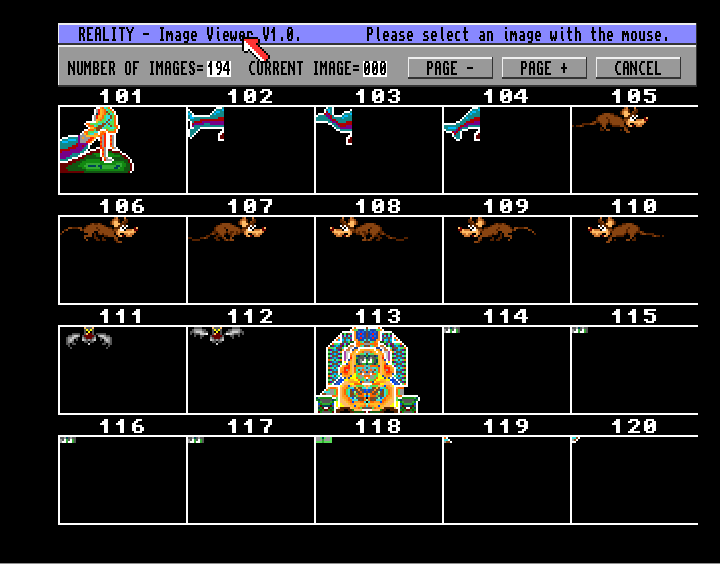 The sprite we want to use is the rat sprite. This starts at sprite number 105 and has 3 frames of animation for movement to the right and 3 frames of animation for movement to the left. The next option is The number of ANIMATION images - if you want a static animated item such as torches, you would select 0 - for the rat, we need to select 3 as the rat has 3 frames of animation for each direction - the maximum any bob item can have is 5. The next option is to set the Animation Speed - This determines how fast the sprite is animated - a speed of 6 seems to work quite well and is the default setting we are using. Lower speeds makes the animation routine run faster whilst higher numbers makes the animation run slower. If you want to experiment, change the speed and then select Test Bob this will enable you to test the bob in any of your rooms - you are first asked to select the location / room you want to test the bob in. 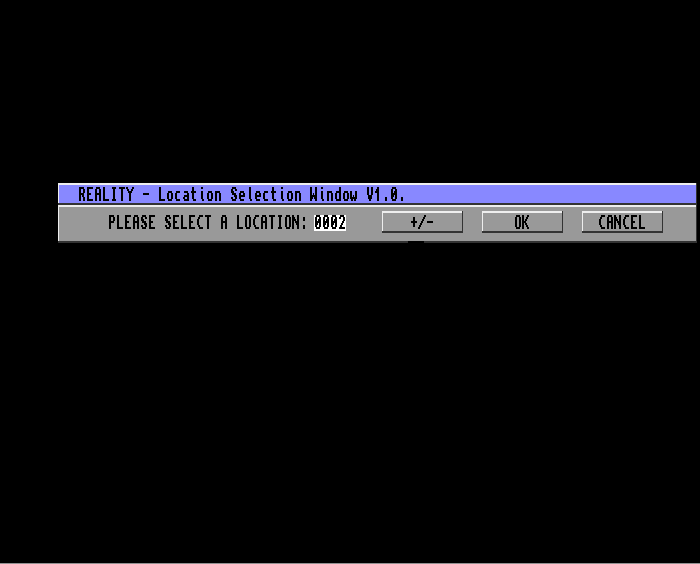 We are going to place the rat baddie in room 2 so we are going test the rat bob in this location.  When you are taken to the screen, you will have two bobs showing - one which you can move and one which is moving automatically. At this stage you are just checking animated speed and not looking to change the bobs movement - if you are happy with the animation spped and want to exit press the left mouse button. Pressing the right mouse button will overwrite the start position of the bob, in the above picture I would be overwriting the pattern where the bob is running along the ground to a starting position where it would start below the ground level which is clearly something I don't want to do at this moment in time. Returning to the Bob Editor we now have to decide on the type of (movement) pattern. There are nine choices to select from as shown below. 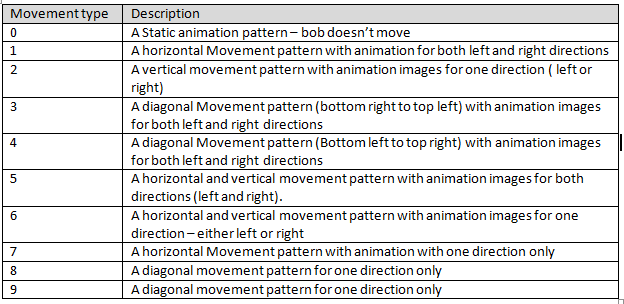 We want the rat to move in a horizontal direction, changing its animation for both left and right direction. If you want to check the animation direction routine then from the Bob Editor menu select View Type. You need to remember that it will show the animation direction routine for the current number showing in the grey box and not the one list against Type of Pattern to be used by the bob. 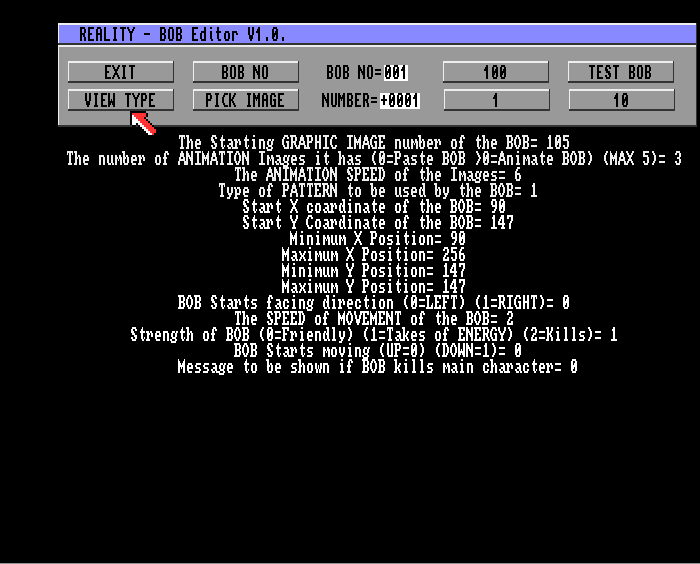 When you click on View Type you will be taken to another screen where Charlie Chimp will show you how the bob will move along with a short description of the movement type. 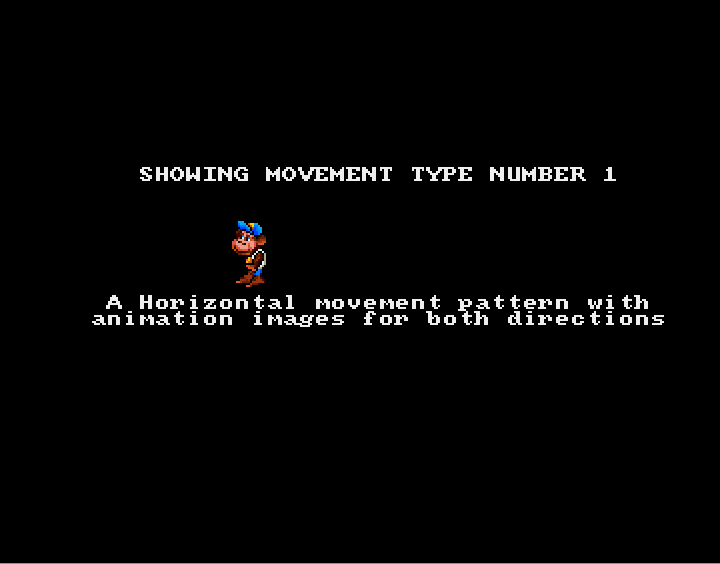 We are nearly finished with adding our rat to room 2. All we need to do now is work out the start position and the distance the rat can move. What I normally do is have a pen and paper handy and make a note of the relevant X and Y co-ordinates for start position - furthest distance to the left and right the bob can move to and the furthest distance the bob can move vertically. The first location we want to set is the start position - it is generally a good idea to have the baddie starting in the middle of the room rather than near the sides where the player can enter. For the start position, if you exit the test bob screen by pressing the right mouse button then reality will automatically set the start position to that of where the moveable sprite was when you exited the screen. In the example below the start position would be overwritten to X - 091 and Y=147 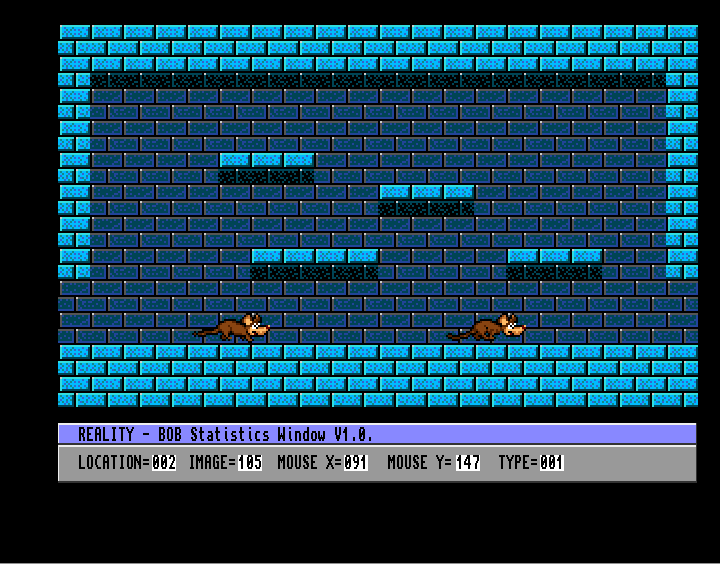 Now its a case of selecting the furthest location the bob will move to the left minimum X position and the furthest location the bob will move to the right maximum X position. Again you may want to leave some space for the player to hide at the edges of the screen, rather than having your enemies moving to the extreme end of the left / right hand sides of the screen. Now you have to select the furthest location the bob will move vertically. The highest position is shown by Minimum Y position and the lowest position vertically the bob can move is shown by maximum Y position. The next option is to select whether you want the bob to start facing in a left or right direction. If you select 0 the bob will start facing left and will begin moving to the left. If you select 1 the bob will start facing right and will move to the right first before then moving in the opposite direction. Now we have to select the speed of movement of the bob - The higher the number the faster the bob will move - 2 is a good default speed for baddies - 8 is ridiculously fast, but feel free to experiment. Now we have to set the strength of the baddie, which basically states whether the baddie will harm our player by taking some energy (set number to 1, or whether it will kill the player instantly, set the number to 2 or is friendly and causes no damage, set number to 0. For our rat we want to set the variable to 1 to reduce the player's energy if it collides with the rat. Next you have the option to select the direction, vertical moving baddies will start moving in - set this to 0 for upward moving baddies and to 1 for downward moving baddies. The rat is a horizontal moving bob so we don't need to worry about this. Lastly, you can select a particular message to be shown, if the player dies as a result of hitting the bob. Just select the number which relates to the message number you want displayed. Once,everything is set as you want, Exit the Bob Editor. Then from the Reality Adventure Skeleton main menu select Save Data. If everything has gone as planned, you should have now added a bob / baddie to one of your rooms. 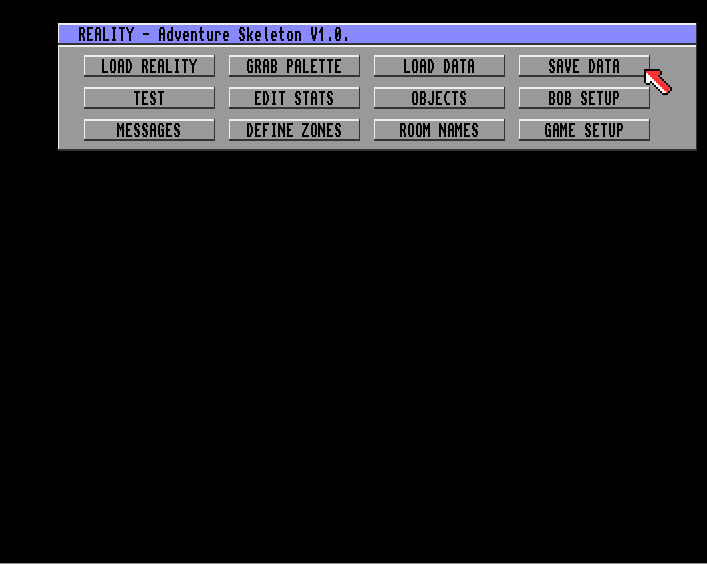 Overall, this has to be one of the easiest game creator kits I have used to add attack pattern and enemies to a game map. The next tutorial may either look at objects in more detail or look at modifying the game information screen (currently shown at the bottom of my DM game). |
|
|
|
27 December 2014, 23:19
|
#113 | ||
|
AMOS Extensions Developer
Join Date: Jun 2007
Location: near Cambridge, UK
Age: 44
Posts: 1,924
|
Quote:
Quote:
Generally I try to keep my animation frames a specific size (e.g. 16 pixels wide, 32 pixels high) for the main character in my (non-Reality made) game. |
||
|
|
|
11 January 2015, 09:43
|
#114 |
|
Registered User
Join Date: Nov 2010
Location: london / uk
Posts: 378
|
Does anyone know if the point and click adventure skeleton disk ever got released as previewed below - and if so does anyone have a copy in their disk box?

|
|
|
|
16 January 2015, 23:25
|
#115 | |
|
Registered User
Join Date: Oct 2009
Location: Crewe, UK
Posts: 146
|
Quote:
I still feel the best undiscovered editor for the Amiga was The Game Engine feature in one of the Amiga Format magazine, I wish that had been found. PS: Anyone remember a game call Bounce, I just found that the other day and completely forgot about the fact that it featured a level editor. Good old days. |
|
|
|
|
19 January 2015, 22:56
|
#116 |
|
Registered User
Join Date: Nov 2010
Location: london / uk
Posts: 378
|
Just a quick update on some reality tips I have discovered whilst working on my adventure game:
The sprites for baddies should be drawn with them facing right followed by facing left You must name all your rooms - otherwise if you click on game setup option and then select view reality will crash - Also if you try to select view in the room names editor reality will crash unless an exisiting room name has been added - if you are creating a bigger map than the game on the skeleton disk the best option is probably to just name the rooms R1, R2 and then put in fuller descriptions later on - at least this way you can still preview the rooms in game setup editior. Biggest frustration so far is if you switch the score panel to top view - which is easy to do by just changing the option from 0 to 1 in the Edit Stats editor, then the in screen item option selection menu doesn't work - I can't find a way to realign the cursors as they need to shift downwards. |
|
|
|
21 January 2015, 01:24
|
#117 |
|
Registered User
Join Date: Aug 2009
Location: Towcester, Northampton
Posts: 311
|
Do you mean the game engine , AF84a cover disk?
|
|
|
|
21 January 2015, 08:08
|
#118 | |
|
Registered User
Join Date: Feb 2007
Location: Melbourne, Australia
Age: 41
Posts: 3,772
|
Quote:
|
|
|
|
|
21 January 2015, 09:43
|
#119 |
|
Registered User
Join Date: Aug 2009
Location: Towcester, Northampton
Posts: 311
|
great guide i will have to try this ;-)
|
|
|
|
06 May 2015, 15:01
|
#120 |
|
Registered User
Join Date: Nov 2014
Location: Netherlands
Posts: 260
|
Trying this program for a few days now, trying to make a shootemup.
I came across this quote on amiga.org from 2005: "It had "skeleton" disks which were basically games that you could alter and customise and pass off as your own. But you couldn't, because it was so buggy you'd get pissed off with it and throw it in the bin." I am now at the bin part. It is quite buggy indeed. After I "Save Stats" and test again the program crashes. I also cannot find where to change picture numbers of the main character or enemies. The only thing I can think of is changing the graphics of the example game and using the prefab waves in a different order which is not my idea making my own game. Shame. Ps. I looked briefly at the adventure disk and seeing amigapd's long tutorial I assume it works much better than the shootemup disk. But im just not good at making an adventure game. 
Last edited by Lemming880; 06 May 2015 at 15:31. |
|
|
| Currently Active Users Viewing This Thread: 1 (0 members and 1 guests) | |
| Thread Tools | |
 Similar Threads
|
||||
| Thread | Thread Starter | Forum | Replies | Last Post |
| 3D construction kit | dlfrsilver | project.SPS (was CAPS) | 11 | 02 July 2011 03:57 |
| 3D Construction Kit | otro | request.Apps | 4 | 19 October 2007 22:18 |
| 3D Construction Kit II | Solid Snake | request.Apps | 6 | 13 November 2006 17:09 |
| 3d construction kit? | gimbal | request.Apps | 3 | 12 January 2005 13:01 |
| 3d Construction kit 2 | thinlega | MarketPlace | 0 | 25 October 2002 22:05 |
|
|


