
|
 25 March 2013, 23:25
|
#1 |
|
Posts: n/a
|
A1500/2000 dead
I was wondering if anyone could point me in the right direction for repaing/recovering an A2000? I bought it new back in 1990 and it has run fine for a some time, until the power supply failed some years ago...
I have just bought a replacement power supply for it. However, when I power it on I seem to get some response in that the screen flickers, but not the Insert Floppy boot up screen. The Caps lock on the keyboard flashes orange/red once and I am able to reset it using Ctrl-A-A, but the screen just stays black/Dk Grey. I looked up the diagnostic There seems to be some battery damage to the 68000 socket and surrounding bus slots. (see attached photos) 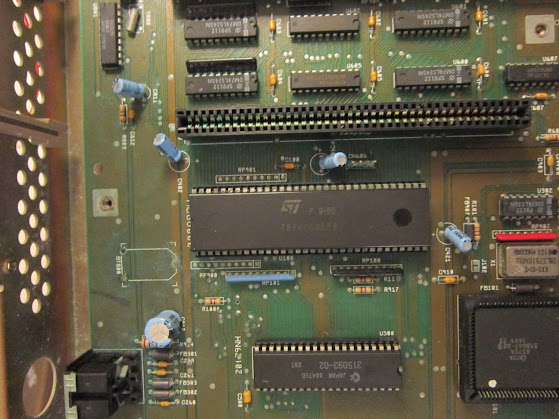  The CPU has some damage (see next photo), although I do have a spare from a battery damaged A500. (I have spares for all the custom chips.)  I would be most grateful for any help or advice? (My soldering skills are not good, but there is always room for improvement.) |
|
25 March 2013, 23:41
|
#2 |
|
Unregistered User
Join Date: Sep 2012
Location: Copenhagen / DK
Age: 43
Posts: 4,190
|
You need to take out the MB and have it cleaned thoroughly. First disconnect everything and take out all the chips in sockets. The corrosion can be stopped by dipping the MB in weak acid like vinegar until it stops bubbling from the affected places. After that it has to be cleaned. I prefer using the dishwasher and then some demineralised water to clean away any deposits from the water. Then it has to be dried on low heat in an oven.
The CPU looks like it should work fine, but it needs the same treatment as the MB. Easy enough to do by hand though. After all this, the MB needs to be repaired. It might just be the green CPU sockets pins that are the culprits but it could also be tracks or vias in the area. It if still doesn't work after the cleaning, something is broken somewhere although I'm pretty sure it can be repaired. Edit: It could also be that the CPU socket needs replacing which is a job that can take a little while due to the amount of pins, however not particularly hard. |

|
|
26 March 2013, 10:40
|
#3 |
|
Registered User
Join Date: Mar 2013
Location: Manchester
Posts: 189
|
As desbribed above, your starting point is to remove the board and clean it. Despite people using a dishwasher I wouldnt do it that way personally, its pretty unorthadox and whilst it works it goes against everything I know about water, metal and electronics. That said, if you remove the socketed chips (including agnus) before you stick it in the dishwasher, and dry the board quickly with heat (board on its side), the water damage will be at a molecular level, probably no more than when its been in a damp room for an hour.
My prefered way of cleaning is by spraying PCB cleaner or isoprop alchohol on the PCB and brush everything off the board with a brush. Repeat a few times with board on its side to make sure its clean. Its worth cleaning the chip pins up with wirebrush or sandpaper before retesting at that point - you could save yourself from making the fixes described below which will require good soldering skills. Your next step is really going to be to look for damage. Firstly the obvious one to me is you will need to replace that chip socket, clean up the pins on the chip, examine PCB for damaged or missing tracks and replace with wire links, or bridge with solder if small track break etc. You may need to replace a few resistors, caps, diodes etc, but unlikely - unless they been eaten badly by the acid. |
|
|
|
26 March 2013, 15:00
|
#4 |
|
Precious & fragile things
Join Date: Feb 2009
Location: Victoria, Australia
Posts: 1,946
|
As people have written you need to pull the board entirely out of the case.
CPU socket needs replacing, if you sand paper the CPU use a really fine grit and clean it again after with isopropyl or Contact Cleaner to remove filings and any corrosion missed. Battery leak is potassium hydroxide and needs to be treated with a mild acid to neutralize it. If you have a kitchen / laundry sink big enough for the board then put about 5 cm of water in it and some vinegar, I have no idea how much would be good but judging by the leak probably 2 - 3 table spoons and let it soak for 20 minutes or so with mild agitation. This is only a best guess! Take it out, flush the sink and run fresh water over the entire board and gentle agitation again. Then the board needs to be flushed with deionised water and left to dry, either in the oven on super low temperature for 4 - 6 hours or in the sun for the same if it's a hot sun. Many people in the UK offer repairs if you're uncomfortable doing them yourself. |
|
|
|
26 March 2013, 15:54
|
#5 | |
|
Registered User
Join Date: Nov 2012
Location: Vista, Calif
Posts: 194
|
I have replaced sockets, and I have to say that I fixed all kinds of problems with my 3000T by removing the mb, and removing all of the sockets, then replacing them with high-quality sockets with gold inserts.
If you feel confortable, I would ohm out all the pins of any sockets that suffer from corrosion damage. When I was working as a tech, we would take old computer boards, (Industrial, not PC) and clean them under a running hose. Then we would let them dry in the sun. I do NOT like the idea of using an oven, even though the average temp may be low, oven's swing up and down typically +- 50 degree's or more. and things like your old caps may not like that. Loedown is right, the Sun is best, or, a couple of days indoors if not possible. even just blowing a hairdryer on it would help the process. Quote:
I am looking for a power supply for my 2000. I might be able to repair the existing one, but I still want a source. Last edited by prowler; 26 March 2013 at 22:26. Reason: Back-to-back posts merged and quote added. |
|
|
|
|
27 March 2013, 00:23
|
#6 |
|
Posts: n/a
|
Thanks everyone so far for the tips and advice. I am drawn to attempting a repairi myself. I have removed most of the pluggable chips with the exception of 'Agnes', not sure of the best way to get this out?
I have attempted to start the cleaning process, spraying with a little dilute vinegar, mopping it dry, then rinsing with distilled water, and mopping dry again. Not sure about putting it in the oven though; maybe on a low heat with the door open. I will get some PCB spray and clean it some more tomorrow, then I'll probably start with desoldering that 68000 socket. Think I will need some finer tips for the soldering iron - the one I have is the size of Texas! The peripheral sockets at the front and back are pretty rusty and corroded, not sure whether these will clean up or whether I shoulld just replace them. I can probably get some of the custom chips from a dead A500+ I have - unless anyone does not recommend doing that, given that I don't know what is wrong yet. Have ordered a replacement X1 and socket. @tesla - I got the power supply on ebay last week. I thought that was all I would need to get the machine up and running again, sadly not. |
|
27 March 2013, 00:41
|
#7 | |
|
Precious & fragile things
Join Date: Feb 2009
Location: Victoria, Australia
Posts: 1,946
|
Quote:
I replaced my A2000 PSU with a 450W Thermal Take, from memory you need to drill one extra hole and you can screw in three out of the four screw points on a standard ATX PSU pattern. Replacing sockets with new ones would invariably work anyway because you're removing the tarnish / oxidization on the pins of the chips. I've had 35 + year old synths here with black chip legs which I clean up with Electrolube CCS. http://www.usinenouvelle.com/industr...00126366-4.jpg As for your comments on ovens, I can agree that thermostat controlled ones can vary greatly in their temperature ranges but with some simple modifications you can make them very precise. I used a Maxim MAX31855 K type thermocouple chip which has an accuracy of + / - 2 degrees C over 700 degree range coupled to a PIC microcontroller and Solid State Relay. Once the oven gets to temperature and stabilizes there's no reason why it would vary by much more than 3 degrees, you use the PIC to program a switch on point of 2 degrees below your target and measure how long the element(s) should be on for to bring temperature back up. A two degree margin also limits hysteresis so that you're not switching the elements too often. |
|
|
|
|
27 March 2013, 00:45
|
#8 | |
|
Precious & fragile things
Join Date: Feb 2009
Location: Victoria, Australia
Posts: 1,946
|
Quote:
That's the correct tool, PLCC remover. If you don't have or don't want to buy one, use a small jewellers screwdriver, flat blade and gently prise one corner out at a time in stages with the screwdriver where the cut outs are. Emphasis here on the words gently and stages. |
|
|
|
|
27 March 2013, 06:29
|
#9 | |
|
-
Join Date: Jul 2003
Location: Helsinki / Finland
Age: 43
Posts: 9,861
|
Quote:
I also recommend the PLCC puller. |
|

|
|
04 April 2013, 20:54
|
#10 |
|
Posts: n/a
|
I would like to report a succeedful operation, but alas not. During the desoldering process, I seem to have damaged some of the tracks to the co-processor slot. I have managed to get the old 68000 socket off but seeing the damage I have caused has put me off making any further changes. I should really know better at my age.
I will probably just try to pick up a working (or non-working) Rev 6.2 MB should one become avaliable, and hone my soldering/desoldering skills in the meantime. On the plus side I did manage to pick up this beauty on Ebay for €120. Was listed on the ebay.de site. Despite the previous owners little touches to the front panel (the holes drilled for switching ROMS etc.) it is in wonderful condition.  it is in wonderful condition. https://lh4.googleusercontent.com/-Gham_GMqzQE/UV3JqSe54nI/AAAAAAAAATA/-Ecz4e9z45M/s419/IMG_0027.JPG) 
|
| Currently Active Users Viewing This Thread: 1 (0 members and 1 guests) | |
| Thread Tools | |
 Similar Threads
|
||||
| Thread | Thread Starter | Forum | Replies | Last Post |
| A1500 , what to do ? | willbloke | support.Hardware | 13 | 29 July 2011 18:27 |
| wanted : amiga keyboard A1500/2000/3000/4000 | jimbob005 | MarketPlace | 3 | 12 January 2010 15:29 |
| Help required with A1500 | Hoops | support.Hardware | 7 | 05 August 2008 20:46 |
| A1500 > A1200 | THX1138 | support.Hardware | 2 | 02 January 2003 15:16 |
| Can My A1500 Kick It ?? | THX1138 | New to Emulation or Amiga scene | 21 | 29 November 2002 20:04 |
|
|


