
|
 05 November 2012, 13:31
|
#21 |
|
Registered User
Join Date: Dec 2011
Location: Northamptonshire, UK
Age: 41
Posts: 1,236
|
try pm'ing Kipper2k. he may be able to help

|

|
|
12 November 2012, 23:43
|
#22 |
|
Registered User
Join Date: Dec 2011
Location: Northamptonshire, UK
Age: 41
Posts: 1,236
|
just a little update.
I'm still saving for the mediator. I think I should have enough for it midway through next month, then enough for the gfx and sound card in January. I've been cutting and filing the case some more, which allowed another inch of room at the exhaust of the PSU for ducting and cabling. I've also been drawing out cut and fold lines on the aluminium sheet, for the backplate and generally thinking hard about it all almost every day. Lots of tweaks, adjustments and improvements are all buzzing around my head  Last week I took to cutting and folding cardboard to make mock ups of the ducting and accelerator mount/duct and cellotaping them in place to get a real feel for it. So far everything is going to plan! but until i get the mediator i have no way to be certain. so the actual cutting and moulding of the back plate and ducting will have to wait until then. |
|
|
|
25 June 2013, 22:17
|
#23 |
|
Registered User
Join Date: Dec 2011
Location: Northamptonshire, UK
Age: 41
Posts: 1,236
|
Sorry for the silence folks! finances didn't permit me to make the purchase of a mediator etc so i could continue the project.
The good news is that for the last week i've been cutting, filing and rivetting lots of aluminium, and used a donor pci board cut from a dead PC motherboard, together with my recently purchased PCkey to get a definitive view of where stuff needs to go. having the final height from the PCkey really helped in this area! Piccies will follow as soon as i get a moment to down tools and actually pick up the camera  but I can tell you that the backplate is cut, and motherboard holes are done. motherboard is now fitted and everything fits! but I can tell you that the backplate is cut, and motherboard holes are done. motherboard is now fitted and everything fits!i even cut a slot on the front for the internal floppy drive  things left to do are: -cut the pci card slots on the backplate, including making a collar out of aluminium plate for the pci plates i scavenged from an old PC case. -fashion a mounting bracket and duct for the PSU. -rewire the case buttons & lights to the motherboard -create custom length power and data leads for items such as the floppy drive and future SCSI CD and HD drives. -fashion the BPPC holding brackets and fan ducts (this one definitely has to wait until i can afford to buy the mediator because of the accelerator card slot riser) |
|
|
|
26 June 2013, 00:07
|
#24 |
|
Registered User
Join Date: Apr 2011
Location: birmingham
Age: 55
Posts: 2,827
|
i dont think projects like this can be rushed,dont worry youll get there in the end.
|
|
|
|
27 June 2013, 11:13
|
#25 |
|
Registered User
Join Date: Jul 2002
Location: Sweden
Posts: 762
|
I think you should try the Mediator first before hacking up a case.
I sold mine, would rather have genuine Zorro slots or AGA @ 1024x768 with the Indivision :-) |
|
|
|
27 June 2013, 11:35
|
#26 |
|
Registered User
Join Date: Dec 2011
Location: Northamptonshire, UK
Age: 41
Posts: 1,236
|
my indivision still wont work with any of my monitors. tempted to sell it tbh.
AGA and indivsion dont help me much when it comes to creating and editing tru-color 3d renderings, images etc at high resolutions. i could use a pc for that, yes, but i dont wanna :P |
|
|
|
27 June 2013, 15:36
|
#27 |
|
Registered User
Join Date: Dec 2011
Location: Northamptonshire, UK
Age: 41
Posts: 1,236
|
PICCY TIME!
 can you spot the newest additions? :P  yep, you guessed it! i cut a hole for the internal floppy   shaped the button to match the cd button and painted it black to match  you need small fingers to push the disk all the way in, or an implement but i have small fingers so dont care  had to cut the HD tray and rivet it in higher to give *just* enough room for a pci card underneath it. i also managed to pick up a 4gb scsi drive that's the same height as this sata one pictured, so all is good  - i also reversed the brackets so had to drill new holes on the top of the case frame, makes it easier to fit the hd anyway - i also reversed the brackets so had to drill new holes on the top of the case frame, makes it easier to fit the hd anyway  Rear view with the NEW BACKPLATE! pen markings showing where the four PCI slots with eventually go. i decided to take advantage of the case having a little more height on the right hand side from where a PSU would usually go.  i cut the top off a dead PC motherboard to get an idea of the heights involved, which rested perfectly on the PCkey  next on the agenda is fixing the PSU with custom brackets and making a duct, and create a temporary bppc holding cradle so i can actually start using the beast while waiting for more funds to accumulate for all the extras Last edited by diablothe2nd; 27 June 2013 at 15:51. |
|
|
|
13 July 2013, 14:40
|
#28 |
|
French in Australia
Join Date: May 2012
Location: Gold Coast
Age: 52
Posts: 507
   |
So you made the backplate yourself with drill bits and file ?
Great stuff !!!! |
|
|
|
13 July 2013, 14:49
|
#29 | |
|
Registered User
Join Date: Dec 2011
Location: Northamptonshire, UK
Age: 41
Posts: 1,236
|
pretty much! i only used my band-saw to cut from the large sheet, and my pillar drill (drill press) for the round holes (like the L and R RCA). the rest was various grades of jewellery files, and a cordless drill with many different drill bit sizes
Quote:
|
|
|
|
|
26 August 2013, 22:05
|
#30 |
|
Amibay Mod/Staff
Join Date: Jun 2010
Location: birmingham uk
Age: 48
Posts: 1,019
|
hi mate have you any more updates on this
looks fantastic btw |
|
|
|
26 August 2013, 22:34
|
#31 |
|
Registered User
Join Date: Dec 2011
Location: Northamptonshire, UK
Age: 41
Posts: 1,236
|
Cheers
 not at the moment. I probably should get started on the pci holes as i know now how much room i'm looking at. but there may be a small problem i think i may have to start again on the backplate as i may have the motherboard set too high. but i cannot lower it until i know where the BPPC will sit with the card adapter that comes with the mediator. it raises it up, but without it infront of me i dont know how much by and if there's decent room for airflow. i know for sure it'll all fit, but the tolerances i'm dealing with are in only the few millimetres i'm still saving for the mediator. it will come soon, as i think i almost have the money now as long as no random expenditures pop up i think i'll be buying one from AmigaKit either this or next month, so then the real work can begin
|
|
|
|
26 August 2013, 22:55
|
#32 |
|
Amibay Mod/Staff
Join Date: Jun 2010
Location: birmingham uk
Age: 48
Posts: 1,019
|
looking forward to it mate
|
|
|
|
28 August 2013, 00:01
|
#33 |
|
Junior Member
Join Date: Mar 2002
Location: Exeter, Devon, UK
Age: 49
Posts: 1,706
 |
Loving the work that has gone into this! This is the kind of thing that really shows.
Just one question! Are you drawing up dimensions of all this? A complete guide with drawings would enable people to make their own by having all the metal processed leaving only assembly to be done. BTW I really like the disk drive mounting and clean opening for it A fair few years ago over at a forum called Overclockers.co.uk there was a chap who was a god with aluminum and made some epic works of art. Around the time when case modding really started to peak. Your build reminds me of it all! |
|
|
|
28 August 2013, 09:34
|
#34 | |||||
|
Registered User
Join Date: Dec 2011
Location: Northamptonshire, UK
Age: 41
Posts: 1,236
|
Quote:
it certainly was/is a lot of work cutting those holes by hand. i do have a fretsaw but i'd still need to get the files out, and it would still take as much time to get the holes nice and neat. There is still a lot left to do. I'm just stuck at the moment because of not having all the componentsQuote:
The finer bits like hole placement is mostly just placing pieces around the inside of the case, taking measurements. adjusting fit, more measurements, then cutting drilling riveting etc. Quote:
Quote:
Quote:
although i'm choosing function over form at the moment I think the most i'll stretch to with fancy stuff is pressing/etching the AMIGA logo into the front fascia, like on the A600/1200.
|
|||||
|
|
|
02 September 2013, 21:16
|
#35 |
|
Registered User
Join Date: Dec 2011
Location: Northamptonshire, UK
Age: 41
Posts: 1,236
|
If the mail man is very nice, I may be uploading some nice hardware pr0n piccies of my recent purchase tomorrow
|
|
|
|
04 September 2013, 16:17
|
#36 |
|
Registered User
Join Date: Dec 2011
Location: Northamptonshire, UK
Age: 41
Posts: 1,236
|
Yipeeeeeeeeeeeeeeeee!
Well, the post finally arrived, and yes, it's not just a Mediator...
 Mediator SX Spider USB 10/100 Ethernet Audio Card 3DFX graphics card ok it's not exactly what was on my list in an earlier post, but for the price i got it all for, i couldn't refuse It's been probably the most tense part of this project. Without having all the products in my hands i've had to take considerable risks, and many many many careful measurements. And as you can see from this image, it is indeed tighter than a Nun's chuff in there!  I have quite literally 2mm gap. I can *just* get the BPPC in and out without removing anything else  As for my previous worry about the motherboard being too high and that i'd have to drop it and make a new backplate all over again... well, that aint gunna happen. it's as low as it'll go! dunno if you can see, but it's about 2mm from the heatsink to the case bottom!!  I wasn't far out with my PCI slot predictions either!!! I was concerned I wouldn't be able to get two pci slots one above the other, and i was right.  but lady luck strikes again...  ...as this particular pci slot AND the card going into it, is perfectly placed, which means I only need 3 full length slots  So there you have it! everything seems to have just fallen into place in some crazy, weird but awesome kind of way, and I now can stop worrying and actually continue! WHOOP WHOOP! 
|
|
|
|
04 September 2013, 16:30
|
#37 |
|
Global Moderator
Join Date: Aug 2008
Location: Sidcup, England
Posts: 10,300
|
Nice work!
But how will you achieve sufficient headroom for those PCI expansion cards? 
|
|
|
|
04 September 2013, 16:34
|
#38 | |
|
Registered User
Join Date: Dec 2011
Location: Northamptonshire, UK
Age: 41
Posts: 1,236
|
Quote:
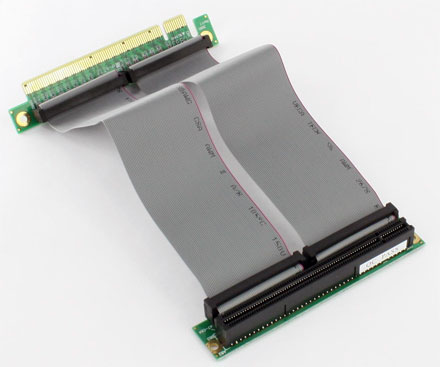 and mounting them horizontally instead as per this:  the network card i'll just cut down the bracket and bent it so it bolts into the top lip of the chassis
|
|
|
|
|
04 September 2013, 16:45
|
#39 |
|
Global Moderator
Join Date: Aug 2008
Location: Sidcup, England
Posts: 10,300
|
Yes, I see.
 I had thought those markings were from earlier experiments with riser cards. I had thought those markings were from earlier experiments with riser cards.  I assume you've already come up with a plan to mount them securely.
|
|
|
|
04 September 2013, 16:47
|
#40 | |
|
Registered User
Join Date: Dec 2011
Location: Northamptonshire, UK
Age: 41
Posts: 1,236
|
Quote:
edit, i may even go so far as to add bracing to the pci extension leads, but that is much further down the path. i'll cross that bridge when i get to it
|
|
|
|
| Currently Active Users Viewing This Thread: 1 (0 members and 1 guests) | |
| Thread Tools | |
 Similar Threads
|
||||
| Thread | Thread Starter | Forum | Replies | Last Post |
| CD1200 trackball help | T_hairy_bootson | support.Hardware | 5 | 12 October 2011 17:08 |
| Drivers for Alfadata CD1200 PCMCIA | amigappc | project.ClassicWB | 1 | 03 January 2011 08:05 |
| Alfa Data CD1200 Controller | daimakaimura | support.Hardware | 4 | 06 August 2010 09:04 |
| Cd1200 | Amigaboy | Amiga scene | 8 | 04 November 2003 05:37 |
| Amiga CD1200 | Antiriad | Retrogaming General Discussion | 19 | 05 April 2003 23:55 |
|
|


