
|
 20 December 2021, 22:55
|
#1 |
|
Newbie Amiga programmer
Join Date: Jun 2012
Location: Front of my A500+
Age: 38
Posts: 372
|
A500 battery leakage damage control
How can one determine if the batteries' leakage did some damage to the MB or not? The affected areas of the MB are covered with green crystallide, but the machine seems to work without problems, however CPU-slot cards refuse to work.
|

|
|
21 December 2021, 00:29
|
#2 |
|
Registered User
Join Date: Oct 2021
Location: San Francisco
Posts: 29
|
If they're covered, it may work now but I believe that the electrolyte can continue to cause damage. For the time being, you'd need to buzz out all the traces with a multimeter to see if they're intact - and there's also the possibility that the leakage has crept onto components, too. Otherwise - how do the cards fail?
Either way, you're better tackling the damage and cleaning it up to prevent further problems. |
|
|
|
21 December 2021, 07:16
|
#3 |
|
Registered User
Join Date: May 2010
Location: Helsinki, Finland
Posts: 1,341
|
Visually, indicators of corrosion (after cleaning) are dull/powdery solder joints, flaking solder mask and darkened traces. Something like this:
 If the board works once throughly cleaned and neutralized, there's a decent chance that the corrosion will stop and do no further damage. The CPU slot not working would indicate that at least some traces have already been compromised, however. |
|
|
|
21 December 2021, 10:04
|
#4 | ||||
|
Newbie Amiga programmer
Join Date: Jun 2012
Location: Front of my A500+
Age: 38
Posts: 372
|
Quote:
Quote:
Quote:
Quote:
|
||||
|
|
|
22 December 2021, 10:09
|
#5 |
|
Newbie Amiga programmer
Join Date: Jun 2012
Location: Front of my A500+
Age: 38
Posts: 372
|
Bump. Anyone? Any tip what can be used to dissolve and clean that green stuff?
|
|
|
|
22 December 2021, 10:43
|
#6 | |
|
Registered User
Join Date: Apr 2020
Location: Marstal
Posts: 19
|
Quote:
Then use isopropyl alcohol to clean up. It may be necessary to desolder components if the green stuff has crept underneath. It may also be necessary to remove solder mask over blackened traces, in order to completely clean the trace. Cheers |
|
|
|
|
22 December 2021, 11:04
|
#7 |
|
Registered User
Join Date: Oct 2021
Location: San Francisco
Posts: 29
|
Sorry, busy fixing my own machine!
I did this for my old Amiga 500 Plus that had been under the bed for 25 years - the battery had leaked, and while not totally destroying the traces, discolored the board and necessitated the replacement of the nearby resistors. I can't find any pictures of my own repair right now, but I: - (carefully!) cut the original battery out with a sharp pair of wirecutters - this'll make desoldering easier, but be careful with the PCB. - desoldered the remaining battery clips from the PCB. Again, not sure of your soldering experience, but do all you can to protect the traces and pads - I did this with one of the Engineer solder suckers (https://www.amazon.co.uk/Engineer-So.../dp/B07TFDYNJ3), which is expensive but effective. - removed any damaged components. The greenish leakage had not only crept onto the resistors in my case, but also up the legs of some of the chips. I removed anything that looked contaminated at this point; the resistors were cheap to replace, but I managed to clean and salvage the chips. - scraped off the gunk with a fiberglass pen, leaving the copper exposed (e.g. https://www.amazon.co.uk/Cooksongold.../dp/B071WPTC7P) - soaked the damaged areas in white vinegar for ten minutes to stop further damage (although lemon juice might be better, it seems - the idea is that you're neutralizing the leaked electrolyte) - washed the treated areas (I think I used IPA, but water is OK if you dry it properly) At this point, you can inspect the damage: - with a meter, you can buzz out the traces to ensure the connections are intact. Any breaks will then need to be repaired. - with the components removed, the copper left exposed by the corrosion of the solder mask needs to be protected. I tried various PCB touch-up pens (https://uk.farnell.com/chemtronics/c...reen/dp/604045) but wasn't really satisfied - so in the end, I just applied flux to the exposed traces, and tinned them with solder. - finally, with the board repaired, I reinstalled replacement / salvaged components and put in a new easily-replaceable battery (https://amigakit.amiga.store/amiga-l...er-p-1093.html) It's a bit easier to see with a guide, and there's a few out there; for example, https://retrorepairsandrefurbs.com/2...tion-upgrades/. Good luck - the main thing is to be careful when desoldering, so as not to make the board damage worse. |
|
|
|
22 December 2021, 22:53
|
#8 |
|
Newbie Amiga programmer
Join Date: Jun 2012
Location: Front of my A500+
Age: 38
Posts: 372
|
Thanks for the tips guys. I am not very good at soldering, but i managed to recap my machine back in 2015 and replaced the battery twice, second time to a CR-2032 socket. (I had enough of them batteries.)
I made some photos about the recap and the second battery removal last year. Here are two which shows the area (please click for the large resolution ones):  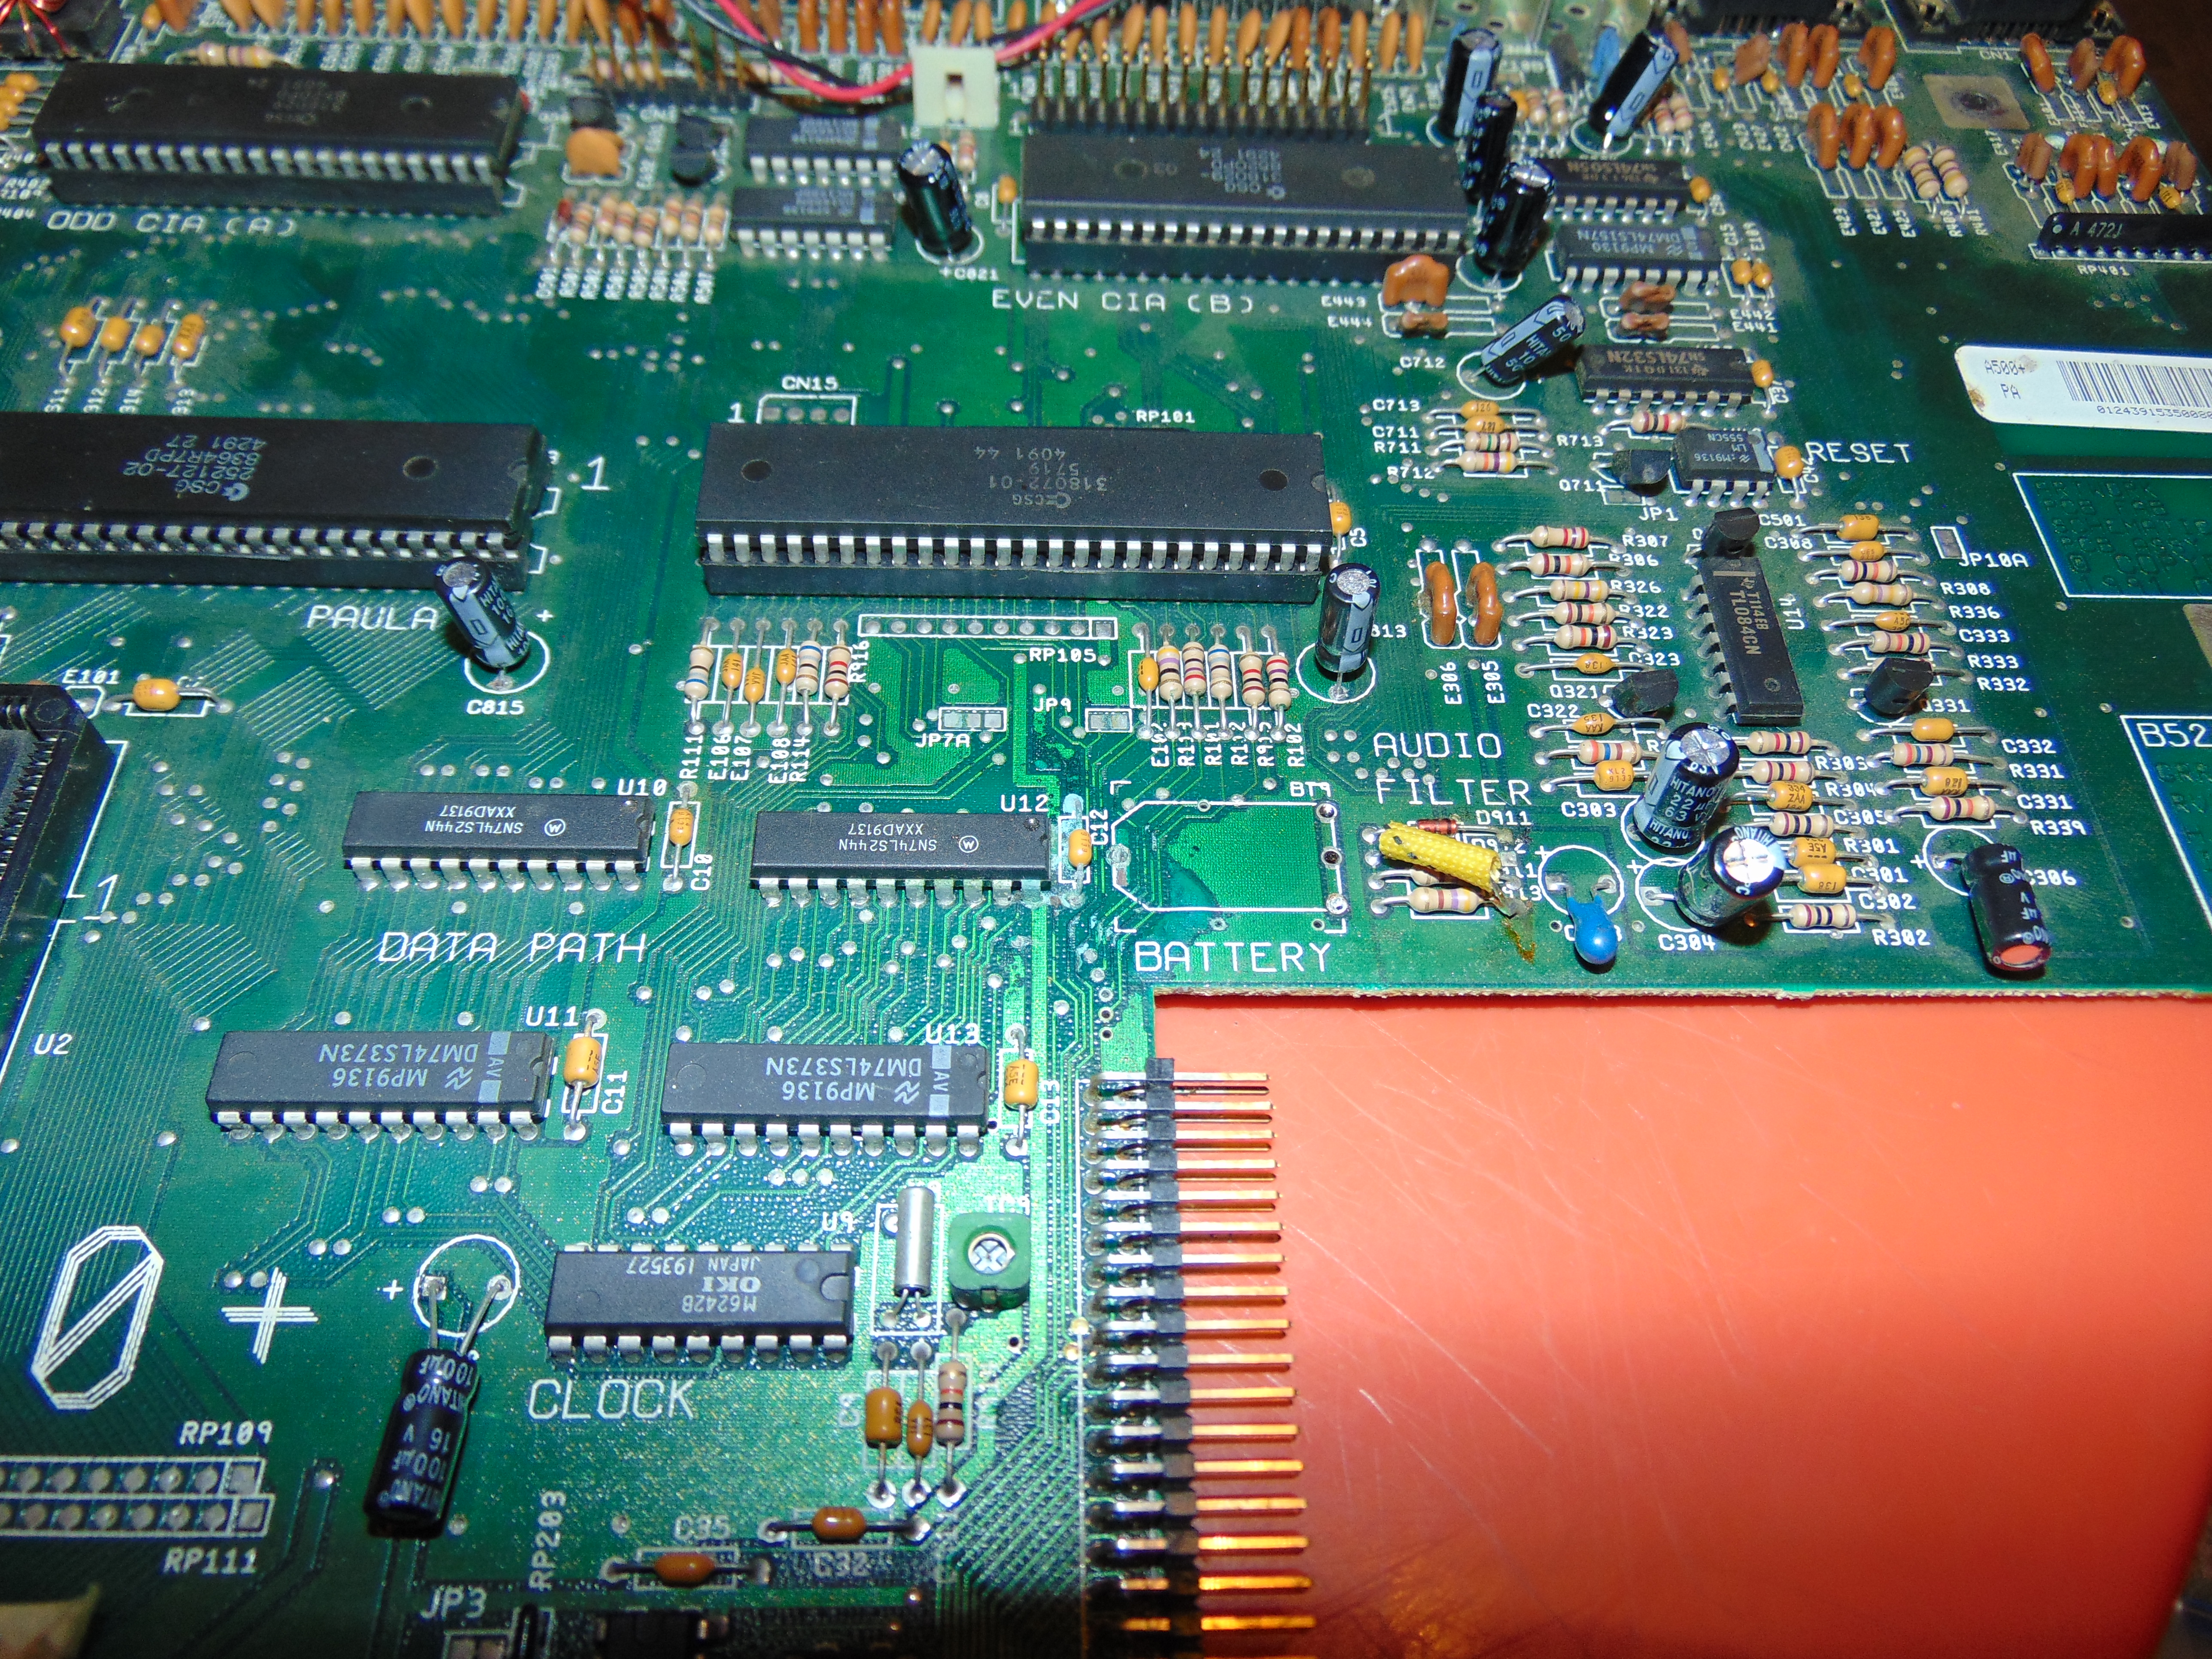 These images were made after i cleaned the board, but only with wet (watered) earpicker. What do you think, how bad it is? Is it necessary to solder the socket out again, to flow the area with vinegar? It seemed clean beneath of it. Last edited by TCH; 22 December 2021 at 23:09. |
|
|
|
23 December 2021, 07:32
|
#9 |
|
Registered User
Join Date: May 2010
Location: Helsinki, Finland
Posts: 1,341
|
The worst of the damage seems to be around U12. You could clean that area with vinegar (without removing any components) and see if the light green fluff comes off. Most likely all of the electrolyte that was on there has already reacted and corrosion will not continue further. Clean the vinegar off the board once you are done (preferably using distilled water and/or isopropyl alcohol).
If it was my system, I'd probably do the vinegar treatment, a bit more cleaning and then leave it be. Should there be issues later on, you can always desolder the chip and fix traces at that point. |
|
|
|
23 December 2021, 10:31
|
#10 |
|
Newbie Amiga programmer
Join Date: Jun 2012
Location: Front of my A500+
Age: 38
Posts: 372
|
Thanks, got it. Will do soon.
|
|
|
| Currently Active Users Viewing This Thread: 1 (0 members and 1 guests) | |
| Thread Tools | |
 Similar Threads
|
||||
| Thread | Thread Starter | Forum | Replies | Last Post |
| Battery leakage on Amiga 500+ | AngryInca | support.Hardware | 6 | 11 February 2018 20:45 |
| A500+ Battery Leakage | psygnosis | support.Hardware | 10 | 13 April 2013 15:12 |
| Repairing A2000 from battery leakage | TjLaZer | support.Hardware | 2 | 04 June 2012 20:13 |
| A2500 battery leakage cleanup | Dreamcast270mhz | support.Hardware | 10 | 29 December 2009 05:59 |
| A500+ is......dead? (Battery leakage) | Smiley | support.Hardware | 17 | 05 September 2007 01:55 |
|
|


